Friday, 31 May 2013

Chocolate Covered Pretzels

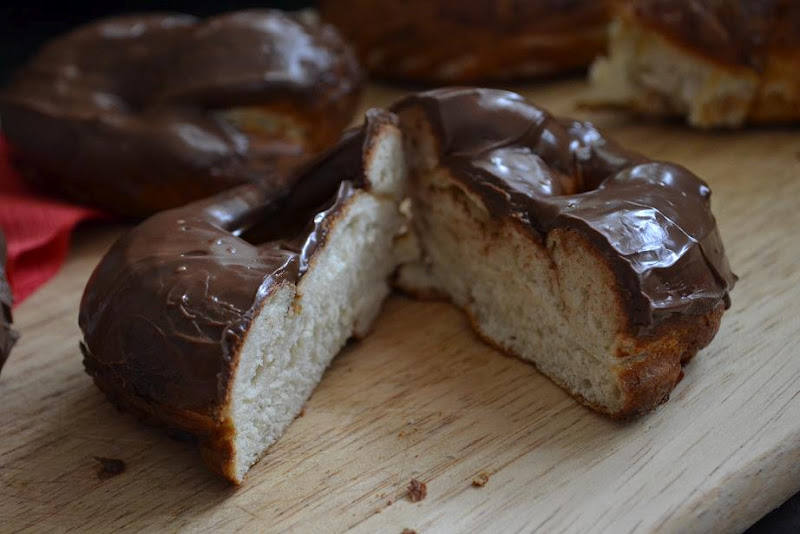
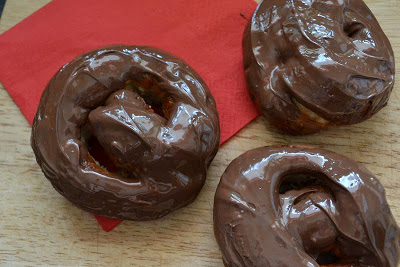
A while ago I wrote a step-by-step guide on how to make pretzels for Yahoo! – and although I’d made them a few times before that, now it seems, we can’t get enough of them.  I loved the soft, fluffy dough, the dark, salty crust, their chewiness.  And then I went and dipped them in chocolate.

I realise it’s nothing new, dipping pretzels in chocolate – you could dip them in cinnamon sugar instead, or leave them as they are and eat them with wholegrain mustard for a savoury treat. You can even wrap the dough thinly around a frankfurter before baking for a pretzel dog. But if you love the salty-sweet combination, here it is. I’ve used half milk and half plain chocolate because it adds so much flavour – the milk chocolate giving sweetness and the plain chocolate that heady cocoa rush.

Chocolate covered pretzels – would you?

Ingredients:
Makes 6
1 x sachet (7g) fast action dried yeast
1 tbsp sea salt flakes
50g light brown sugar
500g strong white bread flour
225ml lukewarm water
4 tbsp bicarbonate of soda
1 egg


Method:
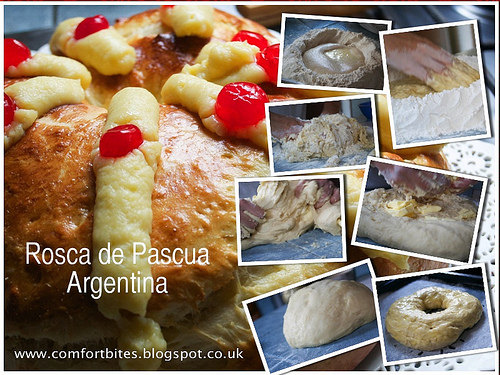
1. In a large bowl, mix together the yeast, the 1 tbsp sea salt flakes and the brown sugar. Tip in the water and mix (best to use your hands) until it forms a dough.


2. Sprinkle a little flour on the work surface and knead the dough for about 5-10 minutes, until it’s stretchy and soft. Put into a bowl, cover with cling film and leave for one hour to rise in a warm place (I use the airing cupboard) until about doubled in size. 

3. After the dough has risen, cut into 6.


4. Take one of the pieces of dough and roll it out into a rope shape – I like my pretzels chunky but if you like the clearly defined knot of a pretzel then roll it out super-thin.

5. Twist the two ends of the dough ‘rope’ over each other twice. Now bring the top half over so that the two ends are on the circular bit at the bottom. Moisten your fingers with water and use them to stick the pretzel in place.

6. Lay out the pretzels on a greaseproofed-baking tray and leave them to rise again for half an hour. Boil the kettle and tip the bicarb into a bowl.
7. Once the kettle’s boiled, tip 600ml boiling water into the bowl with the bicarb. Gently dip each pretzel into the hot water for 20-30 seconds and lower back onto the baking tray. Brush them with beaten egg and then sprinkle with a little extra salt. Bake at 220°C for 15 minutes. Leave to cool.

8. Melt together 100g milk chocolate and 100g plain chocolate either gently in the microwave or in a bowl over a pan of simmering water. Pick up a cooled pretzel and dip the top into the bowl, twisting it a little as you bring it up, coating it thickly in the melted chocolate. Leave the chocolate to set on a sheet of greaseproof paper or a wire rack and then enjoy!


What do you think? Do you like the sound of these? What’s your favourite salty-sweet combination?

Thursday, 30 May 2013

Tuna and Olive Empanadas (Empanadas de Atún)

Empanadas are a bit like small pasties. They were laid out at just about every gathering while I was in Argentina, usually stuffed with minced beef (empanadas de carne) or cheese and ham (empanadas de jamón y queso). We visited a friend, Marcello, who owns a fishmonger’s in El Palomar, Buenos Aires – and, while there was an abundance of fresh fish on the counter, there were also pastries stuffed with fish or veggies. One of these was empanadas de pollo de mar. Pollo de mar (translated as chicken of the sea) is a fish with a pointy face that’s local to Argentina. Depending on who you talk to, the fish gets its name either from it’s beak-like appearance or from the fact it doesn’t taste overly ‘fishy’ so can be used instead of chicken in recipes. Anyway, it was served in these empanadas with green olives and onion and it was completely delicious. And so began my love for fish in pastry. 


tuna and olive empanadas

You can buy the empanada wraps online (I use the Fargo brand) from Tom Hixson. They come frozen, so just defrost them fully in the fridge before using. Each pack contains 12-14 empanada wraps, which seems like a lot, but the empanadas are actually quite small so they will get eaten. I loved these warm, although they’re great cold and tucked into lunch boxes instead of sandwiches or grabbing on the go. Don’t be tempted to use shortcrust pastry or puff pastry for these, you really need the empanada pastry for best results, as it’s thinner, flaky and more elastic than other pastries we commonly use in the UK. Oh, and as with pastry in general, it’s less easy to work with once it warms up, so get on with filling your empanada wraps straight from the fridge.


tuna empanadas before baking

Tuna and Olive Empanadas (Empanadas de Atún)
Makes 14
Ingredients
1 tbsp butter
1 small, finely chopped onion
1 tbsp plain flour
225ml milk
1 free-range egg yolk
salt and pepper
2 x 160g cans of tuna, drained
14 green olives, from a tin, cut in half
1 egg, beaten with a drop of milk

Method
Gently fry the chopped onion, with a pinch of salt, in the tablespoon of butter until softened. You don’t want any colour on the onion, just let it turn translucent. Sprinkle in the flour and stir with the onions for about 30 seconds. Gradually pour in the milk and stir well, so that it forms a creamy sauce. Take off the heat and quickly stir in the egg yolk to add richness to the sauce and thicken it. Stir well, and set to one side to cool slightly. 

Next, fill the empanadas. Take one disc of pastry in your hand and dip your finger in the beaten egg. Run it along one half of the edge of the pastry. Now add a teaspoonful of the onion sauce to the centre of the disc and crumble in some tuna on top. Add in two olive halves and fold the empanada wrap over, pressing the edges together to seal, so you have a half-moon shape. Press the edges well, so you have a flap around the outside edge. Now you can crimp the pastry, folding it back on itself until the empanada is sealed. 

Repeat with the rest of the empanadas and lay out on a sheet lined with greaseproof paper. Brush with the beaten egg and milk mixture and bake for 15 minutes at 200ºC. 


baked tuna empanadas

Wednesday, 29 May 2013

Smoked Trout Spaghetti with Vodka and Dill

It occurred to me, when I had a packet of cold, cooked smoked trout in the fridge, that it would pair very well with vodka. And then, I decided, dill. And so I went out into the kitchen and cooked this. 

You’re not using much vodka here – a couple of tablespoons – but it gives a fragrance to the pasta which combines well with the moist, sweet trout and the clean, fresh flavour of the dill. I resisted the urge to add cream, as I wanted a clean-tasting dish, and wanted to be able to taste the vodka, too, without it being cloying or too filling. I hope you like it. 


spaghetti with trout and vodka on fork

Smoked Trout Spaghetti with Vodka and Dill
Serves 2
Ingredients
1 tbsp olive oil, plus a small knob of butter (approx 1 teaspoonful)
1 small onion, chopped finely
2 tbsp vodka
100g smoked trout fillets (bones and skin removed)
1 tbsp chopped dill
salt and pepper
150g spaghetti

Method
First, cook the spaghetti in a large saucepan of boiling, slightly salted water. While that’s cooking, melt the butter and olive oil together in a medium-sized frying pan. Gently fry the chopped onion, until it’s translucent but not coloured – about 5 minutes. Add the vodka and then turn up the heat for a few seconds to evaporate most of the alcohol. Once the spaghetti is tender, drain it, reserving about half a mugful of the starchy cooking water. Flake the trout and the dill into the vodka and onion mixture and slosh in the pasta water. Toss the spaghetti into the mixture and warm through, tasting and seasoning with salt and pepper if you think it needs it. 


spaghetti with trout and vodka

Tuesday, 28 May 2013

Hot Dog of the Month: The New Yorker

For years, this was my favourite way to eat a hot dog. Just a good, plain frankfurter in a white bun, topped with soft, browned onions and drizzled with American-style mustard. It’s the cartoon equivalent of the hot dog – instantly recognisable and associated with 1950s diners and street carts in New York. Sauerkraut is also a New York tradition with hot dogs – have it without the onions and the mustard, or pile high with onions and ketchup too. 


american hot dog mustard onions

The New Yorker Hot Dog
Peel and slice a small onion and fry in a little oil until very soft and browned, turning them sweet and slightly sticky. Grill or pan-fry your frank until it’s golden on all sides and heated all the way through. Split a white hot dog bun and slide in the frank, topping with the onions (or saurkraut if you prefer) and then drizzle with American-style, yellow mustard. You’ll need a napkin. 

Friday, 24 May 2013

Lamb Lollipops (Quick Lamb Koftas)

Don’t worry, I haven’t gone mad, freezing lamb in lollipop moulds… it’s just that after I made these a couple of times, they became known in the family as ‘lamb lollipops’. Biting it off the stick makes the children feel like they’re eating a lolly. For grown-ups, of course, they’re just koftas. Minced lamb, seasoned with garlic, parsley and cumin (add some chopped mint in there too if you like) wrapped around a wooden skewer and grilled until cooked.

lamb lollipops from above

I serve these, stacked up on a plate, at the table along with some chopped Romaine lettuce, marinated olives, sliced tomatoes, hummus and wholemeal pitta breads – the girls just dig in and it’s one of those dinners where I know they’re going to eat everything on their plate.

The lamb cooks in about 7 minutes under a grill, but if you like (the fat in the lamb can pop and hiss onto the bars of an electric grill, producing a lot of smoke sometimes) you can always cook them as burger shapes in a pan with a little olive oil. I love them pulled off their skewers and stuffed greedily into a hummus-spread pitta along with some Romaine lettuce.

Lamb Lollipops (Quick Lamb Koftas)
Makes 8
Ingredients
500g lean minced lamb
1 tsp cumin
2 tbsp chopped flat-leaf parsley
2 garlic cloves, chopped finely
pinch of sea salt
grinding of black pepper
8 metal or wooden skewers (I use the type that holds burgers together)
few tablespoons of olive oil

Method
Put the minced lamb in a bowl and add the cumin, parsley, garlic, salt and pepper. Mix with your hands until just combined – don’t overmix or the lamb can turn tough and rubbery. Divide the mixture into eight. Pick up a skewer and pick up one of the portions of lamb. Wrap the meat around the skewer until  it’s evenly covered, and hides the point at the top, which if wooden, will burn while grilling.

Lay the skewers on a foil-lined grill tray and drizzle with olive oil. Slide under the grill and cook for about 7 minutes, turning once halfway through. Once they’re cooked, serve straight away with salads, pittas, dips and olives. These are also great with couscous which has been seasoned with a little lemon juice and parsley. These lamb koftas would also make great barbecue food, too.


lamb lollipops in stuffed pitta

Thursday, 23 May 2013

Stir-Fried Brown Basmati Rice with Soya Beans and Mushrooms

One of my favourite dinners, lately. But I know what you’re thinking. How can brown rice, mushrooms and soya beans constitute comfort food? It sounds too healthy. Well, all I can say is, you have to try it. The brown Basmati rice is chewy, with a nutty flavour. The sweet, almost creamy little soya beans give colour and a soft texture. And the mushrooms, when mixed with the spring onions and garlic, just give it that intense, woody flavour on top. Add a slosh of dark and rich soy sauce and you’ve got dinner. Best eaten hot – in a bowl, with a spoon, in front of the telly. Miles better tasting than a takeaway, and healthier, too.


stirfried brown rice with soya beans mushrooms

Stir-Fried Brown Basmati Rice with Soya Beans and Mushrooms
Serves 1
Ingredients
50g brown Basmati rice
1 clove garlic, chopped
1 spring onion, trimmed and chopped
2 tsp vegetable oil
3-4 chestnut mushrooms, cleaned, trimmed and sliced
handful frozen soya beans
dark soy sauce – about 1 tbsp
1 tsp sesame oil

Method
Put a pan of slightly salted water on to boil. Rinse the rice with cold water and then boil for about 15 minutes, or until tender. Once cooked, drain well and rinse with cold tap water. Set to one side. 

In a frying pan, fry the garlic and spring onion in the oil until softened but not coloured. Tip in the mushrooms and the soya beans and cook for 3-4 minutes more. Tip in the cooked rice and season with the soy sauce and the sesame oil, tossing everything together. Tip into a bowl and eat straight away. 

Variations: 
You could use any veggies really in this dish that you have kicking around, but remember if you’re keeping it ‘elimination-safe’ you need to exclude nightshades such as potatoes, tomatoes, chillies and peppers. Chuck in some chopped kale or spinach if you have any too. And if you have any coconut oil in the cupboard you can use this instead of the vegetable oil, although I do find that this gives the dish quite a strong coconut flavour, which is fine if you like it. You could also fry a handful of cashew nuts along with the spring onions if you like, which will add protein.

Wednesday, 22 May 2013

Sándwiches de Miga (Argentine Sandwiches)

There were many things I expected to taste in Argentina. The beef, definitely. And the hot dogs. Big, meaty, bold food, certainly. But I didn’t expect to see the dainty little sandwiches that are sándwiches de miga

My husband’s cousin runs a bakery and very kindly brought a stack of these sandwiches for me to sink my teeth into. The name translates as ‘crustless sandwiches’. The bread isn’t like any bread we have at home – it’s bright white, extremely thin and very light. It’s baked in great big loaves which are then sliced thinly just for making these. The flavour and texture wasn’t unlike the milk bread we get here, although if you want to have a go at making them you’d do worse than cut the crusts off a few slices of Warburton’s fluffy medium-sliced white. But it’s not exactly the same. 

sandwiches de miga
Sándwiches de miga – in Argentina

Sándwiches de miga are sold in bakeries and rarely made at home. Fillings-wise you’ll see aubergine, creamed sweetcorn, ham, cheese and also palm hearts, thinly-sliced and snuggled up against salsa golf – a pink Marie Rose-style sauce. 

You can have three layers of bread or two: I love the three, the middle slice of bread artfully keeps any soggy ingredients (tuna mayonnaise/salsa golf) away from any crisp salad leaves or cheese. 

Here are some flavours of Sándwiches de Miga, in case you fancy making some at home:

  • egg mayonnaise, lettuce, sliced green olives and ham
  • ham and cheese (along with one or more of the following: tomato, avocado, lettuce, egg mayonnaise, green olives, roasted red peppers)
  • ham, cheese and pineapple
  • ham, lettuce, cheese and palm hearts
  • anchovies
  • creamed sweetcorn
  • aubergines


sandwiches de miga


My clumsier attempt at sándwiches de miga at home: the cheese should be very thinly sliced, not in big clumps as in the pic (daintiness was never my strong point), Tasted good, though…

Tuesday, 21 May 2013

Need Vegetarian Inspiration? My Favourite Veggie Recipes for National Vegetarian Week (20-26 May 2013)

It’s National Vegetarian Week this week, and to celebrate, I’ve put together a list of some of my favourite vegetarian meals. Need some veggie inspiration? Check these out, they all make a regular appearance here at Comfort Bites HQ…

Avocado Toasts


avocado toast

It doesn’t look very appetising, but it will surprise you. Soft slices of ripe avocado, on (usually) wholemeal toast spread with a little butter or sometimes soya spread and then sprinkled liberally with salt and pepper. It’s from Gwyneth Paltrow’s book It’s All Good, although she uses mayonnaise instead as the base. To my surprise, my seven-year old loves this.

Sweet Potato, Quinoa and Chickpea Burgers


sweet potato, chickpea and quinoa cakes

I’ve made veggie burgers from scratch before, and up until now they’ve been a bit hit and miss. Sometimes they break up too much in the pan and other times they have a sandy texture. But not these. These are divine and really simple to put together. They come from the Ambitious Kitchen blog, where she also suggests covering them in breadcrumbs and serving with a spicy yoghurt sauce. I usually just stick to the plain burgers and eat them either in a bun or with salad. Check out the recipe here.

Garlic Mushroom Burger with Polenta Fries

garlic mushroom burger and polenta fries

I blogged about this in March, and it appears quite regularly on lists of my favourite foods. Garlic-scented mushroom, stuffed between two halves of a wholemeal roll with peppery rocket and golden, crisp polenta fries on the side. What’s not to love? Here’s the recipe. 

Quinoa with Kale and a Fried Egg


kale quinoa and egg

Another one from It’s All Good. The quinoa is really filling, and the fried kale gives it a ‘bubble and squeak’ flavour. The rich yolk runs between the grains and makes it a satisfying breakfast, although I’ve craved it (and eaten it) at all times of the day. You can keep cooked quinoa in the fridge so you can whip this up in minutes. It’s basically a really healthy stir-fry, and is also great with garlic mushrooms.

Roasted Mushroom Pasta


roasted mushroom penne

I don’t know how I went so long without roasted mushrooms. They darken and shrink in the oven and turn sweet, woody and intensely flavoured. Perfect stirred into pasta, or into a risotto too for that matter. Here it is.

Bill Granger’s Sweetcorn Cakes with Avocado and Lime Salsa


bill granger breakfast sweetcorn cakes avocado salsa 

This one is from Bill Granger’s book, Bill’s Open Kitchen and uses tinned sweetcorn which makes it handy enough to whizz together whenever you feel like it. Sweet, nutty sweetcorn with fragrant coriander, soft avocado and all held together with a squeeze of lime juice. I love it. You can find the recipe here.


What are your favourite vegetarian dishes? 

Monday, 20 May 2013

It’s All Good by Gwyneth Paltrow – A Review

I blogged about Gwyneth’s first book before (Notes From My Kitchen Table) and decided that she didn’t deserve all the aggro she got from the press about it. Yes, there were parts of the book that seemed indulgent (private cooking lessons with Jamie Oliver, languid lunches with movie star friends) but the recipes were good. And they weren’t all macrobiotic, vegan recipes either. Roast chicken, lobster, pasta dishes. I loved it.

So I was quite keen to try out her second book, It’s All Good.

gwyneth book

Yep, she’s been criticised for this one, too. Some call the book ‘out of touch’ and ‘creepy’ and one person complained that for a family to eat like her would cost $300 per day. But yet again, I can’t help but feel this is unjustified. I cooked quite a few of these recipes for myself and my family, to test out the cookbook, and I spent a good £30 less on my weekly shop, not more. The emphasis is on fresh fruit and vegetables, whole grains and dairy-free ingredients. Refined sugar is out – so you’re using maple syrup and other natural sweeteners instead. There are some meat recipes – duck, chicken, beef – but you’ll find yourself blending smoothies, chopping up salads and stir-frying quinoa, too. 

gwyneth beetroot and avocao salad
Gwyneth’s Roasted Beetroot, Avocado and Spring Onion Salad with a Mustard Dressing
The book begins with an admission that, after fainting at a family lunch, Gwyneth was tested and found she had a blood parasite, was severely run-down and her digestion was in trouble. Her doctor advised her to embark on an elimination diet and she found a dramatic improvement in her health. The book clearly states if a recipe is suitable for the elimination diet or is vegan, and it’s easy to flick through and decide what you want to eat. The photographs are vivid and informal in nature and of course Gwyneth and her kids feature throughout.

turkey meatballs gwyneth japanese
Japanese Turkey Meatballs (her recipe uses chicken)

I made the Japanese chicken meatballs for the children one night for dinner, using turkey mince instead, and they went down a treat. Quinoa with kale, topped with a runny fried egg has become my new favourite weekend breakfast. My four year old ate some. I – and my family – have never eaten so healthily, to be honest.

To be truthful, there are times in the book where you want to roll your eyes a bit. The book is co-written by a lady who worked as her private chef (nice for some), and she explains that once she found out she had food allergies, she had the whole family tested to see if they had any as well. But all the name-dropping that appeared in the first book has subsided here, and you can’t argue that the recipes are tasty, simple to make and healthy.

almond shake gwyneth
Gwyneth’s Almond Milk, Date Banana and Almond Butter Smoothie

The food I’ve cooked so far in It’s All Good has all been tasty, simple to make and nutritious. I love it. I’ve also bookmarked lots of recipes I still want to make. If you’re looking to incorporate healthier ingredients into your cooking, then I’d advise giving it a go. This one’s a keeper.


quinoa mushrooms rocket gwyneth
Gwyneth Paltrow’s Quinoa with Garlic, Rocket and Mushrooms

Friday, 17 May 2013

La Chacra de Andres, Haedo, Buenos Aires, Argentina

When my in-laws found out we were coming to Argentina they promised me a trip to a parilla, a kind of barbecue restaurant that’s really popular there. We pulled in at the front of the neon-lit restaurant on a dark, balmy April evening and I knew I was in for a treat when I saw this through the window… 


asado, buenos aires

There, around a pile of hot, white coals were two or three whole pieces of beef rib, rested up on metal stands and cooking slowly in the heat. Impressed and made hungrier by this culinary kerbside theatre, we strolled in and took our seats. La Chacra de Andres is a large restaurant, situated in the town of Haedo, about an hour’s drive or so from the centre of Buenos Aires. 

We arrived around 9pm and many of the tables were empty. Maybe we were a touch too early, the usual time for the evening meal being between 9pm-10pm. There was a couple nibbling the last of their meal and a family of three seated near us. The atmosphere was casual. You smell sweet, burning coals from the meat cooking at the front of the restaurant while a television screen buzzes and flickers on the wall at the back. We sat down, twelve of us, and were brought drinks (juice, water and wine) and sliced bread with little bowls of cream cheese and chives. 

bread with cream cheese and chives starter
The bread, cream cheese and chive appetiser
After we’d polished off our appetiser, the meat was quickly brought, and placed on the table on little table-top grills that keep the meat warm with coals while you eat. ‘You’ve got to be quick,’ my husband said to me, while forks appeared from all directions jabbing at different pieces of lightly charred meats. Casting my British politeness to one side, I dived in with my fork, too. 

parrilla
Selection of parilla meats: molleja, kidneys, chinculin – the entraña can be seen on the top right of the photo.

There were bony chunks of ribs (costillas), kidneys (riñones), glands (molleja) and grilled intestines (chinchulin). The ribs were luscious; sweet and charred, while the meat within was tender and blushing pink. Many of my family members had gone dewy-eyed at the thought of molleja, but I found it too soft, with a creamy texture and a sweet flavour. Maybe it was just because I wasn’t used to it. The chinchulin was slightly bitter inside and a lot like eating an empty sausage – chewy and crisp in places. 

Entraña is a cut of meat from the belly of the cow, and that was curled around the serving dish too. I cut myself a piece and found it full of flavour – a cut that we could do with eating more in the UK, where I think we stick to the regular cuts of meat far too much. We ate all this sharing a couple of plates of salad and some skinny chips. 


asado buenos aires
There are ribs under all that somewhere, I promise

The twelve of us ate until we were really full for 900 pesos, the equivalent of about £120. And we took home a lot of the meat for the fridge for picking over the next day. As with anything, you get parillas that aren’t so good, and others that the locals regularly go to. We were told this was a good one. And you get to park your car on the forecourt too, if you give the man a little tip before leaving. 

You’ll see parillas on many streets around Buenos Aires – some people even set up grills on the side of the road and sell chorizos or panchos (hot dogs) to passers-by, advertising their wares by a makeshift cardboard sign and the wafting smell of charcoal. Argentinians know how to cook meat, and they know how to make the most of an animal too, using up every part of it. My advice? If you find yourself in Argentina, you have to try parilla. Just don’t be squeamish, no one else will be. 


la chacra de andres, ba
La Chacra Andres, the front of the restaurant

Thursday, 16 May 2013

The Big Healthy Comfort Food Swap

It’s an unfair twist that foods we crave for comfort when we’re feeling low happen to be also quite bad for us. I can’t tell you the number of times I’ve bitten into a glazed doughnut or spooned Nutella straight from the jar and wished things were different. 

And you don’t have to be a genius to figure out that, while the occasional piece of chocolate fudge cake is ok, you can’t expect to be healthy and eat these kinds of foods all the time. 

But what are our options, then? Well, I decided to come up with some comfort food swaps – healthier things you can switch to, that will give you the same kind of satisfaction – texture, flavour – as the ‘naughty’ foods. Have a look at these…

Substitute salted, roasted almonds for crisps
Crisps (or potato chips, if you’re reading in the US) are my biggest weakness. I couldn’t actually buy multipacks of crisps because I’d just eat three or four packets in a row. But they’re full of salt, vegetable oil and are referred to by many nutritionists as ’empty calories’ because they don’t really do anything good for your body. But since I’ve  kept a bag of roasted, salted almonds in the cupboard, I don’t ever fancy crisps (hurray!). Almonds provide Vitamin E and a handful of the crunchy, salty things staves away a crisp craving. They’re calorific, yes, but given the choice between crisps and almonds at least the almonds are benefitting your body.

sub quinoa for white rice

quinoa


I’ve only recently started to appreciate quinoa. It’s a seed that you boil until soft and basically serve as you would couscous or rice. And it’s great for keeping in the fridge, ready to stir into garlic mushrooms or toss into salads. Quinoa contains protein (great if you’re vegetarian or vegan), is thought to aid the digestion and contains essential amino acids for our health. Apparently Aztec warriors used to eat it before battle to increase their chances of winning. Looks like those Aztecs might have been onto a thing or two.

sub ricotta for mascarpone
Ricotta is such a versatile cheese. You can fill ravioli with it, make ice cream and gnocchi with it and turn it into muffins and cheesecakes. Mascarpone is versatile too, and is used in cheesecakes, puds and trifles. But the thing with ricotta is that is contains 10% fat. Mascarpone contains about 40% fat. Substitute ricotta for mascarpone in pasta sauces, cheesecakes or try it in trifles for a creamy texture but less fat. 

sub sweet potatoes for white potatoes

sticky sweet potato wedges


White potatoes are great little things. They’re full of carbs which give us energy and also Vitamin C, which keeps our immune system ticking over nicely. But one night, when you’d normally reach for the white spuds, try sweet potatoes instead: they contain beta carotene, Vitamin E, Vitamin A and have  lower glycaemic index than white spuds. I love them baked in their skin and topped with goat’s cheese and chives or chipped into wedges and baked until sticky and crisp.

sub smoothies for milkshakes
In one of my favourite restaurants, they make a whole load of different milkshakes, thick and frothy with ice cream, which frosts up the glass. I love the peanut butter one. And I thought that there was no way I could get my ice-cold milkshake fix while being healthy. Until I tried the almond milk, almond butter and date smoothie in Gwyneth Paltrow’s book It’s All Good. A chilled, creamy, nutty shake with a fraction of the calories of my restaurant one. 

sub wholemeal pasta for white pasta
I remember when I was about 20, my doctor told me to up the amount of fibre in my diet and switch to wholemeal pasta. So I bought some. And it was like eating strands of sand. Wholemeal pasta has come on in bounds in recent years, and it no longer tastes like sand. Buy a reputable brand, or try the half and half pastas you can get made from half wholemeal flour and half white for a more subtle flavour. I love wholemeal spaghetti cooked and dressed in pesto or some greens, or as spaghettti al olio – tossed in lightly cooked garlic, chopped parsley and olive oil. You’ll increase your fibre intake without even trying. 

And if you’re really having one of those days…

sub dark chocolate for milk chocolate
If you’re prone to the odd chocolate craving, and who isn’t, keep a pack of dark chocolate (at the back of) the cupboard. Dark chocolate is more bitter but contains less milk and sugar than milk and white chocolate. White chocolate isn’t actually chocolate at all, but a by product of the chocolate making process – cocoa butter is mixed with vanilla, milk and sugar to make your Milky Bar-style choccy. And because dark chocolate is packed with more of that intense cocoa flavour, you’ll need less. So no more munching through 1kg bars of Dairy Milk, then… 

What are your tips for eating comfort food without piling on the calories? 

Tuesday, 14 May 2013

The Whole Fromage by Kathe Lison: A Review

When I saw the subtitle to this book, ‘Adventures in the Delectable World of French Cheese’, I knew I had to read it. I mean, if there’s ever a subject that’s going to keep me engaged for the length of a book, it’s cheese. 


cover27449-medium

The book was easy to lose yourself in – a memoir really, of one person’s travels around France, finding out how French cheese is made, who makes it and the history of the various cheeses. At times I thought the words flowed beautifully off the page and really set the scene. For example, in the part where she talks about the birth of Camembert, we get this: ‘a priest runs through rain-streaked groves of oak trees in the Norman countryside. He spies the lit windows of a manor house. A young woman answers his knock.’ I felt like I could have been there. 

The history of French cheese is full of intrigue, scandal and romance. I didn’t know that Roquefort came into being because a young shepherd left his curds and bread lunch behind a rock to pursue his love interest, returning months later to find the cheese streaked with mould. I also didn’t know that Camembert has its own idol – Marie Harel, who was taught the secrets of making the cheese by a priest in return for her allowing him somewhere to stay while he was on the run. But it was the description of ‘cheese espionage’ that I loved, the efforts made by rival cheesemakers to find out how to make Camembert: ‘Picture the rosy-cheeked lass with a bit of straw stuck to an exposed thigh being asked between furtive caresses how long she rennets her curd. Picture her blinking at her lover in consternation.’ 

Along with the characters (which Kathe seems to bring to life through the pages), the dark caves, cheese-nibbling bugs and cheese knights (yes, really) she does also address some more serious issues. There’s some thought-provoking over whether the traditional art of cheesemaking can continue for much longer, in an age where it’s convenience and budget prices that earn manufacturers brownie points. She talks about the rules and regulations cheesemakers have to go through to ensure their cheese is protected and given AOC status, and why this was even necessary in the first place. And then there are battles with governments and health authorities over whether some varieties of cheese, with their stinky centres and critter-nibbled rinds are actually safe to eat. 

The only thing I would like to have seen more of in the book are pictures (I downloaded the Kindle edition). The descriptions were good, but to have been able to flick through to a page showing me the various cheeses that aren’t so well-known, like Banon for example, would have been useful. The same goes for the cheesemakers themselves or photographs of the cheesemaking process. This is a small niggle though really, as the writing portrays enough; it would have just been the icing on the cake. 

Another great thing is that at the back of the book the author gives you two sections: one, a list of the reputable cheese shops in Paris, along with descriptions of the shop, the types of cheese they stock and how friendly the owners are. And the second section gives you a list of phrases that are useful when talking about cheese in France, for example affinage (the amount of time a cheese is aged) and dégustation (a cheese or wine tasting). 

For me, this was a great book that delved into the lively world of French cheese. The history of the cheeses and their regions, the influence of royalty and other leaders on the success of certain cheeses and also the characters behind each one of them. If you want to find out more about French cheese and how it’s made, then this is a great – and entertaining – place to start. 

The Whole Fromage is published by Crown Publishing, June 2013. 

ETA: The author of the book, Kathe Lison, commented on this post to say that she’s set up a Facebook Page where you can actually see the photos she took on her travels to France. Check them out at www.facebook.com/TheWholeFromage 

Salted Caramel Ricotta Ice Cream

When I left Argentina, I was given a cookbook by my family, so I could recreate some of the authentic dishes I’d eaten there once I’d got home. The author was Doña Petrona, who is the Argentine equivalent of a kind of cross between our Mrs Beeton and Delia Smith. 

She appeared on telly in the 1960s, and released a definitive collection of her recipes called El Libro de Doña Petrona. Her book became the one people turned to for authentic, tried and tested Argentine cuisine and many Argentine households have a copy not too far from the kitchen. And flicking through the book, on the plane home somewhere above Brazil, I found a recipe for ricotta ice cream; what she called helados rápidos con ricotta (‘quick ricotta ice cream’). I couldn’t wait to try it out. 

Ricotta freezes very well, and gives the ice cream a thicker, more substantial texture than the plain old custard-based ice creams. Also, as the ice cream is made with ricotta (154 calories per 100g) and natural yoghurt (134 calories per 100g) it’s healthier than those mixtures rich in eggs, cream and sugar. (Double cream alone can contain around 470 calories per 100g). Healthy, that is, until you dump a can of caramel into it. 


salted caramel ricotta ice cream_

The measurements in Doña Petrona’s book are slightly vague. Along with the specified 500g ricotta she calls for ‘a pot’ each of yoghurt and dulce de leche. So I added the quantities slowly, until it formed the right consistency, and came up with this: a rich, thick and creamy ice cream with the unmistakable flavour of caramel. If you can get real, dark, dulce de leche (lucky you) then do use that instead. 

Ricotta and Caramel Ice Cream
(adapted from a recipe by Doña Petrona, in El Gran Libro de Doña Petrona)
Ingredients
500g ricotta
200g Greek natural yoghurt
397g can of caramel (I used Carnation caramel) or use dulce de leche if you can get it
half a teaspoon sea salt flakes, plus more to serve, if you like

Method
Empty the ricotta into a large bowl and beat until all the clumps have gone, leaving a smooth, white mixture. Tip in the yoghurt and then beat again, ensuring there are no lumps and the yoghurt is mixed smoothly with the ricotta. Finally, pour in the caramel or dulce de leche and the salt and mix again until well combined. 

You can either pour this into the frozen bowl of an ice cream maker to churn, but you can also just empty into a freezable container and freeze until it’s the right consistency. You can also sprinkle the ice cream with a few sea salt flakes to make the salty sweetness just that little bit more intense. 

Do you fancy trying ice creams made with ricotta? What do you think?


Friday, 10 May 2013

Ricotta Gnocchi with Tomato and Basil Sauce

Have you ever made gnocchi? If you have, then you might already know that, despite being very rewarding (and NOTHING like the stuff you buy in the shops) it is also quite time consuming to make. However I have found a gnocchi that takes literally minutes to stir together and then to cook. Ladies and gentlemen, I give you ricotta gnocchi. 


ricotta gnocchi with tomato sauce

I first found that ricotta could be used in this way in Doña Petrona’s book, El Gran Libro de Doña Petrona, where she suggests mixing ricotta, an egg and some flour, along with a pinch of salt, and then boiling the mixture in large dumplings. When I followed her recipe, the mixture was too creamy for boiling – perhaps something to do with watery, supermarket ricotta compared to what she probably used, straight from the cheesemaker. I adjusted the quantity of flour though and it was just right. I’d also advise on making the gnocchi smaller – a heaped teaspoon, just for quicker cooking and also because it looks prettier when serving.


These are the fluffiest, lightest little gnocchi you might ever taste – but they’re deceiving. You could pack away a fair few of them before you realise they are quite filling after all and need to go and have a lie down. I made a rich and silky tomato and basil sauce to go with them, and sprinkled them with Grana Padano before grinding over some black pepper. Keep a couple of tubs of ricotta in the fridge and you’ll always have a home-made, quick dinner up your sleeve. 


ricotta gnocchi with tomato sauce half

Ricotta Gnocchi with Tomato and Basil sauce
Serves 4 hungry adults
Ingredients:

For the gnocchi:
500g ricotta
1 free-range egg
good pinch of sea salt flakes (about half a teaspoon)
100g plain flour

For the sauce: 
2 tbsp olive oil
2 garlic cloves, chopped
400g passata
salt and pepper
2-3 tbsp chopped basil
heaped tsp sugar

Method
First, get the gnocchi mixture ready. Drain any liquid from the tubs of ricotta and tip the cheese into a mixing bowl, with the egg and salt. Mix well, until smooth, and then add the flour, mixing for a second time. You should have a mixture the consistency of thick mousse – you’ll be able to pick it up with a spoon and it’ll hold it’s shape. If not, add a teaspoonful more flour. 

Put a large pan of salted water on the heat. While that’s heating up, make your sauce. Fry the garlic very gently in olive oil with a pinch of salt, until softened but not coloured. Tip in the passata, the sugar and the basil and bring to a simmer. Taste, adding salt and pepper to season. Turn the sauce right down to keep warm while you cook your gnocchi. 

Take a teaspoonful of the mixture and push it off with another spoon, directly (and carefully!) into the boiling water. Repeat, until you’ve used up about half of the mixture. As the gnocchi rise up to the top, lift them out with a slotted spoon and drain them well. Continue with the rest of the batch. Once the gnocchi is cooked, serve with the sauce along with black pepper and Grana Padano or Pecorino for grating over. 

Thursday, 9 May 2013

Wholemeal Peppered Smoked Salmon Tart

Salmon. It’s good stuff, giving us protein and of course those all-important Omega-3s to make us brainy. But you can get bored of eating it with potatoes or Japanese-style, with rice. So I decided to make a tart with it – a wholemeal one (as if salmon wasn’t righteous enough).

The pastry is really easy, but a little time-consuming to make, but it’s well worth the effort. You end up with a home-made tart that’s wholesome, filling and perfect eaten hot or cold with new potatoes and veggies or taken off out to divide up for a picnic (if the weather holds out). 


smoked salmon tart cut

Wholemeal Peppered Smoked Salmon Tart

Serves 6
Ingredients
For the pastry: 
200g fine wholemeal plain flour
100g salted butter, slightly softened
3 tbsp cold water

For the filling:
4 spring onions, washed, trimmed and chopped
40g butter
2 eggs
100ml double cream
1 tsp horseradish sauce
salt and pepper
cooked peppered, boneless smoked salmon fillets

Method
First, make the pastry. Sieve the flour into a bowl and rub in the butter with your fingertips until it looks a bit like breadcrumbs. Stir in the cold water and mix to form a dough. Wrap in clingfilm and chill in the fridge for 30 minutes. Once chilled, roll the pastry out to about 4mm thick and use to line a flan dish. Cover with greaseproof paper and baking beans and bake at 160ºC for 15 minutes. Take out the beans (they’ll be hot, use a metal or wooden spoon) and the greaseproof paper and bake again, to crispen up the tart base, for another 5-7 minutes. 

To make the filling, fry the spring onion in the butter until just softened. Leave to cool. Beat the eggs, cream and horseradish and season with a little salt and pepper. Stir in the spring onions and their butter and pour into the tart base. Quickly break up the salmon (discarding the skin) and arrange over the tart. Slide back into the oven and bake for 30-35 minutes, until the tart is set. Eat hot or cold. 


smoked salmon tart

Wednesday, 8 May 2013

Cheshire Cheese and Tenderstem Broccoli Filo Pie

The idea for this recipe came when I was tucking into the Greek version of this pie, ‘spanakopita’, made with feta cheese, eggs and spinach and crisp filo pastry. It occurred to me, mid-bite, that it might be worth coming up with a British version, using home-grown ingredients instead. And so I did. 

This version uses Cheshire cheese, which has a milky flavour and crumbly texture, not unlike feta but obviously a bit less salty. I teamed it with Tenderstem broccoli and then of course good old filo pastry. I hope you enjoy. 


cheshire cheese and tenderstem broccoli pie

Cheshire Cheese and Tenderstem Broccoli Filo Pie
Serves 6
Ingredients
270g filo pastry (6 sheets)
100g unsalted butter, melted
1 tbsp olive oil
1 onion, peeled and chopped
200g Tenderstem broccoli
200g Cheshire cheese (I used Joseph Heler White Cheshire), grated
3 free-range eggs
salt and pepper

Method:
In a small frying pan, heat the olive oil and fry the onions, with a pinch of salt, until softened. Tip into a bowl and wipe the pan with kitchen towel. Add the broccoli and cover with water. Boil for about 5 minutes, until just tender. Plunge into cold water and slice in half lengthways. Leave to cool. 

Brush the bottom of a roasting dish with melted butter and lay over half a slice of the filo pastry. Brush over the butter again and add another layer of filo on top, until you have 4-5 layers. In a bowl, combine the grated cheese, cooled onion, broccoli and eggs and add a grinding of black pepper. Pour this over the filo and top with another layer of pastry. Brush with butter and then repeat, until the rest of the pastry has been used up. Brush with a final layer of butter and bake for 25-30 minutes in a 200ºC oven, until golden and crisp. Lovely.

Tuesday, 7 May 2013

Argentina’s Easter Bread: Rosca de Pascua

One of the first things I noticed about Easter in Argentina is their long Easter holiday. Where I was staying, they leave work on Thursday so they get Good Friday off and they don’t go back to work until the following Wednesday. And there were only a few corner shops actually open over those days, not like at home when we say it’s Easter weekend and then continue to shop for groceries, take books back to the library and pay money in at the bank.

Another thing I noticed was this: Rosca de Pascua, the Argentine’s traditional Easter bread. At a visit to the panadería (bakery) on Easter Sunday morning (they were open just to sell facturas for Easter breakfast) I was transfixed by rows of beautifully decorated brioche-like breads. I was surprised that none of them had whole eggs baked inside or onto them, but I was told that although some families still do, the Argentine government have warned that the eggs may not be safe and can transfer bacteria from the shell onto the bread. And although many families now buy their Rosca de Pascua in from the panadería, my niece decided to make one from scratch. Here’s how the Argentine Rosca de Pascua is made. 

rosca de pascua 10

First, warm milk is mixed with beaten eggs and fresh yeast and poured into a well of flour (called a ‘corona’, or crown). Gradually, just like when you’re making bread, the liquid is pushed into the flour with the fingertips, taking care not to break the ‘crown’ so you don’t end up with eggy liquid running over your worktop.


Next, the dough is kneaded, until the liquid is absorbed. Then, soft pieces of butter are kneaded into the bread. This seems to take ages and the dough becomes sticky. Gradually though, and with lots of kneading, the butter is all absorbed. The kneading now continues, until the dough is no longer wet or sticky and comes away cleanly from the work surface each time it’s lifted. 

rosca de pascua


The dry, silky-looking mound of dough is then left to rest, before being rolled out into a sausage shape and then the two ends pushed together to form a ring. The dough is placed onto a buttered and flour-sprinkled baking tray and gets another rest under a damp tea towel to rise, before being placed in the oven for about 20 minutes, to cook. 

The traditional shape is a ring, although our dough rose a little more than we expected and although you could still see the ‘ring’ shape, it wasn’t as prominent as the ones in the bakery. The bread is then cooled until it’s just warm and then decorated with crème pâtissière and maraschino cherries. Once it was decorated, we cut chunks of it and ate it, still slightly warm. It was rich and eggy, a lot like brioche, but with a stronger yeasty flavour and slightly less sweet. 

Have you ever tried Rosca de Pascua, or any other Easter breads from around the world? 

rosca de pascua 11

LinkWithin

Related Posts Plugin for WordPress, Blogger...