Friday, 29 June 2012

Pan Haggerty

If I’m being honest, I’d admit that I didn’t really know what Pan Haggerty is until I did a quick search for it on the internet. And then I realised that I’d been eating something very similar to it for years. While I was at university I had a boyfriend called Steve who lived in Derbyshire and when I used to visit them his mother would layer up potatoes and onions, scatter the whole lot with grated Cheddar and bake it all in a roasting dish for us to share with some lamb chops or sausages. I’ve made it myself a few times, changing things as I go along and here’s how I make it. Now that I know what it is.

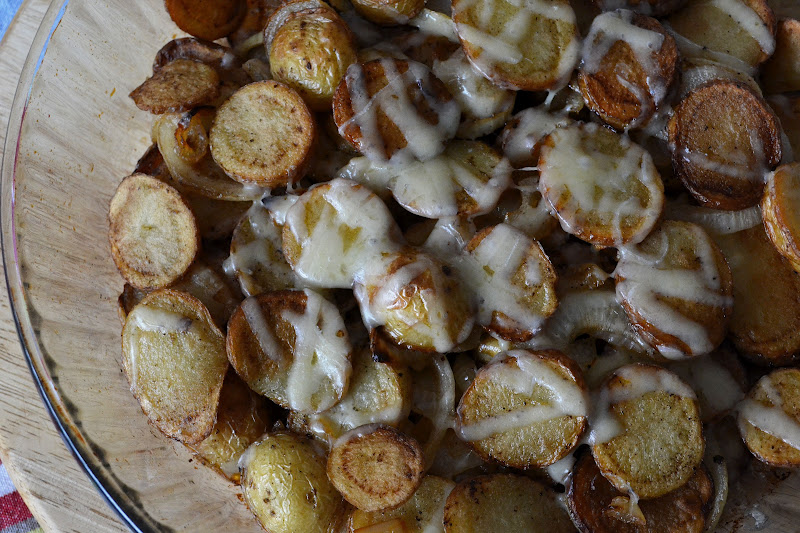
The action of frying the potatoes in a single layer in a pan first is a long one, but one that shouldn’t be avoided as all of the buttery juices give so much flavour to the dish – and you can be sure as well that it will all be cooked through (nothing like baking something for 45 minutes and then finding a slice of semi-raw potato halfway down).

Pan Haggerty is thought to come from the North of England, is real comfort food and an excellent example of something being created out of the ingredients available at any one time. People have said that it should really be cooked in a pan but then I think that cooking it in the oven means that the heat is much more evenly distributed. It’s cheap to make, too – we eat ours mostly with some good quality baked sausages, all crisp and sticky from a hot spell in the oven.


Pan Haggerty
Serves 4-5

Ingredients:
  • 50g butter
  • glug of olive oil
  • 1 onion, peeled and sliced into rounds
  • 400g waxy potatoes, skin on – I usually use Charlotte potatoes
  • Handful grated Davidstow Cheddar cheese
Method:
  1. First, preheat your oven to 200°C. With a sharp knife, slice the potatoes into rounds about 5mm thick.
  2. In a large frying pan melt half of the butter and slosh in a tiny glug of olive oil. Fry the onion slices until soft and set aside. Add the remaining butter and fry the potatoes gently, until browned on both sides, in a single layer in the pan. Once they’re soft in the middle, layer one third of  them in one layer in the bottom of a heatproof oven dish. Season with salt and black pepper.
  3. Scatter half of the onion slices on top, and then top with more potato slices. Season again with salt and pepper and layer over the rest of the onions. Finally, top with the remaining fried potato slices and season again. If you have any buttery juices left in the pan, pour these into the dish, too.
  4. Bake, uncovered, in the oven for 30-40 minutes, until all the potatoes are soft and everything is sizzling and brown.
  5. Switch the oven off. Scatter over the cheese and return to the hot (but switched off) oven so that the cheese can melt in the residual heat. Once the cheese has melted, serve straight away.

What are your favourite potato dishes?

Thursday, 28 June 2012

Posh Canapés: Smoked Salmon, Horseradish and Dill on Rye

Sometimes, when you’re having a party or for when you’re cooking for people, it’s the little things that matter. For example, having a jug of a home made, iced drink on the table rather than bottles of designer mineral water. Or using washable napkins rather than the everyday perforated paper ones. Things that might not take any time at all, but just show that you wanted to make a little effort. Like these little beauties.


These are perfect for bringing out at any party (for Christmas or garden parties, they’re great) and they look so elegant, when they’re actually just diddy little circles cut out from a slice of rye bread, a smear of horseradish-flavoured creme fraiche and a twist of smoked salmon balanced on top. But they show that you’ve wanted to make an effort. Because this is really just an assembly job, they take really no time at all to put together, and you could make up quite a few in a short space of time. And quite strangely, my children love them; just with a little less horseradish.

Smoked Salmon, Horseradish and Dill on Rye
Makes 8
Ingredients
  • 2 slices rye bread
  • 2 tablespoons creme fraiche
  • 1 teaspoon horseradish
  • 1 wafer thin slice of good smoked salmon
  • a few sprigs of dill and black pepper, to serve

Method
  1. First, stamp out circles from the rye bread using a small cookie cutter. Put to one side. 
  2. In a small bowl, mix together the creme fraiche and the hoseradish. Smear a little of this mixture over the tops of the rye bread circles.
  3. Tear off a little piece of the smoked salmon from its slice and twist into a curve, placing it on top of the rye.
  4. Top with the dill and grind over a little black pepper.
What are your favourite easy to make party recipes?

Wednesday, 27 June 2012

Bill Granger Sweetcorn Cakes and Avocado Salsa

This recipe is the reason I have started going overboard with buying up tins of sweetcorn. I’m hoarding them away just in case I ever want to make these at short notice – which is quite often, now. The recipe is in Bill Granger’s book Bill’s Open Kitchen, listed under breakfast. I can’t stress this enough: you have to try these.


All you do is open a couple of tins of sweetcorn (or, as he suggests, cut the kernels off a fresh corn on the cob if you have one), save about half a cup of them to one side and then blitz the rest in a processor, with some red onion, coriander leaves, eggs, flour and baking powder. Then you mix in the rest of the sweetcorn, dollop the mixture into a hot frying pan and cook for a minute or two on each side.

No one ever has to convince me about anything that has avocado and coriander in it. I love them both – stirred together here with a squeeze of lime juice and a good pinch of sea salt flakes. If you don’t have the book, you can find the recipe online here. It’s one of my favourite dishes, even if I made bigger dollops in the pan than I should have; I ended up with 6 instead of 12. But they were totally delicious. It’s made me want to have a go at making lots of other fritters and salsas with other types of veg. Beetroot would be good, I reckon.

Good luck, and if you try this, let me know how you get on!

Tuesday, 26 June 2012

Simple Pan Fried Sole with Parsley and Lemon Butter


Sometimes I think that if you have really good, fresh fish, you don’t need to pimp it up with much in the way of sauces and marinades but just enjoy it as it is, or with something simple. And it doesn’t get much simpler than chopping up some parsley, throwing it in melted butter and squeezing over some lemon juice. I used lemon sole for this, just because it was what was available, but this would work with any white fish. Think you don’t have time to cook? This could be on the table (from first move to plate) in 6-7 minutes. Enjoy!


Simple Pan Fried Sole with Parsley and Lemon Butter
Serves 4
Ingredients
  • 4 whole sole
  • 1-2 tbsp olive oil
  • a few knobs of butter
  • 4 tbsp plain flour
  • 1 lemon
  • sea salt
Method
  1. Dust the fish in the flour until coated and shake off any excess. Heat the oil in a large frying pan with one knob of butter and gently lower in the fish. Cook for 2-3 minutes on one side, and then gently turn the fish over and cook on the other side for 2 more minutes.
  2. When the time is up, pierce the skin of one of the fish gently with a sharp knife and check that the fish flakes apart and is opaque. Transfer to warmed plates.
  3. Immediately, wipe the pan with a some kitchen towel (you’ll get some brown residue from the flour). Put back on the heat and melt the other knob of butter. As soon as it’s melted, throw in the parsley and a small pinch of salt and cook for about 30 seconds. Take off the heat and squeeze in the juice of one small lemon. Spoon over the fish and serve. Great with some skinny fries.
How do you like to eat fish?

Monday, 25 June 2012

Snickers-Style Chocolate and Peanut Ice Cream Sundae

Since I read (and tried out) the recipes from The Icecreamists’ book I’ve been busy dreaming up all sorts of different flavours for ice cream. I felt inspired by the way they just chop up certain chocolates and melt them and mix them in; or dollop in a spoonful or two of Nutella, or peanut butter. One of my favourite flavours in the book was the peanut butter ice cream. And I took a scoop of this, along with a scoop of my own chocolate ice cream and thought: Mmmmm, that tastes just like a Snickers in ice cream form.
 
And so the Snickers-Style Sundae was born. Have a look at it. Nice, huh?


The recipe for the peanut butter ice cream is loosely based on the recipe in the book, but I have made a few adjustments and also a few recommendations. The first thing I did was add a little more salt. The second thing I did was to make sure I always used runny, American-style peanut butter. Forget the cheaper thick, pale, paste-like stuff, it just doesn’t work and turns grainy and somehow powdery after being frozen. The stuff I buy comes in a small plastic jar with a blue lid and has a sticker saying you have to stir it before using as it separates. This is the peanut butter you need.
 
The chocolate ice cream is made using chocolate with 60% cocoa solids. You could use a darker chocolate if you like (72% and above) but for that real Snickers flavour, you need that milkyness rather than the bitter dark chocolate tang.
 
You could also make your own caramel sauce but mine is shop-bought. And you can use salted, dry roasted or honey-roasted peanuts if you have them – whatever you prefer.
 
Snickers-Style Chocolate and Peanut Ice Cream Sundae
Makes 4
Ingredients
For the peanut butter ice cream:
  • 125ml double cream
  • 250ml whole milk
  • 2 egg yolks
  • 85g caster sugar
  • large pinch of salt
  • 250g American-style, runny peanut butter
For the chocolate ice cream:
  • 125ml double cream
  • 250ml whole milk
  • 2 egg yolks
  • 85g caster sugar
  • 100g chocolate, with 60% cocoa solids
To decorate:
  • couple of handfuls of roasted peanuts
  • a drizzle of caramel or toffee sauce
Method:
  1. To make the peanut butter ice cream, pour the milk and cream into a saucepan and heat gently, until warm but don’t let it boil or burn on the bottom. In a bowl, whisk the egg yolks with the sugar until it forms the consistency of a thick custard. Gradually pour the warm milk mixture onto the egg yolks, whisking all the time and sloshing it in bit by bit. Pour back into the saucepan and heat gently, stirring all the time, until you see it thicken. Pour back in the bowl and leave to cool completely.
  2. When the mixture is cool, blend in the peanut butter using a whisk or stick blender and pour the lot into an ice cream machine to churn. Freeze until needed.
  3. For the chocolate ice cream, heat the milk and cream as before, in a saucepan, and break in the chocolate. Whisk the egg yolks with the sugar. When the milk mixture is warm, but not boiling, gradually pour this onto the egg yolks bit by bit, whisking all the time. Pour back into the saucepan, stirring, until you see it thicken. Pour this back into the bowl, chill, churn and then freeze.
  4. To serve, just take 2 scoops of each flavour and arrange in a sundae glass or bowl. Drizzle over the toffee sauce and sprinkle the peanuts over the top.


Friday, 22 June 2012

Do You Want Dirty Pots With That?

I couldn’t believe it when I read this. I had to read it twice. And then I sat for a moment, and checked that it wasn’t April 1st.

Housebites is a food delivery company, that aims to reinvent the takeaway – where you can place an order for restaurant-standard meals, which are then delivered to your door. This is all very well and good, and Stephen Fry and Lily Allen are said to be fans of the service. Great stuff. But then I read that some customers have ordered in the food to feed their friends, and then pretended that they cooked it themselves. There were so many of these customers, Housebites says, that they started offering to send the dirty pans the meals were cooked in, too – for authenticity in the kitchen.

There’s no doubt that Housebites are to be applauded for this – being inventive and creative enough to cater to these customer demands (they charge you £5 extra if you want the dirty pans, although they’ll give you back £2.50 if you wash them up before returning them). But ordering in food and then pretending to everyone that you cooked it brings up another, bigger problem than having to rent a load of dirty pots and pans for a night.


What happens, when, a couple of weeks later, one of your friends rings you up and says, “Oooh, that Coq Au Vin that you cooked the other night, what’s the recipe? I’ve been telling everyone about it and I want to have a go and cook it myself.” It would leave you stammering on the phone, mumbling something about having to go and wash your hair urgently and hanging up. But I’m not going to launch into a rant about how people should learn to cook restaurant-standard meals from scratch. No Siree.


The problem here is not with the people who use this service, and neither is it with Housebites, who are only catering for customer demand. The problem is with some sections of society, who make it so difficult for someone to admit that they can’t cook to ‘chef’ standard. I can’t stand food snobbery, although I’ve come across it many, many times. People who insist that you can’t call your dinner Spaghetti Carbonara, because “well, it contains cream, and a real Spaghetti Carbonara is made with just eggs and Parmesan cheese.” I always tell them that that is how I like it, and I’m just cooking myself some dinner, not hoping for Michelin-starred status or a PDO stamp on my plate.


Housebites launches ‘dirty pan’ service to customers who want to pretend they’ve cooked dinner themselves
Photo: Housebites
It is intimidating to cook for people – I’ve done it and got it wrong so many times. I had a couple of work friends who came for dinner, ate the main course and then asked “is that it?” (this was a while ago, long before I started blogging and didn’t understand the need to allow for bigger portions than mine), and fed grey, undercooked soggy pastry to a prospective Mother-in-Law (we didn’t marry, but that was nothing to do with the pastry).

But are these really things to be frightened of? For every mistake I’ve made in the kitchen I’ve learned not to do it again. And it’s made me a better cook, and, over time, a more relaxed host. And be honest to your friends: I’ve had great girly chats over plates of pasta just sprinkled with salt, pepper and cheese. And when anything has gone wrong in the kitchen I’ve found people to be so easy going about it, even rolling up their sleeves and frowning with me over a pot of stew. We’re not all auditioning for a place on Come Dine With Me. Pretending that you’ve cooked your dinner when you haven’t might gain you Brownie points in the short term, but when your friends find out they might feel hurt – and you won’t develop as a cook yourself. And not only that, but you set a standard. The next time, it’ll be more difficult to say, “let’s just sit around and order in a pizza.” It’s all a bit of a shame, really.


Order in food, by all means, but let’s not pretend we’ve cooked it, shall we? And perhaps, one day people won’t feel so intimated by sharing food with friends. After all, they are friends, aren’t they?

Thursday, 21 June 2012

The Luther Burger: A Burger in a Krispy Kreme Doughnut

The Luther burger has been doing the rounds for the last few years in the US with foodies enthusing over it. American celeb chef Paula Deen even published her own recipe for it. And I wondered what all the fuss was about. So I stacked up minced beef, glazed doughnuts, cheese and bacon and tried it for myself.

Thought to have been named after Luther Vandross who first requested it, the burger consists of a glazed ring doughnut (usually a Krispy Kreme) cut in half (glazed side down) and a beef burger slipped inside, so the sugary glaze melts onto the hot meat within. Paula Deen actually insists on using two Krispy Kreme doughnuts. You then add a rasher or two of smoked bacon and a sprinkling of cheese, before popping the whole thing back onto a clean pan to crispen up and heat the doughnut. Turn it over and cook for a couple of minutes and you’re done.  In theory, I could see how this would work. Sweet and salty are such a fantastic combination – just think of bacon and maple syrup and peanuts and chocolate for example. And the beef, I thought, would add a real savoury touch to that, with the creaminess of the melted cheese.


It’s said that one burger packs 1000 calories, around half your recommended entire intake for the day. And as I bit into it for the first time, I was hit with a rush of nostalgia. You immediately get the smell and taste of the fairground from the warm doughnuts and you can smell the aroma of charred burger along with it. Then you taste salty bacon amongst all that and then… well… actually, that was it. The flavour of the sugary doughnut seemed to overwhelm the burger and although the smell of the burger cooking had lingered in the air I could barely taste the meat amongst all that sugar. The cheese went missing somewhere inbetween although I could detect it’s creamy texture if not its taste. It just tasted sugary and I was hit with a buzzing sugar rush about half way through – but if anyone asked me whether the taste of it was worth taking in that enormous amount of calories for (around 1,000), I’d say no, probably not. Just give me a good, charred burger and a doughnut for pudding if you have to. But not the two together.


Is the Luther Burger taking the burger a bit too far or is it just plain crazy? What do you think?

Wednesday, 20 June 2012

Maple-Glazed Bacon

Sometimes you want a sweetness to smoked bacon, whether it’s for making salads, sandwiches or sliding into a burger. But don’t rely on the ‘maple-cure’ stuff you sometimes see in the shops – it’s easy to give your grilled bacon that sweet-smoky glaze in just a few minutes – and I reckon it tastes tons better, too.

Because I use bacon quite a lot in my cooking, I started buying in Laverstoke Park Farm’s nitrate-free, smoked streaky bacon, and always have a pack of it in my freezer. It’s just like old-fashioned bacon – it’s not bright pink, but brown (due to the lack of nitrates), has a good streak of fat in it and is thickly cut. It has a really different flavour to the typical ‘supermarket’ bacon – less sweet, more smoky and, well, more like pork, really. Giving it the maple glaze treatment makes it glossy, sweet and crisp: we love it.


How to Make Maple-Glazed Bacon
Makes 6 rashers 
 
Ingredients:
  • 6 rashers of good-quality smoked, streaky bacon
  • About 4 tablespoons maple syrup
 
Method:
  1. Line a grill tray with a sheet of foil. Heat your grill to high.
  2. Lay over the bacon strips onto the foil, leaving a space between each one, and drizzle the lot with about 2 tablespoons of maple syrup. You don’t need much. Slide under the grill and cook until crisp.
  3. Turn over the bacon with a pair of tongs, not a fork. Drizzle a little more maple syrup over each rasher and put back under the grill for another few minutes until sizzling and crispy.
  4. Remove from the grill and transfer the rashers to a plate, leaving to cool a little.

These are perfect used in BLT sandwiches but I love them in my beefburgers. Gorgeous!


Tuesday, 19 June 2012

Chicken Cooked in a Slow Cooker


OK, I didn’t say this was going to look pretty. But it’s amazingly easy, effortless and you’re left with soft chicken meat that just falls off the bone.

It all started when the heating element on my oven blew up one Sunday afternoon. I’d planned roast chicken for dinner, but obviously had to have a rethink. And, after a quick Twitter convo with Kavey, I decided to pop it in the slow cooker. She gave me some instructions – quarter an onion, layer it in the bottom of the crockpot, put the chicken on top and then pour boiling water in until it comes halfway up the bird. Cook on high for one and a half to two hours, and then turn down to medium for another 3-4 hours. Sunday dinner was saved!

You can put in a couple of bay leaves and some carrot and celery too if you want to enhance the flavour of the stock. The chicken ends up very soft – I scoop mine out with two spoons and a leg or a wing sometimes falls off – don’t worry if this happens to you. Just scoop it out.


I’d read anxious message board posts on this from worried people about the low temperatures and would it really kill all the bacteria in the chicken – but it’s cooked for 5 hours and as long as you check it’s cooked all the way through (it always is) I can’t see any problem. I’ve made this countless times now since that day and we’ve had no problems with it.

There are so many great things about cooking a whole chicken in this way. Firstly, you end up with the tastiest stock that you can use for risottos, soups or whatever else you fancy. I always freeze it. Then, you can make an even tastier batch of stock by putting all the bones and skin back into the crockpot and pouring over fresh boiling water and some more veg.  Leave all that to simmer away in the slow cooker on low overnight – it’s true – you wake up to the most delicious smell and end up with another batch of richly flavoured stock.

Other great points: you can leave it cooking all day, you don’t have to check on it or anything. It’s also less messy than roasting in an oven with all that spitting and hot fat. It’s more energy efficient (there’s that old tale of a slow cooker using up the same energy as a lightbulb). And the meat will be so moist and tender and will fall off the bone so easily that you won’t waste a scrap of it. Save leftovers for wraps, sandwiches, curries, stews, etc.

The downsides? Well, for me there’s only one, which is that pale, baggy, goose-pimpled skin. But then we never eat that anyway, it just looks better when it’s roasted. Again – it’s no looker – but boy, it’s my new favourite way to cook chicken.

Thank you Kavey! Check out her post on slow cooked chicken on Kavey Eats.


Monday, 18 June 2012

We Should Cocoa: Vanilla Iced Coffee and Chocolate Cake

This month’s We Should Cocoa challenge is hosted by Lucy at The KitchenMaid, and the aim is to create a recipe that uses coffee and chocolate. I definitely knew I wanted to make a cake for this, but couldn’t decide on the icing until the last minute. Would it be chocolate icing or coffee? I decided, in the end that it would be neither: either flavour would tip the balance of the flavour of the actual cake. So I went with one that works well with both coffee and chocolate: vanilla.

I think it’s actually quite difficult to make a cake with chocolate and coffee and have it so that you can taste both. I often add some coffee to my chocolate cakes, which gives it a richer flavour, but doesn’t ever taste of ‘coffee’. And a spoonful of cocoa added to a coffee cake makes it taste richer, but doesn’t necessarily give it a ‘chocolatey’ flavour. But with this cake, you do taste both flavours – the sweet, husky cocoa and the roasty richness of coffee. The thin layers of vanilla buttercream just add a soft sweetness and a final dusting of espresso powder over the top gives it an extra burst of flavour as well as the appearance of a milky, cocoa-dusted cappuccino.


Vanilla-Iced Coffee and Chocolate Cake

Ingredients:

  • 225g plain flour
  • 250g caster sugar
  • 80g cocoa powder
  • 1 1/2 tsp baking powder
  • 1 1/2 tsp bicarbonate of soda
  • 2 eggs
  • 250ml milk
  • 125ml vegetable oil
  • 1/2 tsp vanilla extract
  • 150ml boiling water, with 1 tbsp good quality instant coffee granules dissolved in it 
For the buttercream
  • 150g unsalted butter
  • 300g icing sugar
  • 1/2 tsp vanilla extract
  • 1/4 tsp instant espresso powder, for sprinkling
Method
  1. Mix all of the cake ingredients in a large bowl, except the boiling water and coffee granules. Stir well, until smooth.
  2. Gradually pour the coffee mixture into the mixture and give it a good stir, to comine.
  3. Pour into a deep 25cm round cake tin and bake for 40-45 minutes at 180°C, until a skewer poked through the cake emerges clean. Leave to cool completely.
  4. Cut through the cake, horizontally.
  5. Make up the buttercream by mixing the butter and icing sugar together, along with the vanilla essence. Spread about one third of the mixture onto one half of the cake and sandwich the two pieces together. For a really neat result, freeze the cake for 15-20 minutes. This will stop crumbs coming loose while you ice, although to be honest I did skip this part.
  6. Once you’ve sandwiched the two halves together, spread the rest of the buttercream over the top and sides of the cake, smoothing it down as you go with a flat knife. Finish by sprinkling the espresso powder over the top, which gives it the appearance of a milky cappuccino dusted with cocoa – and also adds an extra burst of coffee flavour.


What do you think? Would you eat a slice? 🙂  


Friday, 15 June 2012

Win Prizes with Jersey Tourism

Jersey Tourism have been in touch and asked me to let you know about a super competition they are currently running via their Facebook page. Have a look at this….

Image Copyright Jersey Tourism

With a beautifully warm climate and lush green fields, Jersey is an island packed with culinary delights. From the island’s own vineyards to its fresh seafood and a wide range of delicious dairy products made from the rich, creamy Jersey milk, there’s plenty to discover for the gastronome. To help you discover the island, this June Jersey Tourism are giving two people the chance to win a 3 night stay on the island, complete with a complementary walking tour by Jersey-born naturalist Arthur Lamy.
 
As well as this 3 night stay, which includes flights and 5-star accommodation for two, there’s also a chance to win prizes every day – from Friday 15th – Thursday 21st you can win delicious hampers of Jersey fudge,chocolate & black butter from La Mare Estate! (http://www.lamarewineestate.com/shop/)
 
Visit the Jersey Tourism Facebook page to enter – http://on.fb.me/KkZeYW

Image copyright Jersey Tourism


Thursday, 14 June 2012

Blacksticks Blue Burger with Guinness Dipping Sauce

One for the Dads… and the Mums too, actually. I wanted to come up with something special for Father’s Day and here it is. A beef burger, topped with with British Blacksticks Blue cheese, a slice of red onion and a gorgeous Guinness dip.

I slid the finished burger under a hot grill for a few seconds and the cheese softened but didn’t really melt – but it tastes amazing and we loved it. I hope if you make it that you like it too!


Blacksticks Blue Burger with Guinness Dipping Sauce


Blacksticks Blue Burger with Guinness Dipping Sauce
Serves 4
Ingredients
  • 400g good quality minced beef
  • 1 egg
  • olive oil
  • sea salt
  • 4 sesame buns, split
  • crunchy lettuce (Romaine, little gem etc)
  • 40g Blacksticks Blue cheese
  • Small red onion
For the dip:
  • 200ml Guinness
  • 1 white onion, finely chopped
  • 1 clove garlic, finely chopped
  • 2 tsp olive oil
  • 1 tbsp dark soy sauce
  • 3 tbsp light brown sugar
  • 2 tsp cornflour, dissolved in 1 tbsp cold water
Method:

  1. Put the mince in a mixing bowl and crack in the egg. Mix with your hands – but not too much – and form into 4 patties, all the same size. Drizzle with olive oil and sprinkle with a little salt.
  2. Put a dry frying pan on a high heat. Add the burgers and cook for about 4-5 minutes on each side, until cooked through.
  3. Meanwhile, make the sauce. Heat the olive oil in a small pan and fry the onion and garlic until softened. Stir in the Guinness, soy sauce and brown sugar and leave, bubbling, for about 3 minutes. Pour in the cornflour and water mixture and stir immediately. The sauce will thicken. Taste, adding a little more salt if you need to and set to one side, keeping it warm.
  4. Serve your cooked burgers in the split sesame rolls, spread with a little mayonnaise – along with the lettuce, chunks of Blacksticks Blue and a slice of red onion. Eat with crispy fries and some of the warm dipping sauce alongside.
What are your favourite burger recipes?

Wednesday, 13 June 2012

Giraffe, Reading

It was out of pure chance that we ended up, on a sunny weekday evening, at Giraffe alongside Reading’s Riverside. In the heat of the last few weeks, our fridge finally decided to pack up and the food that was left inside had to be chucked out – (don’t ask – it wasn’t pretty). To console myself (and due to lack of fresh food) I decided to take us all out for a burger. (As you do). And so the four of us ended up at Giraffe.

As soon as we arrived, we were greeted by a member of staff who told us to choose where to sit, and he would bring over our menus. Which was where our 3 year-old decided to push out her bottom lip because she wanted to sit on an ORANGE chair (her favourite colour). No problem, he said – and brought one over. Which demonstrates just what the service at Giraffe is really like. Nothing’s a big deal. You want to sit outside? Fine. You want an ORANGE chair, and a glass of ORANGE, with a little ORANGE plastic giraffe sticking out of it? That’s fine, too. Everything’s just so relaxed.


We all ordered burgers. One of the girls had a fishfinger burger; lettuce and fishfingers in a toasted bun with a generous portion of chips. Our youngest opted for a chicken burger – a chicken breast with lettuce and tomato in a toasted bun, also with chips. They actually have two sizes of children’s meals – one for under 7’s – and one for the older kids. This is brilliant, because it helps you to fit the menu to whatever appetite your child has, so you pay what you need to and reduce waste. The portions the girls got were still generous – and more importantly, they still managed to find room for pudding later on.

We ordered two Giraffe beef burgers, which came with chips and a little pot of chipotle mayonnaise. The chips were long, skinny and crunchy. The beef tasted charred on the outside, was juicy in the middle and actually really good. You can choose between a whole load of optional extras, like cheeses, avocado, onions or mushrooms to have in your burger too; I chose fried onions, which were red, glossy and sweet. Perfect.

Drink-wise, if you go, get the Teapigs fruit tea. My husband had this, while I had the fresh lemonade but although my drink was really zesty and refreshing, his iced tea was gorgeous, which meant that we all took it in turns to swipe it and nick some while he was pretending not to look. 

Strangely, after the generously-proportioned main courses, the puddings seemed a little more modest. The girls chose ice cream ‘sundaes’, which came in the form of one scoop of vanilla ice cream – one with strawberry pieces scattered over the top and the other speared with a flake. We went for the apple crumble, which (as the menu suggested) was ample for the two of us to share, but came with only one scoop of vanilla ice cream in the centre, which meant much jabbing of spoons and secret swiping of ice cream while the other person really was looking away. The crumble itself was full of soft pieces of apple – sweet but not too sweet – with a crunchy topping.

The burgers at Giraffe were great. The main courses were just the right size – we’re used to having Man vs Food moments in other restaurants, egging each other on to finish the last few doughy bites. We didn’t need to here. We were full, but comfortably full. The puddings were fine – the girls’ puds smaller than we expected – but to be honest, perfect for giving you that little refreshment before leaving, rather than you waddling out, trying not to make any sudden movements (TGI’s, I’m looking at you). But what made us want to come back to Giraffe more than anything is the service. Nothing was too much trouble. The staff were attentive, funny and put us all at ease. And I think that’s the difference between a good restaurant and a great one. You wouldn’t want to eat at the poshest restaurant in the world if the staff were rude. And I bet they wouldn’t give you an orange plastic giraffe in your drink, either.

Giraffe are situated on the Riverside, just outside the entrance of the Oracle. You’ll find it on the Wagamama side. Tel: 01189 590101.

Tuesday, 12 June 2012

June BSFIC: White Chocolate and Nectarine Ice Cream

 
When I learned that this month’s Bloggers Scream for Ice Cream challenge was for something fruity, I knew that I didn’t want to do just a strawberry, blueberry or raspberry ice cream. They are all lovely ice cream flavours, but I’ve been cooking a little bit with white chocolate lately and decided to try and incorporate a fruit that would go really well with white chocolate and that wasn’t normally used in making ice cream. And as I pushed a squeaky trolley around my supermarket one rainy afternoon, I found it: Nectarines. As people jostled and pushed past me (the fruit and veg aisle in our local Sainsbury’s is like a war zone), I stood for a second, trying to imagine the sweet, scented nectarine against cold, creamy white chocolate. And it worked.


You need to choose ripe nectarines that give a little when you prod them with your finger. Forget hard, unripe ones – they’ll be too sour. I reckon this could also work well with peaches, too, if you have any sitting around. This is one of my favourite ice creams I’ve made so far: sweet, creamy white chocolate ice cream with a sweet-sour crystallised ripple of nectarine purée running through it. Perfect.

White Chocolate and Nectarine Ice Cream
Makes approx 550ml
Ingredients
  • 125ml double cream
  • 250ml full fat milk
  • 2 egg yolks
  • 85g caster sugar
  • 110g white chocolate, melted
  • 2 ripe nectarines, stone removed and skin kept on
  • 1 tablespoon of vanilla sugar, or caster sugar
Method
  1. Chop the nectarines into bite-sized pieces and heat them in a pan with 1 tablespoon of vanilla sugar (just use regular caster sugar if you don’t have any). Leave for about 5 minutes and they will soften and turn a bit jammy. Turn off the heat and leave to cool.  
  2. Pour the double cream and the milk into a small saucepan and heat gently, until you see steam coming off it but it’s not yet boiling.
  3. Whisk together the egg yolks and the sugar in a separate bowl – they will clump together straight away into a paste, but keep whisking and the mixture will loosen into a thick custard.
  4. Splash a little of the hot milk/cream mixture onto the whisked egg yolks and whisk in straight away to prevent lumps forming. Gradually pour in the rest of the warm milk and cream and whisk until combined.
  5. Scrape the slightly cooled, melted white chocolate into the ice cream mixture and stir to combine. Leave to cool completely.
  6. Churn the cooled mixture in an ice cream maker for 25 minutes. When the ice cream has churned and is thick, purée the nectarines with a stick blender until smooth. Gently fold this cold purée into the churned ice cream to create a ripple effect.
  7. Scrape into a freezable container and freeze for at least 3 hours, or until firm.


Are there any other fruits that should be used more often in icecreams?

Monday, 11 June 2012

Review of The Icecreamists Book

The Covent Garden Icecreamists store has had its fair share of publicity over the last few years, with health inspectors being called in to seize batches of breast milk ice cream and Lady Gaga threatening to sue them over the name of it (‘Baby Googoo’), which was also served up by ladies with long blonde hair, pointy silver bras and masks. They offered to change the name, but the pop star still wasn’t happy. “Not even with Ladyboy Gaga,” they cheekily state on their blog. The Icecreamists also opened their gay pop-up on Maiden Lane (for over 18’s only) and also ran a saucy ad showing a smiling Prince Harry sticking his finger through the middle of a doughnut. It’s not surprising, then, that before he was playing naughty with ice cream, Matt O’ Connor was the man behind the campaign group Fathers 4 Justice. The group that organised the Batman and Robin stunt on Buckingham Palace in 2009, and the ‘Spiderman’ climbing up on the London Eye in 2004.


And what’s interesting is that many of these escapades inspired great ice creams which are detailed in the book. The Savoy Chill, he says, was inspired by an interrogation by a female officer wearing fishnet tights and a cocktail dress at London’s Savoy, as he sipped on Earl Grey tea. The idea for the Mint Condition ice cream came after the police force suspected that he would scale Ben Nevis wearing St George’s armour. Something, he states, he was in no condition to do at the time. And this is why this book – far from being just a ‘recipe’ book – is one of the most entertaining books I’ve read in a while.

I decided to roll up my sleeves and make a few ice creams from the book. The Peanut Butter ice cream was brilliant – a sweeter take on peanut butter on toast, served on toasted brioche with peanuts scattered over. The recipe states to use unsalted peanuts, but I reckon these would work well too, if you like the salty-sweet combination. And I used American-style, runny peanut butter, which made it easier to blend into the ice cream mixture. It was gorgeous and one of our favourites.


The Icrecreamists Peanut Butter Ice Cream

The Mint Condition ice cream is a basic mixture, with chopped and melted After Eight Mints stirred in. The recipe stated though to melt the mints, and then later to chop them (they were already melted) – so I just melted half and chopped half. It was so refreshing, and made me think differently about ice cream. With the right ingredients it’s so simple to play around with flavours.


The Icecreamists Mint Condition Ice Cream

But our favourite ice cream was Espresso Yourself: a rich, creamy coffee ice cream, used in their Godfather cocktail, also in the book. A couple of scoops (if you can stop there) is perfect for finishing off a meal, instead of a cup of the real stuff. I squeezed some toffee sauce all over mine and it’s one of the best desserts I’ve had.

The Icecreamists Espresso Yourself – Coffee Ice Cream

The photography in the book is colourful, sharp and moody – the design is full of Union Jacks, bright colours, punk-style lettering and that scratchy, swirly writing that lets you know that it’s also a bit naughty. There are saucy anecdotes as well as recipes for ice creams, cocktails, sorbetttos and lollies. And as well as breaking boundaries with flavour combinations and styles (the breast milk ice cream recipe is also in the book, should you have any, er, handy…), the book also breaks down the myth that making ice cream is difficult. The recipes don’t have long, complicated lists of ingredients and once you master how to make the basic mixture, you realise how easy it is to experiment with flavours by adding a dollop of peanut butter or some melted chocolates. I loved this book, and I’ll be using it a lot. I mean, come on, how could I not love a book with a whole chapter dedicated to ‘Guilty Pleasures’?


The Icecreamists is published by Octopus Books, ISBN: 978-1-84533-706-3. To find out more about the book, visit Amazon. To find out more about The IceCreamists stores, visit their website.

Friday, 8 June 2012

Nutella Porridge

My three-year old is a genius. Each morning, she plods out into the kitchen, opens a few cupboard doors where the handles are at her height and peers in at boxes of cereals and jam jars, deciding what to have for breakfast. Usually she’ll go with a boiled egg, something on toast or Shreddies. But one morning she said: “I’d like porridge. With chocolate spread.” The first response that came out of my mouth was “No, chocolate spread is for toast….” and then I had to stop myself. It could work.


I just made up a bowl of porridge and stirred in a teaspoonful of Nutella. It was divine. And I don’t know how I had the two ingredients in the cupboards for so long without thinking of it myself. It’s now a breakfast treat for all of us, thanks to her. If you’re stuck for something sweet and soothing for breakfast this weekend, give it a try.

Do you have any special ways to eat porridge? Simply, with a drizzle of honey, or something more glamorous?

Thursday, 7 June 2012

Jamie Oliver’s Cypriot Chicken from 30-Minute Meals

Jamie Oliver’s Cypriot Chicken, cooked

I am often lured by Jamie’s 30-Minute Meals book when trying to decide on what to cook. It’s nothing to do with the apparent promise of it all being on the table in half an hour – in fact many of these recipes take me longer or sometimes take up less time. It just depends on the day.

Chicken breasts stuffed with feta cheese, parsley, basil, sundried tomatoes and lemon zest

But I’d had my eye on this one for a while. Chicken breast stuffed with feta cheese, sundried tomatoes, parsley, basil and lemon zest – pan fried and then served with vegetables and garlicky flatbread. OK, so I cheated with the flatbread and bought one ready-prepared, but it was the chicken I was most interested in and preparing the flatbread would be the work of seconds, it’s so quick.

The stuffing being chopped up: unfortunately this image does not come with smell-o-vision.

When you’re chopping up those herbs along with the feta, tomatoes and the lemon zest, the aroma that wafts up from your choppping board is gorgeous. I thought the chicken breast might open out in the pan and I’d lose the stuffing from it, but it didn’t.

Jamie’s Cypriot veggies: garlic, asparagus, black olves and tomatoes

You then leave the chicken cooking while you get on with the veg – asparagus, tomatoes, olives and garlic – perfect. It’s all easy – there’s nothing difficult about any of the preparation. And no, I didn’t get it done in 30 minutes. From stepping into the kitchen to sitting everyone down to eat, it took around 45 minutes. But it’s still good going. And we all loved it – even the girls. My husband had the leftover chicken in sandwiches to take to work the next day and I made a salad for my lunch with the leftover white cabbage salad, the rest of the feta and some of the black olives and tomatoes.

Garlic and herb flatbreads: these were ready prepared but would be easy to do yourself

 If you have the book, I’d urge you to try this one if you haven’t so far. We’ll be having it again for sure.

The white cabbage salad – grated and tossed with oil, lemon juice and herbs – I left out the red chilli for the girls

Have you tried this Jamie meal yourself? How did you get on with it?


Wednesday, 6 June 2012

Nigella’s Cherry and Chocolate Cupcakes

It sounds weird, but I’d never thought of folding jam into a cake batter before. Fruit, yes – mashed, chopped or left whole. But now I know the flavour and moisture that goes into a cake by adding jam, you can expect to see a whole load more jammy cakes here.


Nigella writes that the recipe is simple and quick – and it is. But what I think is really important is that depending on the type of morello cherry jam you use, you do have to cut back on the sugar. I bought the best quality cherry jam I could find, which I knew would be less sweet than the cheaper kinds. And I played it safe and took out about 30g sugar – and it all paid off. The result was a sweet chocolate cake with slightly tart cherry jam rippled through it, which worked brilliantly.

The cakes are topped with a swirl of the dark chocolate ganache that I love – and then with a cherry. My ganache was a bit runnier than the icing in the book, but hey – these things happen and no one complained. These cakes look amazing and taste great. Do consider them for a cake stall/birthday party/family gathering/rainy afternoon this summer.


You can find the recipe here on Nigella’s website.

Tuesday, 5 June 2012

King Prawn, Asparagus and Proscuitto Mixed Grill

There’s a recipe in Jamie Oliver’s 30-Minute Meals, where you chuck salmon fillets, prawns, asparagus and tomatoes in a tray and grill for a few minutes, until it’s all cooked. He serves it with a green salsa, and boiled new potatoes.

And so I decided to do something, admittedly very similar, but without the salmon; and instead of a green salsa, I just wanted to sprinkle it all with sea salt, lemon and parsley. And it was brilliant. And, amazingly, probably the easiest thing I’ve ever cooked, despite it looking a bit showbizzy and something you could show off about with your friends (if you wanted to).

What surprised me most I think about this, was the reaction of the children. I took the floppy grey, armoured little prawns out of the pack to show them, with their spindly legs and long antennae and they LOVED it. I think we adults think it’s probably best not to show kids things like this and serve them up all pink and sweet and juicy and just hope that they eat it, but I’m often surprised by the foods they get excited about. And when they were cooked, my husband taught them how to take off the heads and peel the crisp shells off. They schnaffled down almost the lot, leaving only a couple for us. Must rememer to buy more next time… 


King Prawn, Asparagus and Proscuitto Mixed Grill
Serves 2 (double up and use two trays for 4 people)
Ingredients
  • 10 raw, shell-on King Prawns, defrosted if frozen
  • 2 tomatoes, quartered
  • 6 slices Proscuitto
  • 6 asparagus spears, washed and the woody ends snapped off
  • 2 lemons, quartered
  • small bunch of parsley, roughly chopped
  • 1 chunky clove of garlic, chopped finely
  • pinch of sea salt and black pepper
  • olive oil, for drizzling
Method:
  1. Preheat your grill to medium-high. Lay out the proscuitto slices at the bottom of a shallow dish or grill tray and scatter over the asparagus, tomatoes and lemons on top. Top with the raw prawns.
  2. Drizzle the whole thing with a little olive oil, sprinkle with a little pinch of sea salt (not too much, the proscuitto is already a bit salty) and grind over some black pepper. Slide under the grill, and cook for about 7-10 minutes, until the prawns are cooked and pink all the way through. Keep an eye on them, you might have to flip them over so they cook evenly.
  3. While the prawns and the veg are cooking, chop the parsley and garlic clove and put to one side.
  4. When the prawns are cooked, take them out and immediately scatter over the parsley and garlic and squeeze a little lemon juice over just before serving. Serve the mixed grill, with some skinny chips, a little crusty bread and a salad and don’t forget to spoon over the juices from the bottom of the tray.

Monday, 4 June 2012

Heston’s Vanilla Back Bacon, for Waitrose


Part of the reason I love shopping at Waitrose is that you can pick up some really unusual foods, especially since they teamed up with Heston Blumenthal. Among loads of other foods, there were mustard ice creams, pine-scented mince pies and now, vanilla back bacon. The bacon is rubbed with ground vanilla pods and brown sugar and left to mature – you can even see the tiny black seeds when you open the pack, all speckled onto the pink bacon slices.

The first thing I would say about this bacon is that it’s very thinly sliced, but that’s not so bad because it crispens up under the grill easily. The second thing I would say is that you need to try this, even if it’s just for the smell it makes when it’s under the grill. It’s sweet, smoky and salty – a bit like the way you imagine old-fashioned fairgrounds to smell, as you walk between hot dog stands and doughnut and candy floss stalls.


On the pack, there’s a quote from Heston:

“Because as kids we encounter it in desserts, we think of vanilla as sweet but it’s not. It has a delicate, fruity, spicy and sometimes earthy character, depending on where it’s grown.”

We ate ours, crammed between slices of toast. It’s not overly sweet, as you would expect it to taste, but you can detect the musky vanilla tones as you eat. I’d recommend eating it plain (we just used a smidge of butter on the toast) and don’t douse it with ketchup or brown sauce or whatever else you eat on your bacon sarnies because then you’ll lose all the flavour.

At £3.29 for six thin little rashers, it’s not cheap. But I would buy it again. Waitrose suggest using this in sandwiches, in salads or even in risottos. I’d have a slice or two in a burger, with all the trimmings. Try it, and tell me what you think.


Have you tried Heston’s vanilla back bacon? What did you think of it?

LinkWithin

Related Posts Plugin for WordPress, Blogger...