Chocolate is getting more and more clever, isn’t it?
There’s choccy made from raw cacao so that it’s secretly good for you.
And then there’s the dairy-free stuff.
And now there exists a chocolate that is good for you, dairy-free and also contains PROBIOTICS.
I know.
AMAZING.
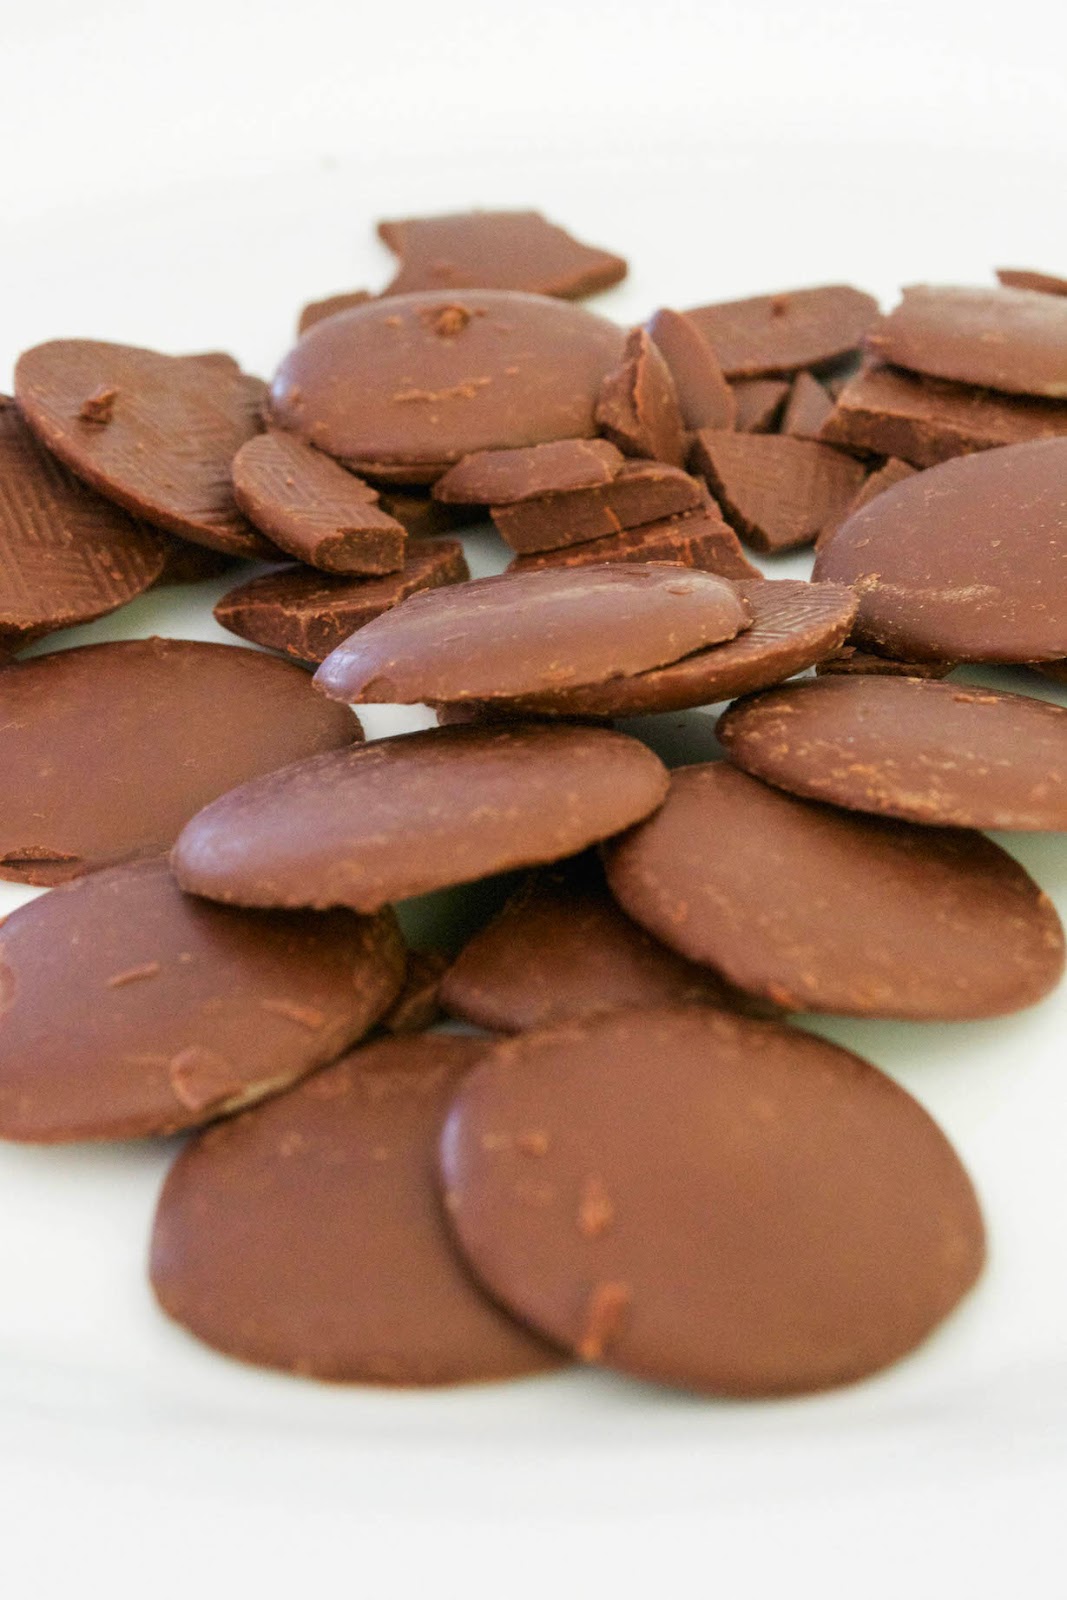
When the people at Ombar told me that they’d developed this chocolate, I’ll admit – my first reaction is that it probably wouldn’t taste that nice. Or, as it was dairy-free it might be loaded with soya proteins. But it was actually delicious – quite soft and easily melted (my six-year old couldn’t hold one in her fingertips for too long) but it had a flavour somewhere between dark chocolate and milk chocolate. It wasn’t sweet and really creamy like milk chocolate – it had a slight bitterness but not as crumbly as plain chocolate. It was good.
Added to this, the chocolate is sweetened with coconut sugar rather than refined sugar – I mix that into my brownies all the time, and it gives a lovely deep toffee-flavour to recipes. And tea. I love it in a cup of Chai tea.
For those of you who want to know the ingredients, here they are:
All natural ingredients. Good stuff, right?
I think these little chocolate buttons are a good thing for a treat if you need to avoid dairy or you want to up your probiotics – my children really liked them. And then I told them they had coconut in them. They HATE coconut. “I still like them,” said my six-year old, shoving another chocolate button into her mouth.
Well, that’s good then.
For more information, go take a look at the Ombar website, which also has a shop where you can place your order.
Thursday, 30 April 2015
Dairy-Free Chocs – With Probiotics In Them: Coco Mylk Buttons From Ombar
Posted by
Jo Romero
at
06:28
Email ThisBlogThis!Share to TwitterShare to FacebookShare to Pinterest
Links to this post
Labels:
dairy free,
dairy-free,
everything,
gluten-free,
paleo,
paleo diet,
vegan,
vegetarian
| Reactions: |
Monday, 27 April 2015
Turkey and Cavolo Nero Cabbage Meatballs
I love meatballs.
They’re cheap to make, you can play around with lots of flavours, and you can eat them hot or cold, at home, or on the go.
I got hold of a load of dark Cavolo Nero cabbage the other day, and I thought I’d serve them alongside some turkey meatballs that I was planning to make.
Actually, I thought – scrap that, let’s chop them up, stick them INSIDE the meatballs and tell the children that it’s herbs.
GREAT idea.
“What’s this, Mum, in the meatballs?”
“It’s cabbage. It’s called Cavolo Nero cabbage.”
(pause)
“Mmm. Nice.”
And so that was it.
I love the earthy flavour that the cabbage gives to the meatballs and you’re getting an extra bit of veggie in there that you don’t really expect. I also love the colour they give. The girls ate theirs with some tomato sauce and gluten-free pasta but we ate ours with fried courgette strips.
Turkey and Cavolo Nero Cabbage Meatballs
(AIP, Gluten Free, Dairy-Free, Nut-Free, Nightshade-Free, Paleo, Primal)
Serves 4
Ingredients
400g turkey mince (I used breast meat here because it’s all I could get, but thigh would be good too)
1 garlic clove, peeled and chopped
3 Cavolo Nero leaves, the central tough stalk removed and the leaves chopped fairly finely
a pinch of salt
coconut oil, for frying
Method
First, empty the mince into a mixing bowl. Add the chopped garlic and the chopped Cavolo Nero leaves and the pinch of salt and mix well, but don’t over-mix.
Heat 1 tbsp oil in a largeish frying pan and, forming the mince mixture into small meatballs, drop them gently into the pan. You might need to do this in batches, if you have a smaller pan – don’t overcrowd them or you might find that they steam cook rather than fry and turn golden.
I brown the meatballs, turning them on all sides and cooking for around 5-10 minutes and then finish them off in the oven, at gas mark 6/200ºC/400ºF for another 10-15 minutes, until fully cooked through. This way, you’ve got the hob free for your veggies or side dishes that you’re going to serve them with.
They’re also lovely hot or cold – keep a batch in the fridge and take them out on a picnic now the weather’s getting warmer.
Posted by
Jo Romero
at
20:33
Email ThisBlogThis!Share to TwitterShare to FacebookShare to Pinterest
Links to this post
Labels:
AIP,
auto immune protocol,
cheap,
clean eating,
dairy free,
dairy-free,
elimination diet,
everything,
gluten-free,
grain-free,
nut-free,
paleo,
paleo diet,
primal
| Reactions: |
Friday, 24 April 2015
Sweet Potato Hash Browns with Bacon and Egg
Mmmm… breakfast.
Looks lush, yes?
The good news is that, despite appearances, this recipe is AIP-compliant (just leave the egg out if you’re eating AIP – the rest is fine) – it’s also paleo, primal, gluten and nut free.
So how did it come about? Well, remember my Sweet Potato Shoestring Fries recipe? Well one day I decided to eat them with bacon and a runny fried egg. It worked so well, I had to tell you all about it.
So here goes.
Sweet Potato Hash Browns with Bacon and Egg
Serves 2
Ingredients
1 tbsp mild, flavourless coconut oil or duck fat
1 medium-sized white sweet potato (I used Sweetbok potatoes from Ocado)
pinch of salt
4 rashers of streaky bacon
2 eggs
handful of spinach of other greens, to serve.
Method
First, peel the sweet potato and then run a julienne peeler along it, or just cut it up into tiny strips.
Heat the oil in a large frying pan and dump in the sweet potato strips, stir-frying on a medium heat. they’ll start to soften and turn golden and crispy in about 5-6 minutes. Stir them occasionally so they brown on evenly. They might even crispen up and stick together a bit. This is good. Season with a little pinch of salt. Go easy. You’re adding bacon, which is often quite salty enough.
Next, grill the bacon until crisp and cooked through, turning once.
Push the now-cooked sweet potato strips over to one side of the pan and fry the eggs.
Serve the sweet potato hash browns with the cooked bacon and the egg on top. I usually wash a couple of handfuls of spinach and quickly wilt them in the pan I cooked the hash browns in. The leaves wilt in seconds and I serve that alongside.
* Here’s the julienne peeler I use for this recipe. It’s cheap and makes strips out of sweet potatoes, courgettes, cucumbers in minutes. I usually ‘peel’ the veggies straight into the pan as the fat melts. It’s also small and easy to stow away in a drawer. It works just like a peeler but cuts as it goes. Find more details below (affiliate link).
Posted by
Jo Romero
at
09:24
Email ThisBlogThis!Share to TwitterShare to FacebookShare to Pinterest
Links to this post
Labels:
AIP,
auto immune protocol,
breakfast,
cheap,
clean eating,
elimination diet,
everything,
gluten-free,
grain-free,
healthy,
healthy comfort food,
nut-free,
paleo,
paleo diet,
primal,
quick,
veggies
| Reactions: |
Tuesday, 21 April 2015
Mickey Trescott Has An Answer To Your AIP Batch Cooking Needs And It’s Awesome
So… I’m a little bit late to the party with this one, but OH MY GOODNESS look at this.
Mickey Trescott, blogger at Autoimmune Paleo, and author of the Autoimmune Paleo Cookbook has put together something that’s so useful for anyone on AIP, whether you’ve just started or if you’ve been doing it ages. She’s set up AIP Batch Cook, which is a programme designed to take some of the stress (and much of the Googling – trust me, I’ve been there) out of batch cooking on the autoimmune protocol.
Each session of AIP Batch Cook includes a programme guide, a one-week meal plan for breakfast lunch and dinner (obviously all AIP-compliant), two instructional videos, shopping lists, chop lists and tool lists – for everything you need to prepare before you start cooking – and also video tutorials on how to make bone broth, render your own cooking fat and making kombucha. You also get digital versions of every recipe that you cook to keep and refer to later, so you can do it all over again.
In the videos, you cook with Mickey in real time, so it’s like having her there in the kitchen with you.
But why is batch cooking important, I hear you ask.
The thing is, because of all the cooking from scratch you do on the paleo or autoimmune protocol diets, to keep some of your sanity and get yourself out of the kitchen once in a while it’s a good idea to prepare a lot of the foods you’re going to be making in the week, in advance. Some weeks I skip this, and I really do see the difference – just the few minutes every meal that you don’t need to spend chopping and can just reheat something you already made, or even just throwing some ready-prepped veg into a pan makes a big difference to your time in the week.
More good news? Membership to Mickey’s AIP Batch Cook programme is on a special launch sale until 8th May (it will go up to full price on the 9th).
Do go check it out.
*This post contains some affiliate links. What this means is that if you click on the link in the post and decide to make a purchase, I make a small commission on that sale. It doesn’t cost you a penny more than it would normally, and it helps me keep the blog going. Check out my ‘affiliate’ section for more details.
Posted by
Jo Romero
at
14:19
Email ThisBlogThis!Share to TwitterShare to FacebookShare to Pinterest
Links to this post
Labels:
AIP,
auto immune protocol,
clean eating,
dairy free,
dairy-free,
everything,
gluten-free,
grain-free,
how to guides,
nightshade-free,
nut-free,
paleo,
paleo diet
| Reactions: |
Monday, 20 April 2015
Pulled Pork and Zoodles (AIP)
This was a ‘throw it all together out of leftovers’ kind of a lunch that I made for my husband and I last week. But it was totally awesome. And it’s more of an idea than an actual recipe – it’s so simple to make. But I had to share it with you.
I cook quite a few joints of meat so I often have some leftover in the fridge, to last me a few days. And by about the third day I’m often getting a bit bored thinking about how to use it up.
But this is a great little idea to have up your sleeve for using up any leftover cooked meats. It would work well with chicken, pork, even beef. The secret is to cut it up small, into strips, so it heats through quickly and thoroughly.
You could use pork that you’ve previously cooked in a marinade or pork that you’ve cooked plain, it’s up to you.
Pulled Pork and Zoodles
Serves 2
Ingredients
2 courgettes/zucchini
1 medium-sized carrot
1 tbsp avocado oil
couple of handfuls of leftover pulled pork
pinch of garlic salt
Method
First, trim the ends off the zucchini/courgette and slice them into thin, noodle-like strips with a peeler and a knife or a julienne peeler that does it all for you. Or a spiralizer, if you have one. Do the same for the carrot.
Heat the avocado oil in a large frying pan or wok and add the leftover pulled pork, breaking it up into smaller pieces with your fingers, as you drop it in. Stir-fry on a lowish heat for a few minutes, until the pork is heated through. Turn up the heat and the pork will start to turn crisp and more golden at the edges. Once the pork is heated through, add the vegetable strips and stir-fry everything together. They’ll wilt down and cook through in 2-3 minutes. Add a pinch of the garlic salt and mix well.
Serve hot.
Here’s the julienne peeler I use to make the courgettes and carrots for this recipe – it’s cheaper than a standard spiraliser and it’s small too – so it’s easy to stow away in a drawer if you’re not using it. Click on the link for more details (affiliate link):
I’ve entered this recipe into Phoenix Helix’s AIP Recipe Roundtable – go have a look for more AIP meal inspiration…
Posted by
Jo Romero
at
04:36
Email ThisBlogThis!Share to TwitterShare to FacebookShare to Pinterest
Links to this post
Labels:
AIP,
auto immune protocol,
clean eating,
dairy free,
dairy-free,
elimination diet,
everything,
gluten-free,
grain-free,
healthy,
healthy comfort food,
low carb,
nut-free,
paleo,
paleo diet,
primal
| Reactions: |
Wednesday, 15 April 2015
The Best AIP Pulled Pork and Garlic Fried Tostones (aka Burrito Night)
So. Before I stopped eating wheat and dairy, we would have what we called Burrito Night at home – pulled pork, rice, coriander leaves, lime, grated cheese, salsas and beans – all rolled up in a big fat tortilla wrap with a generous blob of sour cream.
And when I stopped eating (most of) those things, I still missed Burrito Night.
So I started to make this:
And when I stopped eating (most of) those things, I still missed Burrito Night.
So I started to make this:
This is my favourite dinner to cook, because it looks like you’ve made a real effort, but you haven’t even really tried. Just 10 minutes before you wanted to eat you just chopped up an avocado and fried some green plantain slices.
This is how you do it.
Pulled Pork
I almost always make my pulled pork in the slow cooker because it takes care of it all for me without me needing to worry about burning it. Here’s the method I use – and here’s the recipe for this pulled pork, cooked with fresh thyme and sea salt.
Tostones
I’ve only recently been able to get hold of plantains from one of the local supermarkets, and immediately I fell in love with them. Frying them while they’re green gives you crispy on the outside but fluffy in the middle tostones that remind me of the best roast potatoes (before I gave up potatoes). YUM. I slice them up, fry them in coconut oil and then plunge them into cold water with chopped garlic floating about in it. Then I squash them flat with the bottom of a saucer and give them a second frying. When they’re crisp and hot I lift them out and dredge them with salt. Here’s the method for the tostones, here (I don’t make the beans, by the way).
Chunky Guac
Peel, de-stone and chop a ripe avocado into chunks and plonk it into a bowl. Squeeze over a good pinch of salt and the juice from half a lime. Give it a stir and add freshly chopped coriander (cilantro) leaves. Job done.
Salad
I use whatever salad I have handy in the fridge, but this one was a combo of watercress, rocket and spinach leaves with a good drizzle of extra virgin olive oil over.
What do you reckon? Fancy a pulled pork dinner like this?
Posted by
Jo Romero
at
16:59
Email ThisBlogThis!Share to TwitterShare to FacebookShare to Pinterest
Links to this post
Labels:
AIP,
auto immune protocol,
clean eating,
dairy free,
dairy-free,
elimination diet,
everything,
gluten-free,
grain-free,
healthy,
healthy comfort food,
nut-free,
paleo,
paleo diet,
primal
| Reactions: |
Monday, 13 April 2015
Thyme and Sea Salt Pulled Pork Shoulder
Some people, they say to me: ‘I don’t know how you do your diet – there’s just so much cooking. I couldn’t do it.’
And I say: ‘Well, it’s a good job I have little recipes like THIS up my sleeve.’
Pulled Pork.
With fresh thyme and flaky sea salt.
Done in the slow cooker.
Three ingredients.
Took 30 seconds of actual work.
Yep, you can chuck this lot in the slow cooker at lunchtime and it’ll be ready for dinnertime (in our house that’s about 6pm). You won’t have to think about it, stir, check on it, NOTHING. The only thought you’ll give it will be as it cooks and its aroma wafts beautifully around your home.
This would be lovely with some old-fashioned, traditional gravy and apple sauce or you could dish it up as part of a salad or what we call ‘Burrito Night’ (even though there are no beans or, um… burritos). Tuck in!
Thyme and Sea Salt Pulled Pork Shoulder
Serves 6
Ingredients
1.4kg bone-in pork shoulder joint
4-5 fresh thyme sprigs
good pinch of sea salt
Method
Get ready, because this is going to be short.
Plug in your slow cooker and set it to ‘high’. Dump the pork shoulder into the crockpot. Sprinkle with salt and give the thyme sprigs a rinse under the tap. Shake them off and strew over and around the pork. Replace the lid.
Leave to cook for 5-6 hours, or until the pork is fall-apart tender. Lift out of the crockpot (watch out as there will now be meat juices in the pot) and onto a large serving plate. Shred with two forks and then pour over a little of the cooking juices over the top add moisture and flavour. Serve straight away.
Posted by
Jo Romero
at
07:05
Email ThisBlogThis!Share to TwitterShare to FacebookShare to Pinterest
Links to this post
Labels:
AIP,
auto immune protocol,
clean eating,
dairy free,
dairy-free,
elimination diet,
everything,
gluten-free,
grain-free,
paleo,
paleo diet,
slow cooker,
slow-roast
| Reactions: |
Wednesday, 8 April 2015
Lemony, Buttery Pork Chops
Nowadays, my husband doesn’t regularly cook.
But he used to.
When we were first together, he would cook me one particular dish every week, with a big pile of fluffy, buttery mashed potato. It’s our anniversary at the end of the month (11 years – cripes!) and this got me thinking about what we used to do together at the beginning of our adventure. And one of those things was to sit down together in the evening and eat buttery pork chops. So I asked him to show me how to make it.
And he did.
The first thing you need to know is that as this only has four ingredients in the whole recipe, it’s good to get the best quality pork chops you can. These chops are from free-range pork from Farmer’s Choice – an online butcher in the UK specialising in free-range meats as well as fish and game. It helps to have a little fat on the chop too – as it’ll render down a little bit while cooking and add FLAVOUR…
This recipe is paleo (hello, butter) but not AIP (you could always use ghee though to keep it AIP-compliant). It’s also primal, grain-free, gluten-free and just plain flippin’ gorgeous.
Four ingredients and 10-15 minutes is all you need to recreate this for yourself. Do it. You’ll be glad you did.
One bite in, and you get tender, buttery pork with a fresh lemon flavour. The darker bits, especially near the fat, the bits that caught a little in the pan – are full of the most intense flavour, too. Just saying.
I knew there was a reason I married this man.
Lemony, Buttery Pork Chops
Serves 2
Ingredients
2 pork chops, I used thick, bone-in chops from Farmer’s Choice
Good pinch of salt
1 tablespoon salted butter (use ghee to keep it 100% strict AIP-compliant)
juice of half a lemon
Method
Right. First, heat up a griddle or frying pan and melt the butter in it, over a low heat. Season the pork chops with the salt on both sides and then place them gently into the foaming butter.
Squeeze in the lemon juice and leave to cook on one side, for about 5 minutes – keep it on a low heat so it doesn’t burn on the outside before it’s cooked in the middle – and then flip it over and fry on the other side. Check it’s cooked – cut a little pocket into the thickest part of the chop just to make sure – and then lift it out and leave to rest on a plate. If you still see any pinkness or blood, put it back in the the pan and cook a bit longer.
After the chops are thoroughly cooked, and have had a 2-3 minute rest (this will keep them nice and juicy) serve them, with some of the pan juices spooned over the top.
I received a contribution towards the ingredients for this recipe from Farmer’s Choice.
Posted by
Jo Romero
at
06:42
Email ThisBlogThis!Share to TwitterShare to FacebookShare to Pinterest
Links to this post
Labels:
AIP,
auto immune protocol,
everything,
gluten-free,
nut-free,
paleo,
paleo diet,
primal
| Reactions: |
Friday, 3 April 2015
All For The Love of AIP Breads and Wraps: A Roundup
Because sometimes you really want to be able to wrap up some protein and veggies in something other than a lettuce leaf. Or you crave the chewy, doughy texture of bread – but you can’t eat ‘regular’ bread on the autoimmune protocol.
Here’s a roundup of some of the coolest AIP-compliant bread recipes that might just make your packed lunches that little bit easier…
Sweet Potato Lefse
This version of the Scandinavian Lefse was created by Laura, from Sweet Treats. She says it’s traditional to spread it with butter and sugar but this AIP version is actually quite sweet, so doesn’t need it.
Sweet Potato Pita Bread
This sweet potato pita bread, from Gabriella at Beyond The Bite, makes a great side dish, she says, to chicken soup, roasted garlic dip, and, well, anything actually. Check out the recipe on her website.
Plantain Taco Shells
Another one from Beyond The Bite – and check out these taco shells! I am soooo ready for these…. Gabriella filled hers with tuna and salad but I reckon they’d be super with some pulled pork and guac, too.
AIP Chapati
Sometimes, when you’ve got a saucy, aromatic curry, you just want something to dip it into. Like chapati. And there’s great news – because Bethany at Adventures in Partaking has blogged a recipe. It serves one, so it’s great for whipping up just for yourself as and when you need it.
AIP Bacon-Herb Biscuits
Don’t these look delicious? I take one look at these bacon herb biscuits and I’m hungry. They were created by Alaena of Grazed and Enthused. And the bonus is that you’ve probably got most (or all) of the ingredients to make them in your kitchen. Pinning these to make myself. They look gorgeous.
Plantain Tortillas
Another lovely recipe – this time plantain tortillas. There are just a few ingredients, too. Perfect with just about anything but Stephanie from the blog Fresh Tart reckons she’s making fish tacos with them. Save me one (or two), Stephanie? *bats eyelashes* There’s another recipe for plantain wraps on Simple and Merry, with extra tips and step by step pics. Go check it out.
Green Flatbread
If you’re after getting extra greens (and therefore nutrients) INTO your breads – and of course you are – here’s a great recipe from Petra8Paleo for green flatbread. As well as being AIP-compliant, it’s FODMAP friendly, too.
AIP Pita Bread
You’ll need sweet potato flour to make this pita recipe, from Alaena at Grazed and Enthused. She suggests eating it with AIP hummus, olive tapenade and salad or as a wrap for chicken salad. Oh, and she’s teasing us about a possible breakfast wrap, too. Check out her blog for more details.
Sweet Garlic Biscuits
Yep. Love the look of these sweet garlic biscuits from Gabriella from Beyond The Bite. And don’t worry if you haven’t yet reintroduced butter, because Bre’anna from He Won’t Know It’s Paleo has invented an AIP, dairy free butter substitute. Cool, right?
Still need AIP breads inspiration? Eileen from Phoenix Helix has a Pinterest board that’s well stocked with AIP bread and wrap recipes. Go check it out.
Some products that might be useful for your AIP bread-making projects (affiliate links):
Have you tried any of these? What are your favourite recipes for AIP compliant wraps and breads?
Here’s a roundup of some of the coolest AIP-compliant bread recipes that might just make your packed lunches that little bit easier…
Sweet Potato Lefse
This version of the Scandinavian Lefse was created by Laura, from Sweet Treats. She says it’s traditional to spread it with butter and sugar but this AIP version is actually quite sweet, so doesn’t need it.
Sweet Potato Pita Bread
This sweet potato pita bread, from Gabriella at Beyond The Bite, makes a great side dish, she says, to chicken soup, roasted garlic dip, and, well, anything actually. Check out the recipe on her website.
Plantain Taco Shells
Another one from Beyond The Bite – and check out these taco shells! I am soooo ready for these…. Gabriella filled hers with tuna and salad but I reckon they’d be super with some pulled pork and guac, too.
AIP Chapati
Sometimes, when you’ve got a saucy, aromatic curry, you just want something to dip it into. Like chapati. And there’s great news – because Bethany at Adventures in Partaking has blogged a recipe. It serves one, so it’s great for whipping up just for yourself as and when you need it.
AIP Bacon-Herb Biscuits
Don’t these look delicious? I take one look at these bacon herb biscuits and I’m hungry. They were created by Alaena of Grazed and Enthused. And the bonus is that you’ve probably got most (or all) of the ingredients to make them in your kitchen. Pinning these to make myself. They look gorgeous.
Plantain Tortillas
Another lovely recipe – this time plantain tortillas. There are just a few ingredients, too. Perfect with just about anything but Stephanie from the blog Fresh Tart reckons she’s making fish tacos with them. Save me one (or two), Stephanie? *bats eyelashes* There’s another recipe for plantain wraps on Simple and Merry, with extra tips and step by step pics. Go check it out.
Green Flatbread
If you’re after getting extra greens (and therefore nutrients) INTO your breads – and of course you are – here’s a great recipe from Petra8Paleo for green flatbread. As well as being AIP-compliant, it’s FODMAP friendly, too.
AIP Pita Bread
You’ll need sweet potato flour to make this pita recipe, from Alaena at Grazed and Enthused. She suggests eating it with AIP hummus, olive tapenade and salad or as a wrap for chicken salad. Oh, and she’s teasing us about a possible breakfast wrap, too. Check out her blog for more details.
Sweet Garlic Biscuits
Yep. Love the look of these sweet garlic biscuits from Gabriella from Beyond The Bite. And don’t worry if you haven’t yet reintroduced butter, because Bre’anna from He Won’t Know It’s Paleo has invented an AIP, dairy free butter substitute. Cool, right?
Still need AIP breads inspiration? Eileen from Phoenix Helix has a Pinterest board that’s well stocked with AIP bread and wrap recipes. Go check it out.
Some products that might be useful for your AIP bread-making projects (affiliate links):
Posted by
Jo Romero
at
08:20
Email ThisBlogThis!Share to TwitterShare to FacebookShare to Pinterest
Links to this post
Labels:
AIP,
auto immune protocol,
dairy free,
dairy-free,
everything,
gluten-free,
nightshade-free,
non allergy,
nut-free,
paleo,
paleo diet,
vegan,
vegetarian
| Reactions: |
Wednesday, 1 April 2015
Discovering Aitchbone Joint of Beef
What do you mean, you’ve never heard of aitchbone beef?
(To be honest, neither had I.)
I wrote an article recently for Yahoo! Lifestyle on ‘lost cuts’ of meat that butchers and chefs think we should be eating more of. There are so many cuts of meat that are falling by the wayside while people queue up to buy their pre-packaged chicken breasts, burgers and steaks. How about liver? Kidneys? Ox and pig cheeks? And then, of course, there’s this magnificent cut, called an aitchbone.
I had a Twitter convo with Ant from Well Hung Meat Co (which is where I buy my meat, each month) about the cut, which he proposed as one of the ‘lost cuts’ in danger of being forgotten completely. After a bit of messaging backwards and forwards about what it tasted like, he very kindly offered to cut one up and send it to me to photograph for the article and then cook for myself, to see what it was like. You know, to satisfy my curiosity. Was I excited. Like, TOTALLY.
The aitchbone, he told me, is a Victorian cut and could even actually date to earlier times. A lovely traditional, British, historic cut of meat. People have been eating it for around 200 years – at least. It’s lean, and can be roasted slowly or pot-roasted. Except with this one there was no way I was going to get it into a pot. It weighed over 6kg.
After a bit of online research I decided I was going to roast it slowwwwlly, to medium. A quick look at a reputable online roasting calculator revealed I had to cook it for nearly six hours.
NEARLY SIX HOURS?
NOPE.
I roasted it for 4 hours, at gas mark 5.
The smell of the beef cooking was amaaazzzing. I spent all morning thinking about thick gravy and spicy horseradish sauce. I took a peek 2 hours in. It had turned all burnished and the layer of fat on the outside had started to render down. I clapped my hands together a little bit (as you do) and quickly closed the oven door.
When the 4 hours were up, I gave it a prod – it felt about right, still a bit bouncy – then left it to rest while I went on the school run. It’s about 30 minutes. When I came back, I gingerly cut into the beef, hoping it wasn’t too raw on the inside. After all, I’d undercooked it by 2 hours, according to the roasting calculator.
But it wasn’t raw. It was WELL DONE. But I didn’t actually mind. Just look at it…
There were some pinkish slices at the centre of the joint, so I snaffled those up pretty quick. But OH MY GOODNESS the beef. Even my nine year old joined me at the kitchen worktop, gluttonously grabbing chunks of juicy, hot beef while I sliced it into it with my knife. We fought over the crispy bits that had meltingly tender beef on the other side. It was LUSCIOUS. And although it was cooked a little bit more well done than I had hoped for, it was still juicy and tender.
This episode taught me this:
You must try these forgotten cuts of meat – don’t just stick to your mince, sausages and chicken legs. It would be a shame if these cuts vanished – and I can tell you this was one of the best roast beef dinners we could remember (and my husband’s from Argentina and he’s precious about his beef). Embrace the kidneys, the liver, the cheeks, the trotters, the tongue – even the cuts that seem old-fashioned and have a reputation for being chewy and tough. Usually the secret’s all in the way you cook it. It’s morally right, too, if you’re a meat-eater (you eat the whole animal rather than a few bits of it) – all you need is a bit of advice on cooking and what it tastes good with.
Have you ever tried aitchbone? What are your favourite ‘lost cuts’ of meat?
Posted by
Jo Romero
at
07:17
Email ThisBlogThis!Share to TwitterShare to FacebookShare to Pinterest
Links to this post
Labels:
AIP,
auto immune protocol,
beef,
dairy free,
dairy-free,
everything,
gluten free,
gluten-free,
history,
low carb,
meat,
paleo,
paleo diet,
primal,
slow-roast
| Reactions: |
Subscribe to:
Posts (Atom)


