Steve’s Leaves have a new salad out that’s a mixture of salad leaves, rocket and chives… and Persian Watercress.
That’s it, there – that little frilly, dainty-looking leaf at the front of the plate. It’s quite delicate-looking but has a fragrant, peppery flavour. Steve’s Leaves sent me some to have a play with – and by far the best thing I did with it was this:
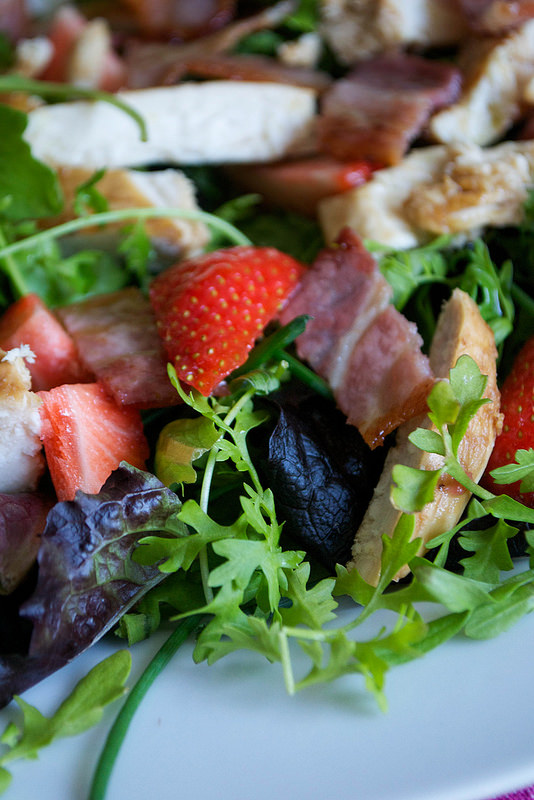
The strawberries are in there because their sweetness pairs so well with peppery flavours – and I’ve added the bacon for saltiness and crunch. The chicken adds protein and balances those flavours out – and I’ve drizzled it with a little Extra Virgin Olive Oil. Easy peasy.
Persian Watercress, Strawberry, Chicken and Bacon Salad
Serves 1
Grab a couple of big handfuls of the Persian Watercress salad and arrange on a plate. Grill or dry-fry 2 rashers of smoked, streaky bacon and chop into bite-sized pieces. Bash a chicken breast, covered with cling film, with a rolling pin until it’s a uniform thickness. Heat a griddle and cook the chicken in a little coconut oil until cooked through. Allow to rest before slicing into strips.
Next, wash 3-4 large strawberries and cut the green tops off. Cut them into wedges.
To assemble the salad, arrange the chicken and bacon over the top of the leaves and tuck in the strawberries. Drizzle with olive oil and give it a pinch of salt. Some chopped avocado would be good here, too.
Note: If you can’t get hold of Persian Watercress, use regular watercress instead, with a mixture of other leaves – snipped chives, rocket and raw spinach all all good.
Friday, 30 May 2014
Persian Watercress, Strawberry, Chicken and Bacon Salad
Posted by
Jo Romero
at
09:41
Email ThisBlogThis!Share to TwitterShare to FacebookShare to Pinterest
Links to this post
Labels:
AIP,
auto immune protocol,
dairy free,
dairy-free,
everything,
gluten free,
gluten-free,
paleo,
paleo diet
| Reactions: |
Wednesday, 28 May 2014
Coconut, Strawberry and Vanilla Ice Cream (Dairy and Refined Sugar Free)
Summer’s coming – and on the few warm days we have had, I’ve craved strawberry ice cream.
But I’m trying to be good – staying away from dairy and refined sugars which make my psoriasis worse.
Well, I found a way to enjoy a lovely, soft strawberry ice cream without any of the guilt.
Ladies and gentlemen, here’s my dairy-free strawberry ice cream made with all-natural ingredients. I hope you like it – it’s suitable for dairy-free, vegetarian, paleo, clean eating and elimination diets as well as the autoimmune protocol (AIP).
Coconut, Strawberry and Vanilla Ice Cream
Makes enough for 6-8 servings
Ingredients
400ml can of full-fat coconut milk
1 tsp gluten free vanilla extract (for strict AIP use vanilla powder – vanilla extract can only be used in the elimination stages of AIP if it’s cooked and the alcohol is burned off)
227g punnet of fresh strawberries
2 heaped tablespoons honey (or to taste) – use maple syrup for vegan
Method
Pour the coconut milk into a bowl and add the vanilla extract. Slice the green tops off the strawberries and add three quarters of them to the coconut milk along with the honey. Blend until smooth. Chop the remaining strawberries into small pieces and tumble these into the coconut milk mixture, stirring.
Pour this into a prepared ice cream maker and churn for 20 minutes, or until creamy and chilled. Scrape into a freezable container and freeze until ready to serve.
Just a couple of things – this ice cream tastes best when eaten within 1-2 days of making. If left in the freezer for too long it might turn rocky just like regular ice cream does. Just let it thaw for a bit for a softer texture before scooping and serving. And if you’re following the AIP or are sensitive to alcohol, then you might want to heat the vanilla extract up first, to get rid of any alcohol before adding it to your ice cream mixture.
But I’m trying to be good – staying away from dairy and refined sugars which make my psoriasis worse.
Ladies and gentlemen, here’s my dairy-free strawberry ice cream made with all-natural ingredients. I hope you like it – it’s suitable for dairy-free, vegetarian, paleo, clean eating and elimination diets as well as the autoimmune protocol (AIP).
Coconut, Strawberry and Vanilla Ice Cream
Makes enough for 6-8 servings
Ingredients
400ml can of full-fat coconut milk
1 tsp gluten free vanilla extract (for strict AIP use vanilla powder – vanilla extract can only be used in the elimination stages of AIP if it’s cooked and the alcohol is burned off)
227g punnet of fresh strawberries
2 heaped tablespoons honey (or to taste) – use maple syrup for vegan
Method
Pour the coconut milk into a bowl and add the vanilla extract. Slice the green tops off the strawberries and add three quarters of them to the coconut milk along with the honey. Blend until smooth. Chop the remaining strawberries into small pieces and tumble these into the coconut milk mixture, stirring.
Pour this into a prepared ice cream maker and churn for 20 minutes, or until creamy and chilled. Scrape into a freezable container and freeze until ready to serve.
Just a couple of things – this ice cream tastes best when eaten within 1-2 days of making. If left in the freezer for too long it might turn rocky just like regular ice cream does. Just let it thaw for a bit for a softer texture before scooping and serving. And if you’re following the AIP or are sensitive to alcohol, then you might want to heat the vanilla extract up first, to get rid of any alcohol before adding it to your ice cream mixture.
Posted by
Jo Romero
at
10:20
Email ThisBlogThis!Share to TwitterShare to FacebookShare to Pinterest
Links to this post
Labels:
AIP,
auto immune protocol,
clean eating,
conventional,
dairy free,
dairy-free,
elimination diet,
everything,
gluten-free,
paleo,
paleo diet,
vegan,
vegetarian
| Reactions: |
Tuesday, 27 May 2014
Boozy Amaretto and Vanilla-Roasted Plums
These plums might just change your life.
They came about after I had a punnet of ‘ripe at home’ plums. You know, those ones from the supermarket that never really fully ripen. I threw them on a roasting tray, dribbled over a bit of liqueur and some vanilla and they emerged, 20 minutes later – soft, sweet and infused with Amaretto. You could serve these hot with whipped cream or custard – or alongside some vanilla ice cream.
Here’s how you make them:
Wash and dry a punnet of plums and cut them in half, twisting so the two halves separate. Tease the stone out of the centre and throw it away.
Cut the now de-stoned plums into wedges and arrange in a single layer on a greaseproof-paper lined baking tray. Heat the oven up to 200ºC/gas mark 6.
Drizzle a teaspoonful of vanilla bean paste and 1 tbsp coconut oil over the plums and slosh over a glug of Amaretto liqueur. Toss everything together with your hands so they’re well-coated and slide into the oven for 20 minutes, or until soft.
What would you serve them with?
OK, well maybe not your life, but they are insanely good.
They came about after I had a punnet of ‘ripe at home’ plums. You know, those ones from the supermarket that never really fully ripen. I threw them on a roasting tray, dribbled over a bit of liqueur and some vanilla and they emerged, 20 minutes later – soft, sweet and infused with Amaretto. You could serve these hot with whipped cream or custard – or alongside some vanilla ice cream.
Here’s how you make them:
Wash and dry a punnet of plums and cut them in half, twisting so the two halves separate. Tease the stone out of the centre and throw it away.
Cut the now de-stoned plums into wedges and arrange in a single layer on a greaseproof-paper lined baking tray. Heat the oven up to 200ºC/gas mark 6.
Drizzle a teaspoonful of vanilla bean paste and 1 tbsp coconut oil over the plums and slosh over a glug of Amaretto liqueur. Toss everything together with your hands so they’re well-coated and slide into the oven for 20 minutes, or until soft.
What would you serve them with?
Posted by
Jo Romero
at
10:49
Email ThisBlogThis!Share to TwitterShare to FacebookShare to Pinterest
Links to this post
Labels:
dairy free,
dairy-free,
everything,
gluten-free,
paleo,
paleo diet,
vegan,
vegetarian
| Reactions: |
Friday, 23 May 2014
Breakfast Meatloaf
I’m not suggesting you get up at the crack of dawn and make this gorgeous meatloaf for breakfast, although I’d buy you a coffee if you did.
It was when I was leafing through Nigella’s book Kitchen that I saw the Ed’s Mother’s Meatloaf that she makes, with beef and onions, bacon and then eggs in the middle. And I thought – ‘Wow, I wish there was one that tasted like sausage instead of beef. That’d be a meatloaf and a half. And I’d eat that for breakfast.’
And so I made it.
Unlike Nigella’s recipe, there are no breadcrumbs in this meatloaf as I wanted to keep it gluten-free. Since I stopped regularly throwing breadcrumbs into everything I like the meatier texture anyway. The eggs and bacon are still there, yes, but I’ve used pork mince and flavoured it to taste like sausage.
This meatloaf, like Nigella’s, isn’t baked in a loaf tin – it’s just free-formed on a baking tray. Definitely allow it to cool just a little bit before cutting, as it will crumble a bit if you cut it still sizzling from the oven. And eat any leftovers for breakfast – or take it to work in a packed lunch. But do eat some for breakfast. It’s lovely.
Breakfast Meatloaf
Serves about 8
Ingredients
1 medium onion, peeled and finely chopped
1 tsp coconut oil (or other fat/oil of your choice)
good pinch of ground mace
1 tsp dried sage
pinch of salt
800g pork mince
3 eggs
15 rashers of streaky smoked bacon
Method
Preheat your oven to 200ºC/gas mark 6 and line a baking tray or shallow roasting tray with foil.
Melt the coconut oil in a frying pan and fry the onions until softened but not coloured (about 10 minutes). Tip into a large mixing bowl and allow to cool.
Once the onion is cooled, add the mace, sage and salt and stir until well combined. Add the pork mince and mix with your hands – but don’t overmix – until evenly combined. Put to one side.
Next, hard-boil the eggs. Drop (gently) the 3 eggs into a pan of simmering water and boil for 6 minutes. This way, you won’t end up with chalky yolks, they’ll be well-cooked, but slightly creamy. Rinse under cold running water and gently remove the shells. Put to one side while you assemble the meatloaf.
Tip half of the meat mixture out onto the foil-lined tray and pat it into an oval shape. Lay the now peeled eggs along the base of the meatloaf, each one touching the one in front. Gently pat the rest of the meat mixture over the eggs, to cover them.
Next, cover it all with the bacon, overlapping each rasher as you go, until the meatloaf is covered. Slide into the oven and cook for one hour, or until it’s fully cooked.
Once the hour is up, let the meatloaf rest for 10-15 minutes and then cut into chunky slices – this way, everyone will get a bit of egg in the centre.
Posted by
Jo Romero
at
06:06
Email ThisBlogThis!Share to TwitterShare to FacebookShare to Pinterest
Links to this post
Labels:
conventional,
dairy free,
dairy-free,
everything,
gluten-free,
paleo,
paleo diet
| Reactions: |
Wednesday, 21 May 2014
AIP Blueberry Cream Cups
One of the problems people face when they start on the autoimmune protocol or paleo diet is what the heck to have for dessert.
Desserts are tricky, because you’re not allowed dairy (no regular ice cream then), no grains (no cake) and no refined sugar (put that sorbet away now).
So for puddings, you have to get creative. And this fruity, creamy treat definitely hits the spot. Blueberries are full of vitamin C, fibre and could help heal the intestines. And coconut cream is full of good, natural fats. A drizzle of maple syrup is ok here, as it’s a natural sugar and its polyphenols could make it friendlier to your blood sugar levels than regular refined stuff.
Go on, try it. Bet you’ll love it.
AIP Paleo Blueberry Cream Cups
Makes 2-4 depending on the size of your shot glasses
Ingredients
70g frozen or fresh blueberries
1 tbsp maple syrup
250ml coconut cream, stored in a fridge overnight
Method
First, heat the blueberries in a small frying pan and stir in the maple syrup. As the blueberries soften, squish a couple of them with the back of a spoon to release their juices. Once you have a jammy, purple syrup but with most of the blueberries still whole, turn off the heat.
Open the chilled carton of coconut cream and squeeze out any watery liquid that has trickled to the bottom. Discard this. Squeeze the thick coconut cream into a bowl and scoop out half into a piping bag fitted with a large star-shaped nozzle.
Pour half the blueberry syrup into the coconut cream in the bowl and blend until smooth. Divide this mixture equally between the serving glasses (use shot glasses).
Pipe the coconut cream in the piping bag over the glasses and finish by drizzling with the blueberries and any syrup left in the pan.
Eat straight away, or cover with cling film and keep in the fridge until ready to serve.
Don’t fancy blueberries? Then try it with raspberries.
Quick note: if you’re storing this in the fridge, after a while the vibrant blueberry colour will fade – this is best made and eaten within an hour or so.
I’ve entered this recipe into Phoenix Helix’s AIP Recipe Roundtable – check it out for more AIP inspiration.
Posted by
Jo Romero
at
09:25
Email ThisBlogThis!Share to TwitterShare to FacebookShare to Pinterest
Links to this post
Labels:
AIP,
auto immune protocol,
everything,
gluten-free,
paleo,
paleo diet,
vegan,
vegetarian
| Reactions: |
Monday, 19 May 2014
Argentine Calamares a la Provenzal (Squid in Garlic and Parsley)
Before I went to Argentina I hated squid. It seemed rubbery and had no flavour.
And then one night we were invited for dinner at my husband’s friend Marcello’s house in Buenos Aires and they accidentally put a tub of this next to me, on the table.
I don’t think anyone else got a look in, it was so good. And don’t underestimate kids – my eight year old daughter loves this.
Squid has a bit of a reputation as being scary to cook, but it isn’t at all. It takes just 1-2 minutes to cook in a pan of slightly salted, simmering water.
Ingredients
300g fresh squid, cleaned and sliced into fine rings
1 clove garlic, peeled and finely chopped
handful fresh parsley, finely chopped
pinch of salt
1-2 tbsp Extra Virgin Olive Oil
1-2 tsp white wine vinegar (optional)
Method
Bring a pan of slightly salted water to a simmer on the stove. While that’s heating up, make the Provenzal dressing. Combine the garlic, parsley, salt, oil and vinegar, if using, in a medium-sized bowl that’s big enough to fit the squid rings in later. Put to one side.
Take the squid rings and gently drop them in the simmering water. Cook for 1-2 minutes – no more – until they’re firm and cooked through, but tender. Don’t leave the pan once you drop them in, it’s easy to overcook squid.
Drain the squid rings and place them, still hot, into the garlic and parsley marinade. Stir to coat the squid well and leave to cool. Once cool, refrigerate until ready to serve. Best to allow the squid to come to room temperature for 20 minutes or so before serving, so the full flavours of the marinade can develop.
Posted by
Jo Romero
at
09:32
Email ThisBlogThis!Share to TwitterShare to FacebookShare to Pinterest
Links to this post
Labels:
AIP,
auto immune protocol,
autoimmune protocol,
conventional,
dairy free,
dairy-free,
everything,
gluten-free,
paleo,
paleo diet
| Reactions: |
Friday, 16 May 2014
Glorious! Limited Edition Soups: Brazilian and Persian
If you didn’t know what Brazilian food is like, then you will by the time summer is over. Ahead of the World Cup, it seems everyone has gone Brazil mad – including Glorious, who have released two Brazil-inspired soups, which they sent me to try, along with their new Persian-spiced soup as well.
I am a bit of a fan of Glorious soups – I love how they are always trying different spices and take inspiration from around the world. Here’s how I got on…
This one’s spicy and (quite brightly) yellow and full of good things like butternut squash, sweet potato and turmeric. It has a tang from the lime juice and also contains plantains along with some Basmati rice for texture. I liked it. It’s part of their SkinnyLicious range, and packs 126kcal per half-pot portion. You’ll love it if you like a bit of spice to your soup and also has a really unique flavour – it’s not like any soup I’ve ever tasted before.
Brazilian Beef and Black Eye Bean:
This isn’t called a ‘meal soup’ for nothing. It’s filling and has bags of flavour. It was by far my favourite of the three – red wine, tomatoes, beef and then zesty lime and the black beans to fill you up. Again, it’s a hot, spicy little number (that’ll be the chipotle chillies) but I just loved how the flavours mingled together. The ingredients list mentions cocoa powder, too…
Persian Spiced Tomato:
I actually ate this soup for breakfast one day (yes, I eat weird breakfasts…) – it’s got a kick but it was the mildest in spice of the three soups, being aromatic and fragrant more than hot and spicy. There are exotic ingredients like saffron, Ras El Hanout and galangal in it too. The tomatoes are roasted and it does give an extra richness to the soup, which has quite a peppery flavour, along with all those other warming spices. This is part of the SkinnyLicious range, like the Rio Carnival soup, with 114kcal per half pot portion.
Have you tried the new Glorious! soups? Which are your favourites?
Posted by
Jo Romero
at
09:32
Email ThisBlogThis!Share to TwitterShare to FacebookShare to Pinterest
Links to this post
Labels:
conventional,
everything
| Reactions: |
Wednesday, 14 May 2014
Brazilian Chicken, Mozzarella and Guacamole Quesadillas
Once I’d tried Encona’s Brazilian BBQ sauce I started to get quite hooked on it. Especially with chicken.
You’ll remember the Brazilian chicken legs with coriander and lime rice I made a little while back – well I loved the sauce so much I just kept buying chicken thighs and sloshing it all over them before roasting. Inevitably, I ended up with quite a few leftovers. And this was the best way I could think of using them all up.
You don’t have to consider this recipe with only the Brazilian marinade (although it’s spiciness is oozily tempered by the mozzarella and cool, creamy guac) – any leftover roasted chicken will do. Try it with jerk chicken, Mexican fajita-type spice rubs – my tongue tingles when I think of a trendy garam masala version of this, too.
But anyway. I’ve wittered on enough. Here’s how you do it.
Brazilian Chicken, Mozzarella and Guacamole Quesadillas
Serves 1
Ingredients
1 tsp olive oil
1 plain tortilla wrap
handful of leftover chicken that’s been cooked in the marinade of your choice
1 small avocado, peeled and stoned
juice of half a lime
small handful fresh coriander leaves
pinch of salt
small handful grated mozzarella
Method
Get out a griddle pan and place it on a medium heat. Brush with a little olive oil.
Lay out the tortilla wrap and sprinkle two-thirds of the mozzarella over one half, then flake over the cooked chicken. Quickly make up the guacamole by mashing the avocado with the lime juice, coriander and a pinch of salt and spread this over the top of the chicken. Sprinkle over the remaining mozzarella.
Fold the tortilla over, to make a half-moon shape and carefully lay it down on the griddle pan. Leave it there for about 2 minutes, by which time you should have those distinctive score-lines on one side, and the cheese will be melted. Flip over, and griddle for a few minutes on the other side, until the cheese has melted, the tortilla is crisp and the chicken is heated through.
Transfer the quesadilla to a board and chop into wedges. Eat immediately.
What do you think? Fancy one?
Posted by
Jo Romero
at
10:18
Email ThisBlogThis!Share to TwitterShare to FacebookShare to Pinterest
Links to this post
Labels:
conventional,
everything
| Reactions: |
Monday, 12 May 2014
Argentine Chocolate and Dulce de Leche Celebration Cake
I know. I’m sorry. (Actually I’m not).
I created it from one of my husband’s memories of a chocolate cake he ate in Argentina, when he was little. He’s been banging on about this cake for ages, so when I was able to get my hands on a big 900g jar of dulce de leche I made it for him.
It took quite a few attempts at this cake to get it just right. I felt it was important to use actual chocolate – rather than cocoa powder – in the cake itself – so eventually found a dark, 80% cocoa bar of chocolate that worked just right. And then the type of dulce de leche is important too – you can buy two main types of dulce de leche in Argentina. The first – ‘regular’ dulce de leche – is milky and smooth but also slightly runny. The second – which is what you need for filling cakes and general baking – is dulce de leche repostero, a thicker, drier version that doesn’t ooze down the sides of a finished cake but stands proud, between the two dark layers of chocolate cake. Cuts into 10-12 slices.
IngredientsFor the cake:
150g butter, slightly softened
125g golden caster sugar
3 eggs
80g dark chocolate, with 80% cocoa solids
1 tsp vanilla essence
150g plain flour
2 tsp baking powder
2 tbsp milk
approx. 8 heaped dessertspoons dulce de leche repostero
120g dark chocolate, 80% solids
100ml double cream
First, make the cake. Preheat the oven to gas mark 5/190ºC/375ºF and grease and line two sandwich tins. Place the chocolate in a small bowl and set it over a pan of gently simmering water (don’t let the water touch the bottom of the bowl) until melted. Set to one side. In a mixing bowl, beat together the butter and sugar until smooth. Stir in the eggs and then pour in the melted chocolate. Mix well and add the vanilla essence. Once the cake mixture is smooth, sift in the flour and baking powder and trickle in the milk. Stir well.
To make the ganache, melt together the chocolate and double cream in a bowl over a pan of simmering water and stir together to form a thick, glossy chocolate ganache. Allow to cool for a minute or so and then pour over the centre of the cake, allowing the ganache to fall and billow out down the sides. It will set and harden as it cools, or you can just dig in now and cut into fat wedges.
So… who wants a slice?
Did you know that I’ve written two ebooks on the food of Argentina? Check them out on Amazon here (affiliate links)…
Posted by
Jo Romero
at
10:50
Email ThisBlogThis!Share to TwitterShare to FacebookShare to Pinterest
Links to this post
Labels:
argentina,
conventional,
everything,
indulgent (non-allergy)
| Reactions: |
Friday, 9 May 2014
Sticky Braised Oxtail with Bacon and Marmite
Pulled pork is now so popular that I sometimes wonder where we’ll be looking next for our meaty cravings. Well I know where it will be – it’ll be oxtail.
Some people I know still get squeamish about oxtail, but there’s absolutely no need to be. For a start, it’s not like you’re bringing home a hairy, swinging tail from the butcher’s – it’s all tidied up and cut up into knobbly coins for you. And yes, there’s quite a bit of cartilage and bone in there, but you’ll be surprised at how much meat flakes off it after an afternoon in the oven. And anyway, all that cartilage – in the form of collagen – is supposed to help you stay looking younger. Honestly.
Now. Don’t be put off if you are a Marmite hater – you can’t really taste a strong Marmite flavour in the recipe, but it does lend a sticky, dark sweetness after it’s been simmering away with the meat for six hours. My children love this – and it’s cheap, too.
Sticky Braised Oxtail with Marmite
Serves 6
Ingredients
2 oxtails, cut up into discs (your butcher will do this for you)
1 onion, peeled and roughly chopped
75g bacon lardons
500ml beef stock
half to one teaspoon Marmite
Method
First, roast the oxtail pieces. Heat the oven up to gas mark 7/220ºC and tumble the oxtail pieces onto a shallow roasting tray. Sprinkle with a little salt and roast for 15 minutes, until they’ve just started to turn slightly golden from the heat.
Meanwhile, heat the bacon lardons in a frying pan and fry, until the marbled fat begins to melt. Throw in the onions and fry gently until softened. Once the onions are soft and the bacon is golden, drain off any excess fat in the pan and then pour in the beef stock. Bring it to a simmer, stirring in the Marmite too, and put to one side.
Take the oxtail pieces out of the oven and, using tongs, transfer them to a casserole dish with a lid. Pour the bacon and stock mixture over the top, replace the lid and slide into the oven, turning it down to gas mark 3/160ºC as you close the oven door.
Leave to cook gently for 6 hours.
Once the 6 hours are up, remove the lid. You should have soft, tender meat that falls easily from the bone and a reduced, if slightly oily, dark gravy.
Lift the oxtail pieces out onto a chopping board or plate and scrape off the meat and fat from the joints, getting rid of the bones. Using a ladle, remove most of the oily top layer from the gravy and discard. Add the shredded beef back in to the sauce, if needed, and serve.
How do you like oxtail? What’s your favourite oxtail recipe?
Posted by
Jo Romero
at
11:48
Email ThisBlogThis!Share to TwitterShare to FacebookShare to Pinterest
Links to this post
Labels:
conventional,
dairy free,
dairy-free,
everything
| Reactions: |
Thursday, 8 May 2014
Nairn’s Muesli Breaks Oatcakes
Nairns – known for their oaty treats – have a new snack out, called Muesli Breaks.
They’re wheat-free (but not gluten-free) and contain a mixture of oats, currants, sunflower seeds and pumpkin seeds.
The oatcakes come in a box of 8 packets, each containing two oatcakes – so I can see that they would be good for packing in your bag and just having around should you get a snack attack somewhere. And, if you do, they’re a good alternative to chocolate bars or other unhealthy things that tempt you while you’re out and about – as they contain just 56 calories per oatcake.
They taste sweet – you can detect the demerara sugar that gives the oatcake a lovely toffee flavour – and then little bursts of sweetness from the currants. The seeds remind you that you’re doing your body some good, with the fibre and the slow-energy releasing oats, too.
The lines across the oatcakes seem to be for decoration as they don’t tend to break along them, should you want to snap one in half. But that’s nothing really, is it? And they’re quite sturdy and dippable – leading me to adopt a new oatcake and cuppa ritual before picking up the girls from school.
I liked them.
Nairn’s do a gluten-free oatcake, so – although I don’t know how tricky it is to make – I think it’s a bit of a shame they didn’t just go the whole hog with these and make them gluten free as well. I know of some people that are intolerant to wheat, but there are a lot more who find gluten a problem.
To find out more about these oatcakes visit the Nairn’s website.
Posted by
Jo Romero
at
06:45
Email ThisBlogThis!Share to TwitterShare to FacebookShare to Pinterest
Links to this post
Labels:
conventional,
everything
| Reactions: |
Tuesday, 6 May 2014
AIP Paleo Tuna Cucumber and Basil Bites
Snacks can be tough on AIP. It’s OK for you Paleo peeps, if you get hungry, you can just boil an egg. But we’re not allowed eggs, so we have to be creative with our snack time, seeing as the good old pre-Paleo nibble of toast and peanut butter isn’t allowed either (and yes, I do miss that).
This is a quick snack that is surprisingly filling. I think it must be the protein in the tuna and the fat in the avocado, but I didn’t need a top up for quite a few hours after eating these.
It’s a fairly unlikely combination, but the basil works beautifully with the avocado and tuna, giving it a fragrant, almost sweet, peppery flavour. A perfect little snack, packed lunch or a party nibble.
A quick note: black pepper’s not recommended on the autoimmune protocol, although while eating these I craved some ground over the top. If you’ve reintroduced black pepper successfully, then you might want to add a pinch. But if not, the peppery basil helps it along anyway.
AIP Paleo Tuna Cucumber and Basil Bites
Makes 8
Ingredients
90g tinned tuna, drained
1 ripe avocado
small handful basil leaves, sliced thinly
1 lemon, cut into 8 wedges
about one quarter of a cucumber (or 8 fairly chunky slices)
Method
Get out a bowl and mash the tuna and the avocado together. Add the sliced basil leaves, reserving a tablespoon of the shredded leaves for the topping later. Squeeze in the juice from one of the lemon wedges and give everything a good stir. Have a taste, adding a little salt if you think it needs it, or more basil or lemon.
When you’re ready to eat, wash the cucumber and dry it and then slice it into eight rounds. Pile a teaspoon of the tuna mixture on top of each cucumber slice and finish with a small scattering of the remaining basil leaves on top. Serve, with the lemon wedges alongside.
What do you think? Thumbs up?
Check out my ebook on AIP and Paleo snacks and quick lunches, here on Amazon (affiliate link):
Posted by
Jo Romero
at
11:04
Email ThisBlogThis!Share to TwitterShare to FacebookShare to Pinterest
Links to this post
Labels:
AIP,
auto immune protocol,
dairy free,
dairy-free,
everything,
gluten-free,
paleo,
paleo diet
| Reactions: |
Friday, 2 May 2014
29 AIP (Auto Immune Protocol) Paleo Breakfast Ideas
Ok. Let’s talk breakfast. Eggs, blueberry muffins, coffee, cereal, toast, croissants… lovely. Except when you’re on the auto immune protocol, a diet designed to help heal your body and reduce the symptoms of autoimmune disease, you’re not allowed any of this.
A lot of conventional breakfasts are packed with sugar, gluten, dairy, grains – which you can’t have on AIP. So what DO you eat for breakfast? Well here are 29 AIP breakfast ideas to help you out. You’ll see that avocado is mentioned a few times here – it’s become my egg substitute (and works brilliantly with salty bacon, which helps, too)…
1. Coconut milk smoothie made from a 400ml can of coconut milk, a handful of frozen blueberries, and half a banana. Add a dash of vanilla extract if you’re ok with that, too.
2. AIP Banana and Coconut Pancakes
3. Pork and Leek Patties
4. Beef patties
5. Chicken soup – made from simmering leftover shredded chicken, spring onion, ginger, garlic and greens in chicken broth.
6. Leftover meats with vegetables – like sliced meatloaf, meatballs, roasted meats, patties etc.
7. AIP Breakfast Porridge
8. Green Plantain Pancakes
9. Beef Liver Paté with stir-fried greens
10. AIP Plantain wraps – just roll up with your favourite filings and out the door you go
11. Paleo Autoimmune Granola
12. Streaky bacon, half an avocado and stir-fried veggies – try grated courgette (zucchini) and carrot fried in a little coconut oil until softened and seasoned with salt
13. Breakfast Hash – this pork, sweet potato and red onion hash is perfect for breakfast as it has a slight sausage flavour thanks to the pinch of mace. Use your favourite minced meat – turkey and chicken work well, too.
14. Ginger Chicken with Courgette Noodles
15. Quick Bramley Apple Pie Pudding
16. Frozen Berries with Whipped Coconut Cream
17. Salmon fillet pan-fried in coconut oil with stir-fried vegetables and avocado.
18. Leftover cooked roasted shredded chicken with greens, avocado and a ladleful of freshly made chicken broth (this is my favourite breakfast the morning after I put a crockpot on to make bone broth overnight).
19. AIP Macaroons – One thing you miss on AIP is the convenience of grabbing a croissant out of the packet if you’re in a real rush first thing in the morning. These macaroons are lovely – I’ve made them – and are handy for when you just need to get out of the door quickly, or keep you going with a bite until you can cook something more substantial
20. Lemon Blueberry Cupcakes – I’d have one just to keep me going if I was in a rush – but you’d still have to eat something ‘proper’ later on…
21. AIP Argentine Puchero – or any leftover stew – just spoon any leftovers of this into a bowl and reheat – you won’t be hungry again until lunchtime – no snacking required!
22. Smoked salmon with salad greens, olive oil and avocado
23. AIP Cookies – this recipe includes chocolate chips – just leave them out for an AIP-compliant cookie to have handy for a quick bite in the morning before you can get proper breakfast started
24. Vegetable soup – just veggies fried with onion and then blitzed with hot stock – a good way to get broth into your diet
25. Leftover shredded cooked meat, bacon, mushrooms, spring onion and courgettes – to make a small stir-fry, perfect for a quick veggie-packed breakfast
26. Prawns/shrimp/crayfish salad with lettuce, sliced avocado – with an apple cider and olive oil dressing if you like
27. Flaked cooked salmon with raw spinach leaves, olive oil and black olives
28. Green Smoothie – made with kale, apple celery – lots of recipes for these online (just make sure they’re AIP compliant and don’t contain yoghurt)
29. Butternut Squash, Kale, Ground Beef Breakfast Bowl – this recipe includes garam masala and curry spices – just omit the spices as they’re not AIP compliant, and use a pinch of mace and dried thyme instead.
On AIP? What are your favourite breakfasts to add to this list?
Looking for more AIP recipe ideas? Check out my Kindle book, Simple Autoimmune Paleo Comfort Food for 30+ recipes, including AIP pancakes, slow-roasted pork with sea salt and rosemary and coconut and date fudge. The book is available on Amazon, to be downloaded worldwide. Or, have a look at this AIP community cookbook, 85 Amazing AIP Breakfasts, available to download now.
Posted by
Jo Romero
at
21:43
Email ThisBlogThis!Share to TwitterShare to FacebookShare to Pinterest
Links to this post
Labels:
AIP,
auto immune protocol,
dairy free,
dairy-free,
everything,
paleo,
paleo diet
| Reactions: |
Subscribe to:
Posts (Atom)


