Wednesday, 31 July 2013

Canela Coffee Shop, El Palomar, Buenos Aires

On a warm afternoon in Buenos Aires, it was decided that my husband and I should leave the children with family and venture out to have a coffee by ourselves as a kind of a ‘date’. For a few days he’d been talking about going along to Canela (it means ‘cinnamon’) so we decided to drive into El Palomar and grab a drink and a tostada. 


canela, buenos aires


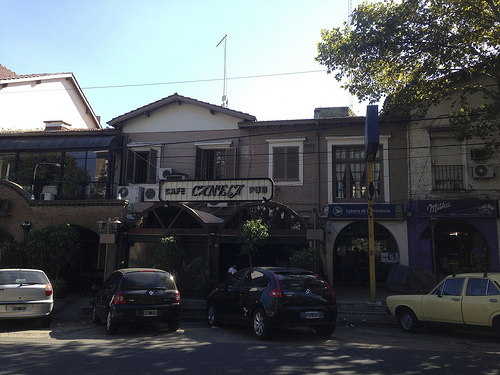
Canela is a big coffee shop in the centre of El Palomar, just outside Buenos Aires. It’s relatively quiet in the daytime but has a real buzz at night, where it becomes a kind of coffee shop/pub. There’s not a huge drinking culture in Argentina, you’re more likely to drink coffee at a football match than beer and enjoy a cappuccino before a night out instead of a few glasses of wine.


tostadas in canela, buenos aires


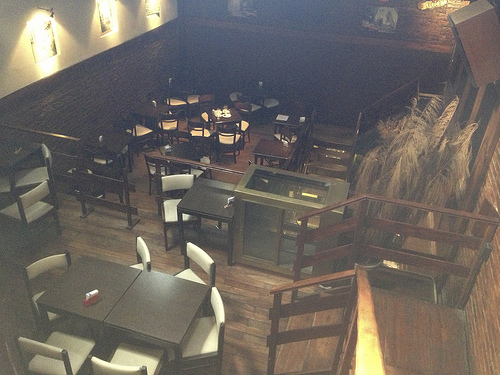
Canela has been running since 1979, and I got to chat a little bit with the owners. There are three floors to the coffee shop, as well as a covered seating area outside, just off the main street, and the bar was well-stocked with alcohol should you fancy a shot of rum in your coffee. 

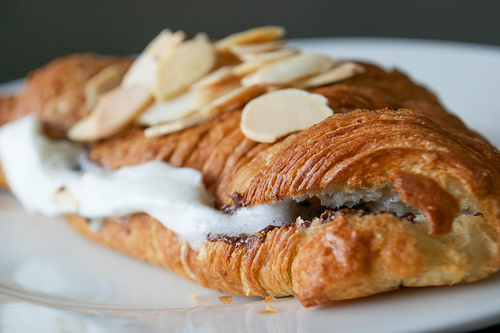
As we ventured upstairs, past a middle-aged lady reading the local paper and sipping a frothy cappuccino, we stopped at a cabinet full of cakes and pastries. ‘Que ricas tortas’, said a voice behind me. It was one of the staff. He told us there was a chocolate mousse cake, lemon meringue pie and a chocolate and dulce de leche cake, if we fancied any of them. They all looked terrific. 

One of the things I noticed while I was in Argentina was that quite often you don’t need to order from the menu. Fancy something that’s not listed? Don’t worry, they’ll try to accommodate you. We mentioned we were peckish for something savoury and he waved us upstairs and said he would fix us a couple of tostadas con jamon y queso


menu, canela


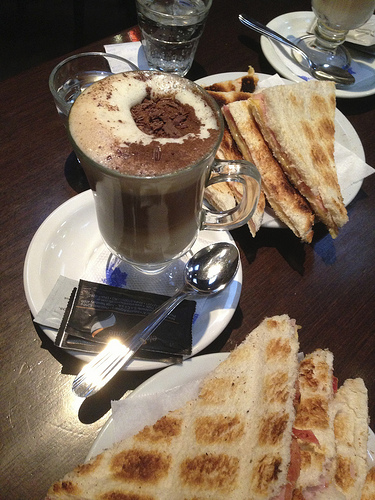
The rich, full-flavoured coffees arrived in glass cups, sprinkled with chocolate pieces and cinnamon – and the tostadas were made with thin but fluffy slices of white bread with the crusts cut off, and neatly stuffed with ham, cheese and slices of tomato. They were filling but still light. We were also each given a little shot glass of fizzy water to refresh us afterwards and to take the strong coffee taste away before we left.


the 'reservado' at canela, buenos aires


Before leaving, we had a mooch around the rest of the café. On the first floor, and just off to the right from the stairs there was a door which lead to the ‘Reservados‘ – a room that gave some degree of privacy and usually used at night-time when the coffee shop gets busier. 

Our tostadas and coffees came to 89 pesos (about £12) and we left full and refreshed. I loved the atmosphere at Canela and the way they were so happy to stop and chat. We probably won’t go back to Argentina for a couple of years but when we do, we’ll be sure to stop by there again. That chocolate and dulce de leche cake looked too good to miss a second time.   


canela, buenos aires

Tuesday, 30 July 2013

Sweet Potato, Avocado and Lime Quinoa Salad

I’ve cut back a little bit on eating meat lately, which means I’ve had to look for other sources of protein. Quinoa is a great source of protein for vegetarians and vegans and whether you buy it ready-cooked or boil it yourself it makes a handy salad. 


quinoa and sweet potato lime salad

I’ve used Quinola Mothergrain red and pearl quinoa for this recipe, having been sent a packet to try out. It gives a gorgeous nuttiness to the salad and the griddled sweet potato and chopped avocado ups your fruit and veg intake. The whole thing is then seasoned and spritzed with lime juice and scattered with fresh coriander. 


Sweet Potato, Avocado and Lime Quinoa Salad
Serves 1, generously
Ingredients 
100g ready to eat pearl and red quinoa (I used Quinola Mothergrain) (or 100g quinoa you’ve cooked yourself and cooled)
1 tbsp olive oil
1 small sweet potato, peeled and sliced into 1cm thick slices
half an avocado, peeled, stoned and then diced into small chunks
juice of 1 lime
small handful coriander leaves
salt and pepper

Method
Tip the quinoa onto a serving plate. Heat the oil in the griddle pan and set on a medium heat. Griddle the sweet potato slices until cooked through – about 3-4 minutes per side. 

Dice the avocado and squeeze fresh lime juice over along with a pinch of salt. Toss this into the quinoa. When the sweet potato is ready, lay the slices on top of the quinoa and scatter over the coriander leaves. Add salt and pepper to taste, and spritz with a little more lime juice before eating. 

Monday, 29 July 2013

Garrapiñadas (Caramelised Peanuts)

In Argentina, garrapiñadas (pronounced ‘garra-pin-yad-as’) are everywhere. They’re sold in little cellophane cones at football matches, in the street and at shops. I became quite addicted to them while I was out there, and so now I make them at home. 

They’re most often made with peanuts (garrapiñadas de maní) although you can easily make them with other nuts, such as almonds (garrapiñadas de almendras). 


Garrapiñadas

Here’s how you make them: 

Ingredients
250g unsalted peanuts
200g sugar
200ml cold water


Garrapiñadas in Buenos Aires
Garrapiñadas in a cone, sold on the street in Buenos Aires

Method:
Empty out the peanuts into a dry, non-stick saucepan and place over a gentle heat, just to warm them through. Combine the water and sugar in a jug and, as soon as the peanuts start to brown slightly on the outside (keep an eye on them) pour the sugary mixture into the pan. Give the contents a stir and then leave to bubble for about five minutes. The caramel will begin to darken and thicken – when it turns golden, tip them out onto a plate lined with greaseproof paper. As they cool, they’ll stick together and turn brittle, so crack them up a bit with a spoon before they all set together completely. Eat once cool. 

Friday, 26 July 2013

Sharpham Park Spelt Breakfast Cereal

Current statistics show that someone is the UK is diagnosed with bowel cancer every 15 minutes, making it the third most common cancer in this country. But it’s been suggested that if we increase our fibre intake, we could dramatically reduce our risk.

The people at Sharpham Park recently partnered with Bowel Cancer UK to create a cookbook with spelt recipes – Gizzi Erskine, Rachel Green and Yotam Ottolenghi are among those who contributed. And now they’ve brought out a new cereal, which is high in fibre and low in sugar and salt.


fruit and fibre sharpham park cereal

The thing is, quite often, you expect these high-fibre cereals to taste of cardboard, but this one really doesn’t. It’s dark and has a rich flavour – kind of nutty – and the sweetness comes from raisins, apple and apricot pieces. I liked it. And even better, it’s been shown that spelt is often easier for people to digest than wheat, although it’s important to note that it does contain gluten.

fruit and fibre sharpham park cereal in bowl

There are two varieties of the cereal – Morning Mult-Flakes and Crunchy Fruit and Fibre (which is the one I tried). Have a look at the Sharpham Park website for more information.

Wednesday, 24 July 2013

Tackling Leftovers: Yoghurt

According to figures by Love Food Hate Waste, us Brits throw away £210m worth of yoghurt and yoghurt based drinks each year. An insane amount of money, when you think how useful yoghurt is in cooking. It lends a creaminess to curries, is a low-fat alternative to cream in many desserts and contains all those handy ‘good’ bacteria for keeping our tums in tip-top condition. 

Part of the problem with yoghurt is that once opened, you need to use the rest of the tub up within 3 days. Bear this in mind when you open the tub for the first time and begin to think about the other ways you can use it up. Mark on the lid, with a felt-tip pen, the date you opened it so you don’t doubt yourself and throw it away two days later even though it’s still fine to eat. 

So, to try and get some (or preferably all) of that money back in our pockets and out of the landfill, here are some ideas for using up leftover yoghurt. Please add your own in the comments box below, I’d love to hear your ideas too. 


creamy lemon coriander turkey curry

Curries: skip the cream and the full-fat coconut milk and make a lemony curry with natural yoghurt. You only need a few tablespoons, but it’ll help you use up the rest of the tub. Natural yoghurt is much lower in fat than many other ingredients used to add creaminess to curries, and gives it a clean (not oily) flavour. Check out my Balti-Marinated Trout and also these picnic or party snacks, Coronation Chicken Voluvents (you can use the Coronation Chicken mixture to make sandwiches too). I also love this Malaysian Ayam Percik, where yoghurt is used to tone down the heat of the spicy marinade. The photo above is a lemon and coriander turkey curry I made for a piece on Yahoo! – it’s low fat and really quick to make. 


vanilla buns with honey and greek yoghurt and strawberries


Desserts: Top scones or muffins with natural yoghurt and fruit, or stir in a little vanilla paste and layer it up with chopped fruits. Natural yoghurt with just a spoonful of honey stirred in is wonderful, and rumour has it that Lady Gaga enjoys hers with peanut butter. I went to a friend’s house for lunch, and she stirred some Amaretto into a tub of yoghurt and we ate it with chopped fruit. It was lovely. One of my favourite snacks at the moment is a few spoonfuls of honey with some frozen blueberries (or raspberries) dropped in, with a swirl of runny honey. As the berries defrost, they streak the yoghurt with their juice – you just need to wait a few minutes for them to defrost before eating.

Cakes: Use natural yoghurt to add a creamy texture to muffins and cakes, or make a whole cake with it, such as this Gateau Yaourt. 


breakfast digestion booster smoothie

Smoothies: Just a tablespoon or two will add a soft, creamy texture to smoothies and do your tummy some good, too. Try this Digestion Booster breakfast smoothie, with blueberries, banana, yoghurt and orange juice. A perfect way to start the day. 

Yoghurt ‘ice cream’: You can make some delicious low-fat frozen yoghurts – try this one with blueberries and maple syrup or my salted caramel and ricotta ice cream, which uses a mixture of ricotta and natural yoghurt. Also, if you do make smoothies, make an extra batch and pour it into ice lolly moulds for a refreshing (and super-cheap) treat when it’s hot outside. 

Breakfast: It’s a great way to start the day by itself, but you can use it to top cereals too, along with a little honey or agave syrup if you want to. Or spoon a blanket of yoghurt over a granola or muesli or mix it with dried fruits. 

See? You’ll never need to throw yoghurt away again. 

What are your ideas for using up yoghurt? 

Tuesday, 23 July 2013

Chocolate Filled Croissant Dessert

Croissants aren’t just for breakfast, they make a handy pudding too… Stuff them with chocolate and cream and sprinkle with flaked toasted almonds for a five-minute warm pud that’ll be perfect for any day of the week…

croissant with whipped cream toasted almonds and dark chocolate


Chocolate-Filled Croissant Dessert
Serves 2
Ingredients
30g dark chocolate (I used Bournville), chopped
whipped cream 
handful flaked almonds

Method

  1. Preheat your oven to 220ºC. Split the croissants and fill with the chopped chocolate. Close the croissants and place on a baking tray and slide into the oven for 3-4 minutes, until the croissants are warmed and crisp and the chocolate has melted. 
  2. Quickly get a medium non-stick pan on the heat and toast the almond slices in the dry pan, until they’re aromatic and slightly golden. 
  3. Add the whipped cream to the croissants and scatter with the fragrant almonds. 
  4. Eat hot. 


Friday, 19 July 2013

Brioche-Style Chocolate Chip Breakfast Buns

Yeah, I wouldn’t want to be up early on a Sunday, clattering pots and pans and measuring ingredients, all squinty-eyed and groggy either. But the good thing about these buns is that you make most of it the night before. They have a rich egginess to them, and, unusually, seem to taste better when they’re completely cooled rather than warm from the oven. They’re fluffy inside, sweet and studded with these milk chocolate chips. And knowing that the dough is all ready to go in the oven makes it really worth getting up for. All you need to do is pour yourself a cuppa and preheat the oven.


brioche buns_

Brioche-Style Chocolate Chip Breakfast Buns
Makes 24.
Ingredients
200g very soft butter (but not melted)
200ml warmed milk
three-quarters tsp fast-action dried yeast
1tsp sea salt flakes
2 tbsp caster sugar
3 eggs + 1 egg for brushing over the next day
500g strong white bread flour
75g chocolate chips (milk or dark, your choice)

Method
The evening before you want to eat the buns, (and about 2 hours before you go to bed) mix the butter, sugar and the eggs together. Heat the milk until just warm and put briefly to one side. 

In a large bowl, mix together the flour, salt and yeast and then stir in the egg mixture – you’ll get a thick dough. Gradually trickle in the warm milk and mix. The dough will loosen up. Cover with cling film and leave somewhere warm for two hours. Place in the fridge overnight. 

The next morning, take the dough out of the fridge and preheat your oven to 200ºC. Take out small handfuls (or use a spoon if you prefer) of the mixture and dump them into the holes of a silicone muffin tray (or use a standard muffin tray lined with papers). Brush with beaten egg and bake for 15-20 minutes, until they’re golden and risen. Leave to cool.  

brioche buns centre

Thursday, 18 July 2013

Macaroni Cheese with Emmental

I was talking with a friend the other day about macaroni cheese (as you do). She told me she likes to use plain mature Cheddar in hers, for that sharp tang. We talked about using Brie, Stilton and other cheeses but I still stood with my preference for Emmental. It’s nutty, slightly salty and although I have added a good handful of Cheddar for all-round cheesiness, it just doesn’t leave you with a dish as rich and oily as the other cheeses seem to. 

You could also arrange some tomato slices on top or snip in some ham, chicken, chopped spinach or partially cooked broccoli if you wanted to. 


macaroni cheese with emmental

Macaroni Cheese with Emmental
Serves 4-6
Ingredients
350g macaroni
25g butter
25g plain flour
1 tsp Dijon mustard
500ml semi-skimmed milk
50g mature Cheddar, grated
200g Emmental, grated
salt and pepper

Method
Cook the macaroni in plenty of salted boiling water, until just al dente – should take about 10 minutes. Drain and toss with a little of the pasta cooking water to help prevent it sticking together. 

While the pasta’s cooking, you can get on with the sauce. Preheat the oven to 200ºC and butter a small roasting or lasagne dish. Melt the 25g butter in a saucepan and stir in the flour, to make a roux. Add the mustard and then small amounts of the milk, in stages, making sure to beat well between each slosh of the milk, to help stop any lumps forming. Once you’ve added all the milk, keep the pan on the heat and stir constantly, until thickened and smooth. 

Turn off the heat under the saucepan and stir in the cheese, reserving a handful for sprinkling on top later. Taste, and season with a little salt and pepper. Tip the cooked macaroni into the roasting dish and pour the sauce over the top, stirring to combine thoroughly. Sprinkle the reserved cheese over and then bake for 15-20 minutes, until bubbling hot and golden on top. Serve immediately, on its own in a bowl or alongside a sharply-dressed green salad. 


Wednesday, 17 July 2013

Frozen Banana Pops

Fans of Arrested Development, I hear you. What genius it was to stick a lollipop stick into a peeled banana, freeze and then dress it with toppings such as chocolate, caramel and sprinkles. Genius and cheap, too. 

I recently wrote a piece for Yahoo! on Summer Baking Tips and got to ask Bea Vo, of Beas of Bloomsbury which summer baking recipes she would recommend. And she talked about frozen bananas, which were made famous by the show Arrested Development. I haven’t been able to forget about them since. 


frozen banana pops

Gluten-free (depending on your toppings), dairy-free (use dairy-free chocolate if you need to) and low fat (again, skip the cream) they’re much healthier than a sugar-laden frozen bought lolly and kids love them too.  I find it easier to cut a banana in half than try and thread a stiff lolly stick through the whole length of a curving banana, which can cause them to split. Here’s how to make them:

How to Make Frozen Banana Pops
Makes 4 banana pops

Peel a couple of bananas and cut them in half. Carefully stick a lollipop or cake pop stick through the centre of the banana, being careful that the stick doesn’t come out half way through the banana. Put the banana halves (with their sticks in) in a ziplock freezer bag, laying them flat so they’re separate and freeze until completely frozen (it’s a good idea to freeze them overnight or first thing in the morning for lunch or dinner later that day). 

Once the banana halves are frozen solid, melt half a bar (about 50g) chocolate in a bowl, either over a saucepan of simmering water or in the microwave. 

Pick up the banana by the stick and drizzle the chocolate over it, spreading it all over. Work quickly, as the cold temperature will immediately set the chocolate. Again, very quickly, sprinkle with some toppings such as baking sprinkles, chopped nuts, grated chocolate or freeze-dried raspberry pieces. Hand out and eat like a lolly. This is also perfect for kids to make themselves – just make sure they sprinkle the chocolate-coated bananas really quickly or the sprinkles won’t stick before the chocolate sets. 

Have you ever made frozen banana pops? What would be your favourite toppings? 

Tuesday, 16 July 2013

Wholegrain Basmati Rice with Kale and Cashew Nuts

I received an email the other day from the people at Tilda, asking if I wanted to try their wholegrain basmati rice. And then a couple of days later, I received an email from a lady telling me all about kale. I’ve developed a bit of an obsession for kale lately, its frilly leaves shredded and added to stir-fries, smoothies or baked into crispy ‘chips’. I decided to pair it with the nutty wholegrain basmati rice and crunchy golden cashew nuts in this dish. The grains of rice stay fluffy and don’t stick together, making it perfect for a quick stir-fry like this one.  It also makes a cheap, wholesome and stress-free dinner that’s also full of fibre, protein and iron. You can’t say fairer than that. 

wholegrain basmati rice with kale and cashews

Wholegrain Rice with Kale and Cashew Nuts
Serves 2 hungry adults, or 4 as a small bowlful
Ingredients
1 tbsp olive oil
100g unsalted cashew nuts
2 cloves garlic, chopped
2 big handfuls of curly kale, washed and chopped quite finely, tough stems removed
120g wholegrain basmati rice (I used Tilda)
salt and pepper

Method
Rinse the rice under the tap and then cook as per the packet instructions (in plenty of boiling water for about 25 minutes should do it). Once cooked, drain and rinse with cold water. Leave to one side. 

Next, drizzle the olive oil into a large frying pan that you can also fit the rice in later. Gently fry the cashew nuts until just sizzling and golden and then immediately remove to a waiting plate. Wipe out the pan, drizzle in another tablespoon of olive oil and then fry the garlic until softened. Add in the shredded kale and stir-fry for about 2 minutes, until the kale is dark, wilted and glossy. Tip in the cooked rice and stir well, finally adding the golden cashews. Season with salt and pepper and serve hot. 

This dish is suitable for the elimination diet, is vegan and therefore vegetarian too. 

For more information about kale, which is in season at the moment, visit the Discover Kale website. Tilda wholegrain basmati rice is produced with the outer bran layer of the grain intact, so it doesn’t break up easily, making it perfect for stir-frying. Look out for it in the supermarket. 


Monday, 15 July 2013

New Research Suggests DRAWING Your Favourite Foods Will Lift Your Mood

Anyone who’s ever scoffed a large pizza with stuffed crust, extra pepperoni and a blanket of cheese on top and then wished they hadn’t for the calorie-count, (isn’t that everyone?) this is for you. Apparently, researchers at St. Bonaventure University in the US have discovered that if we draw some of our favourite comfort foods, like cupcakes or pizza (instead of giving in and eating them) we could improve our mood. 

I’m a bit cynical about this. To start with, what if the fun of drawing was the thing that lifted the spirits, rather than the item of food that they were focusing on? Many artists claim they love to paint and draw because it takes them away from their busy lives and acts as a kind of meditation. Drawing is relaxing, and just a 5-minute doodle can coax your mind away from life’s problems and help you to switch off. 


doodle

And I’m not convinced by the statistics either. Those drawing pizza managed to lift their mood by 28%, and those drawing cupcakes increased their moods by 27%. Strawberry-artists had their moods lifted by 22%. And those who drew a pepper only felt 1% better after their picture was finished. This is easy to explain. You can be creative with cupcakes or pizza – toppings, colours, shading, special oozy cheese effects. But, in comparison, I’d argue there’s much less fun and creativity in drawing a pepper.

I realise it’s not enough for me to just whinge about the findings, so I sat down (on a hungry stomach) and drew some comfort food. It gave me a few minutes away from what I was supposed to be doing which did help to clear the mind and make me feel better, but I think I would have felt the same if I’d drawn a beach scene or a clown. I don’t think drawing the food itself lifted my spirits. It just made me hungrier. 

For more details about the study at St Bonaventure University, here’s the link: http://online.wsj.com/article/SB10001424127887323936404578580032939763200.html

What do you think of the findings? Do you think drawing your favourite comfort foods can help lift your mood? 

Friday, 12 July 2013

Ricotta, Lemon and Basil Pasta

Creamy pasta sauces are great, but they can be calorie and fat-laden. Which is why lately I’ve been making this for dinner – low in fat, and you don’t even cook the pasta sauce, just stir it together and toss with the hot pasta, with a little of the cooking water to loosen it. I’d originally thought of using spinach, but subbed the basil at the last minute. It’s lemony and the basil really lifts the creamy ricotta. No fuss, light and a great dish for summer, too. 


ricotta basil lemon pasta

Ricotta, Lemon and Basil Pasta
Serves 2
Ingredients
160g dried tagliatelle (or other pasta of your choice)
250g tub ricotta
80g bunch fresh basil, leaves picked and chopped 
1 lemon
salt and black pepper

Method 
Put the pasta on to cook in salted boiling water. While that’s doing, get on with the sauce. 

Tip the ricotta into a large serving bowl (that you’re going to tip the pasta in later) and squeeze in the juice of the lemon. Add a good pinch of salt and a grinding of black pepper and then add the chopped basil leaves. Stir everything together and set to one side. 

Once the pasta is cooked, lift it out with tongs (you’ll need the pasta water in a minute) into the ricotta and toss well. Slosh in a little of the pasta cooking water, which will loosen and also season the sauce a little too. Once the sauce is the right consistency for you, taste and season again with salt and pepper or more lemon juice if you think it needs it. Serve hot, with some Grana Padano or Parmesan for grating on top, if you like. 

Thursday, 11 July 2013

Gouda and Garlic Spinach Quesadillas

These quesadillas came about when I found a bag of spinach in the fridge that needed using up, along with a few slices of Gouda. They’re really quick to make – perfect for when you get back late and just need to eat something warm, or for a quick lunch. And each round contains half a pack of spinach – one serving of your ‘five a day’. 

It might seem tempting to skip pre-frying the spinach with garlic – but don’t. It gives a much more rounded flavour to the quesadillas and you’ll know if it’s not there. Also, draining the liquid released when the spinach is cooked will stop your quesadillas turning soggy. Enjoy!


gouda and spinach quesadillas 1

Gouda and Garlic Spinach Quesadillas
Makes 2
Ingredients
1 tbsp olive oil
1 garlic clove, chopped
250g bag spinach leaves
4 slices Gouda
4 wholemeal tortilla wraps

Method
Gently fry the garlic in the olive oil until just softened and then tip in the spinach. It might look like a lot, but it will wilt down quickly. Give it an occasional stir around, to stop it burning. Once the spinach has wilted, remove from the heat and tip into a small bowl. Press a spoon or spatula against the spinach in the bowl and tip the excess water away. Once your spinach is as dry as you can get it, prepare the quesadillas. 

Lay two of the wraps in front of you and scatter with the Gouda – you might need to tear up the slices to make them fit. Go fairly near to the edges but leave a border of about half a centimetre all the way around, as the cheese will ooze out a little once melted. Scatter the cooked and drained garlic-spinach over the cheese and top with the remaining wraps, to make a kind of a sandwich. 


gouda and spinach quesadillas

Wipe out the frying pan with a tea towel or some kitchen paper and dry-fry the quesadillas, one at a time, for about 1-2 minutes per side, until lightly browned and crisp. Transfer to a board, cut each quesadilla into 6 wedges and eat while still hot. 

What are your favourite quesadilla fillings? 

Wednesday, 10 July 2013

Argentinian Chicken Milanesas with Mushroom Sauce (Milanesas de Pollo al Champiñón)

A week ago, I was sitting at my desk, wearing my winter socks. It’s July. The wind was blowing the trees around, and the sky loomed a murky, muddy grey. And, although the weather’s perked up for the moment, on slightly cooler (or wetter) summer days you need something a bit more than a salad to keep those spirits lifted. And this is what I’m talking about. It’s an Argentinian dish of breaded chicken breast, served in a creamy mushroom sauce. The recipe is adapted from one by one of my newest comfort food heroes, Doña Petrona, the Argentinian TV cook. 


milanesas de pollo con salsa de champinones chicken milanesas with mushroom sauce

I’ve changed the quantities of butter and cream – her recipe is generous with both, so I’ve reined it in a little; but only a little. Adding lemon juice to the mushrooms is a genius touch – as well as flavouring the mushrooms it also lifts the rich sauce later on. 

Speaking of the sauce, it can be served, in summer, as an optional extra. Those who want a duvet of cream and mushroom billowing out over their chicken can have one, while the others can have the milanesa plain, alongside cooked peas or a dressed salad. It’s one of our favourite dishes now – real, Argentinian comfort food.

Chicken Milanesas with Mushroom Sauce
Serves 4
Ingredients
2 chicken breasts
75g Panko breadcrumbs
1 egg, beaten
2-3 tbsp plain flour
pinch of salt and black pepper

For the sauce: 
250g chestnut mushrooms
1 lemon
75g butter
1 tbsp plain flour
salt and pepper
250ml double cream
pinch of caster sugar

Method
Cut the chicken breasts in half. Lay each one between two sheets of cling film and bash it – gently though – with a rolling pin until it’s pretty much flattened. Once all the chicken has been flattened, dip in the flour, then the beaten egg and finally in the breadcrumbs. Set to one side, while you prepare the sauce. 

Slice  – or quarter – the chestnut mushrooms (your choice) and tip them in a bowl, along with the juice from the lemon. Give them a stir and leave for 5 minutes. Next, melt the butter in a small frying pan and tip in the lemony mushrooms. Fry gently for about 5 minutes, or until softened. Add the flour and stir well. Season with a pinch of salt and black pepper and then stir in the double cream, mixing well on the heat to form a thickened, creamy sauce. Taste, and add a pinch of sugar to sweeten, stirring again, and adding more salt and pepper if you think it needs it.

Turn the heat down on the sauce and let it just keep warm while you cook the chicken. Heat a little olive oil in a frying pan and fry the milanesas on a medium heat, for about 4 minutes per side, until cooked in the middle. Serve the milanesas on a plate, with the sauce spooned over the top. 


Tuesday, 9 July 2013

Cooking Cheeses on the Barbecue

Meat’s all very well, but when it comes to non-meat barbecue dishes, it doesn’t all have to be copycat soya burgers and vegetables on skewers. What about cheese? Depending on the type you buy, and the way you cook it, it can barbecue really well. So, whether you’re following a non-meat diet or just fancy a change, here are some tips on barbecuing different types of cheese. (And it it’s not all just halloumi either.)


provoleta close up
Argentinian Provoleta – a type of cheese derived from Provolone, but commonly cooked on the barbecue (or ‘asado’) over there

Directly on the grill
The knee-jerk reaction to many when they’re considering barbecuing cheese is to open up a pack of halloumi. It’s salty, makes your teeth squeak (yes it does) and there’s even a British version of it. Apart from being salty and briny in flavour it’s quite mild so it goes well with chillies, red peppers or a rich tomato sauce. But you’ll get good results too from other cheeses. A firm Cheddar can be cut into chunks and threaded onto vegetable kebabs. Cook for just a few minutes each side so that the veggies are still crisp in the centre and take off before the cheese melts – don’t overdo it or you’ll lose the cheese. Provoleta, if you can get it, is heaven on a barbecue. It’s a trademarked version of Provolone cheese, sprinkled with oregano and mild chilli flakes and it’s eaten in Argentina (in the UK you can buy it online from Pampas Plains). Rub with a little oil and cook it either directly onto the oiled bars of the grill or in a pan (or foil, or in a heatproof dish) on the top. You just need a minute on each side, until it develops a chewy crust but hasn’t oozed out of the sides yet. When you’re cooking any cheese on a barbecue, it’s best not to wander off or you’ll lose it through the bars of the grill – in Provoleta’s case you just want to brown it and give it a delicious, smoky crust.

Sandwiches
There’s nothing wrong with making toasted sandwiches on a cool barbecue – just make them up as usual and with tongs, cook for a minute or two on each side and remove just before the cheese oozes. Good ones to try are Raclette (a French cheese which tastes similar to Edam to me). It’s mild and melts well. Or try sliced Brie or Camembert with Prosciutto. Basically anything you’d put in a toastie in your oven grill will work here, too. Experiment with different types of bread too; pittas, nutty wholemeal slices and ciabatta work brilliantly. Avoid breads that are too soft and crumbly as they might break up on the grill. You can also try barbecuing a slice of cheese on top of a veggie like a large flat mushroom. Just don’t try it while the heat is blaring or you’ll burn the bread before the heat’s had a chance to get to the cheese.

Foil Parcels
Ah, the old standby from my Girl Guide days around the camp fire. Jacket potatoes, chicken, fish, baked beans – are all great cooked in foil parcels. Try loosely wrapping goat’s cheese, chopped red peppers (roasted from a jar or raw) and some other veggies in foil and placing on the barbecue. In a few minutes you’ll have a little parcel of soft cheese and aromatic veg to dig into. You could also make a little parcel and drizzle the cheese with honey and thyme, as I do in the oven, or place the cheese in a barbecue-proof dish and melt slowly on top, serving lots of crusty bread alongside. Good ones to try are Camembert, Tunworth, semi-soft goat’s cheeses and Brie. Try feta too, (again, there’s a British version) – loosely wrap in foil before barbecuing and eat with pittas, olives and salad. 

Do you have any favourite cheeses for barbecuing or any tips for cooking and serving them?


Monday, 8 July 2013

Crispy Grana Padano Fried Chicken

I made you some more fried chicken – and this time it’s cheeeessy…


grana padano fried chicken

Crispy little chunks of fried chicken breast, coated in breadcrumbs, thyme and Grana Padano cheese. They take just five minutes to make and they’re perfect for eating with dips, chips and salads. Just give them a little sprinkle with sea salt flakes before serving. These are also a cheaper option for dinner – 2 chicken breasts will feed four of you. 

Crispy Grana Padano Fried Chicken
Serves 4
Ingredients
2 chicken breasts, boneless and skinless
80g Panko breadcrumbs
3 tbsp Grana Padano cheese, finely grated
pinch of salt
half teaspoon dried thyme
2 eggs, beaten
2 tbsp plain flour
olive oil, for frying

Method
Cut the chicken breasts into strips about the width of your thumb, and then cut these strips in half, horizontally, to make them shorter. Measure out the breadcrumbs into a shallow bowl and then grate in the Grana Padano. Stir in a little pinch of salt and the thyme and set to one side. 

Crack the eggs into another shallow bowl and beat them with a fork and then spoon the flour into a third shallow bowl. 

Drizzle 2-3 tbsp olive oil into a medium-sized frying pan and put on the heat. Dip one of the chicken strips into the flour, then into the beaten egg and then into the breadcrumbs, pressing it down so the breadcrumbs stick to the chicken. Carefully lower into the hot oil and cook, on a medium heat, for about 3-4 minutes on each side, until the chicken is cooked through. Continue to cook the chicken in the same way, in batches, but don’t over-fill the pan or they won’t turn crisp. If some of the breadcrumbs fall off while cooking and burn in the pan, just wipe the empty pan out with some kitchen paper between batches, adding more oil as you need it. 

Drain the cooked chicken pieces on kitchen paper and serve while hot. 

Friday, 5 July 2013

Comfort Food Science Infographic

Wading through various websites for facts and figures can be dull; I know that. Which is why I made this little infographic, all about our favourite subject. 

Like it?


comfortfood facts

So now you can see how comfort food affects your body, why we crave it and also rejoice in the fact that we seem to be tucking into it whether we’re happy or sad – all in one glance.

I hope you enjoy it, and please feel free to share, pin or link back to it here. 

Were any of the statistics in this infographic a surprise? 

Wednesday, 3 July 2013

10 American-Inspired Recipes for 4th July

It’s Independence Day, and what better way to celebrate than to round up 10 of my favourite American-inspired recipes? Whether it’s tender, sticky ribs in a glossy barbecue sauce or an Elvis-inspired peanut butter and banana fried sandwich that takes your fancy, have a look at these. Click on the title to go to the recipe…

BBQ Slow-Cooked Pork Ribs

bbq ribs

Sticky, sweet and achingly tender, these pork ribs are cooked in the slow cooker and then caramelised in the oven for a few minutes once they’re done. Serve with coleslaw, or cornbread, or make up some potato wedges to go alongside. Whatever you serve with them though, you’ll need a napkin.

New York Hot Dog
american hot dog mustard onions

Nothing quite screams ‘America’ to me than a frankfurter in a bun, drizzled with American yellow mustard and topped with dark, fried onions. Top with saurkraut too, for American authenticity, or go for tomato ketchup. Or why not try these other American-inspired dawgs…. BBQ and coleslaw, and the Southwestern-style chilli dog (one of my personal favourites).

Elvis Peanut Butter Brioche


banana and peanut butter brioche french toast maple syrup

Elvis sits at a trinity of American legends along with James Dean and Marilyn Monroe. And with his glittering jump suits, big aviator sunglasses and curled top lip, he deserves his place there. It’s said that in the 1970s he used to enjoy a fried peanut butter and banana sandwich or two and I developed a modern style of the sandwich using brioche. I like to think he would have enjoyed that too. Uh-huh-huh *strikes karate kick*.

Peanut and Vanilla Cupcakes

Peanut and vanilla cupcakes

The combination of peanuts and vanilla remind me of that other American sandwich, the Fluffernutter. If you don’t know what it is, it’s a toasted sandwich made with peanut butter on one side and marshmallow fluff on the other. It’s divine. And the same flavours are paired in these cupcakes. Gorgeous with some crunchy nuts piled on top, too.

Pulled Pork and Coleslaw


pork and coleslaw roll

Pork that’s been barbecued until it actually just falls apart when you pull it is thought to originate in the Southern states of the US. It’s brushed with a barbecue marinade which makes the outside shiny and sweet, while the inside stays moist and incredibly tender. Pigs were first introduced to the Americas in the sixteenth century, and a barbecue is first mentioned there in the early seventeenth (it didn’t take them long to put them together). I make mine in the slow cooker and cook it slowly in beer. Serve in a roll with coleslaw.

Sticky Sweet Potato Wedges


sticky sweet potato wedges

I know that sweet potatoes are not the same thing as yams, but I couldn’t resist. You do find sweet potatoes in a lot of American cooking, and the fact that these are crunchy, sweet and go so well with fried chicken, fish and, well, practically anything, means I had to include them here.

Maple-Glazed Bacon


maple-glazed bacon

It was the American classic of bacon, pancakes and maple syrup that made me do it. This sticky-sweet bacon is perfect for sandwiches or for slipping into burgers.

Oreo Cupcakes

Oreo Chocolate Cupcakes

Oreos are the best selling cookie in the whole of the United States, and since they were created in Manhattan in 1912, 362 billion have been sold. I worked on some Oreo recipes last year for Yahoo! Lifestyle and made a milkshake, some truffles and these gorgeous Oreo cupcakes.

Pumpkin Pie
pumpkin pecan pie with whipped cream

I actually only made – and tasted – my first pumpkin pie last year. I know, I don’t know why I waited so long. It’s gorgeous, made easier though by buying canned pumpkin from the shop. If you’ve never made pumpkin pie then don’t wait any longer – you’ll be surprised at how simple it is. This one is topped with a rubbly cinnamon-pecan nut topping – perfect for providing a salty-sweetness that works so well with the creamy pie filling. A spoonful of whipped cream is essential.

Fried Chicken
crispy breadcrumb chicken

Good ol’ Colonel Sanders. And we don’t even care that he wasn’t a ‘real’ military colonel. He bought a cafe in 1930 and started serving up fried chicken to punters, in Kentucky. Now, there are over 800 restaurants around the world, serving up Kentucky Fried Chicken. There are lots of versions of fried chicken – some with cheese, others with herbs and some copycat ‘KFC’ recipes.

Happy Independence Day!

Review of Crussh: Juices, Smoothies and Boosters

I’ve reviewed a new book for you… that I think has changed my life. Well, the way I do breakfast, anyway. 

It’s Crussh – Juices, Smoothies and Boosters, brought to you by the juice and smoothie bar of the same name. In it, there are delicious recipes for various juices and smoothies to up your fruit intake and fill you up in the morning. 


cover29823-medium

The recipes are very easy to follow. They’re short and to the point, and I love how each smoothie is broken up into its nutritional information – what it contains and how exactly it benefits your health. There are smoothies and juices to aid your digestion, give you glowing skin and boost your energy. You’ll need an electric juicer though, and a blender – to get the full potential out of this book, and to make the booster smoothies you’ll need to add things like coenzyme Q10, chia seeds and ginseng to your shopping list. 


papaya and lime smoothie
Papaya Lime Smoothie from Crussh
Also, the book argues that although it’s commonly thought that blending and juicing fruits and vegetables decreases the benefit that it does your body, the opposite is often actually true. They give the example of carrots, saying that juicing them means that the nutritious juice is ready for your body to absorb straight away and doesn’t need releasing from the fibrous membranes. Eaten as it is, they say, you get 1% of beta carotene from a carrot. By juicing it, you get 100%. 


fruits for morning smoothie

Smoothies and juices, they also argue, are a great way of keeping you hydrated. There’s also a section at the front of the book which talks about the fruits and vegetables you can use in a drink and which nutrients they contain – great for making up your own drinks once you master some of the basics. 


blueberry smoothie
Breakfast Burner smoothie from Crussh

Crussh is a great book for people who want to turn their everyday smoothie into something more delicious, and be more adventurous with ingredients and flavour combinations. And if you already have an electric juicer and a blender, you’re already halfway there. 


Tuesday, 2 July 2013

Spinach, Pea and Mascarpone Spaghetti

I’m a bit of a sucker for creamy pasta dishes – and wanted something I could stir together quickly that still felt kind of summery. And here it is. The peas are sweet and cooked straight from the freezer. The mascarpone (a whole tub is used here, to avoid waste) is creamy but somehow still light, and the spinach adds colour and flavour, roughly chopped and stirred into the sauce. You only need to finish it with a grating of Grana Padano and it’s on the table in around 10 minutes. 


spinach mascarpone pea spaghetti 2


Spinach, Pea and Mascarpone Spaghetti
Serves 4-6 
Ingredients
400g spaghetti
couple of handfuls of frozen petits lois
1 tbsp olive oil
1 garlic clove, chopped
250g tub mascarpone
handful spinach leaves, roughly chopped
handful of Grana Padano, grated, plus more to serve

Method
Put a large pan of water on to boil and add in a good pinch of salt. When it’s boiling, add the spaghetti. While that’s cooking, heat the olive oil in a medium-sized frying pan and fry the garlic gently. Stir in the mascarpone and the spinach, and heat until the mascarpone has melted a little. Scatter in a handful of Grana Padano and stir well. Turn off the heat. When the spaghetti has just five minutes’ cooking time left, tip the frozen peas into the saucepan with the pasta. Once the peas and the spaghetti is tender, drain and toss in the mascarpone sauce. Taste, season with salt and pepper and then serve with more Grana Padano alongside. 


LinkWithin

Related Posts Plugin for WordPress, Blogger...