Wednesday, 31 October 2012

Blue Cheese and Smoked Bacon Flat Mushrooms

This is a lifesaver starter, party nibble or small snack, and can be dished up in 10-12 minutes from walking into the kitchen. If you’re serving this as a starter or snack, use big, flat mushrooms and place a little tangle of rocket or lamb’s lettuce alongside. If you want to have these as a party nibble then use little mini portabello-style mushrooms and arrange them on a platter for people to grab. That way they’re exactly bite-sized and people won’t have to deal with juice dribbling down their best party frock. 


Blue cheese and smoked bacon mushrooms
Serves 4
Ingredients:
4 large flat mushrooms, or 10-12 small brown mushrooms
40g blue cheese
4 rashers smoked streaky bacon
 
Method:
Grill the bacon until crisp, chop and set to one side. 
Clean the mushrooms and place stalk side up on a foil-lined baking tray. Heat your oven to 200ºC and remove the stalks. Crumble the cheese evenly over the mushrooms, followed by the chopped bacon. Drizzle with olive oil and slide into the oven. Bake for 7-10 minutes. 
Remove from the oven, grind over some black pepper and serve. 

What are your favourite quick party snacks or starters?

Monday, 29 October 2012

Lying to Children About Vegetables

I read an article last week about how it’s ok to lie to your children about vegetables to get them to eat them. And I was left feeling more than a little confused. It’s everywhere: take Green Giant sweetcorn, whose advertising campaign revolves around a couple of sweet little darlings tucking into their sweetcorn, imagining they’ll turn into a big ‘ho ho ho-ing’ green giant once they’ve finished their tea. Other things like carrots being ‘rocket fuel’ and peas ‘martian seeds’. (Although, after what one dinner lady said to me when I was 5 years old: ‘that cabbage’ll put ‘airs on yer chest’ – it’s a wonder I didn’t avoid them for life). 

Imagination is great. But all this, just to make your child eat their veg? 

First off, I’m not a smug parent. I’ve just persevered (and put up with a lot of toddler teatime tantrums over the years). I never lied to my children about what their veg will or will not do – the most outlandish I got was to tell my 4-year old that carrots will help you see in the dark (which I’d argue was at least a little bit scientific fact). And yet how did I end up with a 7-year old who loves cabbage and artichokes and a 4-year old with a hankering for broccoli and prunes? 


Indian-spiced broccoli – but will kids eat it even if they know it’s just broccoli?


It’s simple. I just dished up vegetable after vegetable, each mealtime. I never made it a big deal. On the outside, I just cleared their plates away if they didn’t eat their veggies, even if on the inside I was panic-stricken about how I was going to get their vitamins into them. I dished up sweetcorn, which was pushed away. The next day, peas. The next, broccoli. And, within a few weeks, when they realised they wouldn’t be getting crisps or yoghurt instead, they started eating their veg. Even now, they often need some encouragement, but they’re learning what the food is actually doing for them (like lentils being good for your blood, or kiwi fruits helping to keep colds and coughs away) rather than imaginative tales about carrots powering space rockets. 

And yes, the way I did it took ages and a lot of patience. But although telling your children peas come from Mars might work in the short term, at some age, they’re going to look at a pea and realise, well, that it’s just a pea. 

Am I wrong? Do you think it’s right to tell children lies about their food to get them to eat it? And do you think that it works? Let me know in the comments box below…

Friday, 26 October 2012

The Perfect Sausage and Mash – How I Do It


For me, there are few dinners more satisfying than a plate of browned sausages topped with sweet, roasted onions; fluffy, creamy mashed potatoes and some juicy little sweet peas, all drenched in home-made gravy. I love it now, because over the years I’ve discovered how to do each bit so that it tastes right for me. Trust me, I’ve forced down enough watery, insipid mash and pale, chewy sausages in my time, so here I’m explaining how I do it now. I hope you find it useful, and if you have any other tips for the best bangers ‘n’ mash, then let me know in the comments box below!

The Sausages
Always good quality sausages (80% pork and above), never the cheaper supermarket versions, which I find, just sit in a pool of fat and water and turn soggy and wrinkled in the oven. I like a nice bite to the sausage skin so I bake them in the oven, just drizzled with a tiny bit of olive oil. I chop the onion into smallish pieces and add them to the roasting tray, tucking them in and around the sausages, but not too close otherwise the sausages don’t brown so well. Then I slip it in the oven at about 200ºC for about 25-30 minutes. 

The Mash
Pick a creamy potato like Maris Piper – you’re doomed if you pick a floury King Edward, which will give you a strange granular consistency. And I know that the ‘perfect’ mashed potato is achieved by baking the potatoes for a good hour, de-skinning them and pushing them through a mouli, but who has time for all that on a weeknight? So I cut the peeled potatoes into chunks and boil them in slightly salted water until they’re just tender – not breaking apart or they’ll get too waterlogged. Once they’re tender I drain them and put them back in the saucepan, leaving them to steam dry a little. Then I mash them. Next I take about 100g mascarpone cheese and beat it into the mashed potato with a pinch or two of salt. 

The Gravy
I stopped buying ready-made gravy a long time ago, once I realised how quick (and much cheaper) it is to make your own. Once the sausages and onions are cooked, I keep the sausages warm and then dump the roasted onions into a small saucepan, along with any of the sticky residues the sausages have left behind. Then I spoon in about a teaspoon or cornflour, stirring all the time so the onions get coated. Then I pour in about 250-300ml hot stock (often beef stock, for the colour), stirring or whisking all the time until it’s thickened. Then I serve the sausages with the mash, a couple of spoonfuls of petit pois and dribble over the gravy. 

How do you make yours? 

Thursday, 25 October 2012

New Milk Launched Specially for People with Milk Intolerances

A new milk has been launched in the UK to enable those with milk intolerances, to, well,  drink milk. Apparently the pesky symptoms of lactose intolerance are caused more often by the A1 proteins in milk and not so much the A2 proteins, so in this milk, there are only the A2 proteins. Still with me? 

Already popular in Australia, the milk is completely natural, and comes from cows who produce milk that is free from the A1 proteins that can lead to some people experiencing symptoms including bloating and digestive discomfort. 


Nutritionist Melanie Bibby said about the milk: ‘While a2 Milk isn’t suitable for people who have been diagnosed with milk allergies or lactose intolerance, it’s a great option for those who suffer from an A1 milk protein intolerance. As a2 Milk is completely natural, direct from specially selected cows, it’s a practical and healthy choice for those that previously avoided milk, perhaps switching to soya, almond or rice versions.”


If it helps, it would certainly help those sensitive to A1 proteins get their daily dose of calcium, and I’m happy that A2 milk has been created naturally. But what do you think? 

Do you have an intolerance to drinking milk? Would you try it? And do you think it would help? 
 

Wednesday, 24 October 2012

Making Gnocchi From Scratch

I love gnocchi. And it’s always one of those things I never thought of making at home, until I discovered I had a bag of King Edward potatoes that needed using up (you can’t get through 2kg of roast potatoes in a week – well I can’t anyway). 

So I thought I’d have a go. It was much easier than I expected and although it took me about 45 minutes from start to finish, I was left with light little pillows of gnocchi that were far better than anything I’d bought from the supermarket. Here’s how you do it…

1. Boil 1kg of unpeeled floury potatoes in water until just tender. Depending on the size of your spuds, this might take about 25 minutes. When they’re cooked, drain them and leave to cool a bit, before slipping off their skins and transferring to a bowl. 


2. Mash the peeled potatoes (don’t add any milk or butter or anything else, just mash the dry potatoes). 


3. Crack in an egg and mix into the mashed potatoes. Then tip in 300g plain flour, along with a good couple of pinches of salt and mix with your hands to combine, until you get a firmish dough, like this: 


4. Take a handful of the dough and roll it out to form a sausage shape – if it starts to break up, just apply a bit more pressure – it will turn smooth on rolling out. Then, cut pieces off with a sharp knife. 


5. Press the prongs of a fork into the gnocchi and roll, or just press the fork in on both sides. This will help the sauce cling to the gnocchi so it has somewhere to go (in the grooves). 


6. Drop the gnocchi carefully into boiling salted water and simmer for about 2 minutes – you’ll know they’re cooked when they rise up to the top of the pan. Then, scoop them out with a slotted spoon, drain off the excess water and then lower them into a pan of tomato sauce, to keep them warm until you serve. Depending on the amount you make and the size of your saucepan you will probably have to make them in two batches. Don’t, whatever you do, grab them in your hands – they will clump together and be difficult to separate. Pick each one up and drop them into the water individually. If you have gnocchis sitting around and waiting for the pan, keep them apart from one another (on one layer) on a lightly floured board.


The finished gnocchi, in tomato sauce sprinkled with grated Grana Padano…. lovely!

Have you ever made gnocchi? How did you get on with it? How do you like to serve gnocchi?

Tuesday, 23 October 2012

Lakeland’s Pie Maker – a Review

Call me sad, but I always look forward to the Lakeland catalogue plopping onto the doormat and then flicking through and dreaming of all the kitchen gadgets I could have if I was a millionaire (as you do). But then, as I flicked through the most recent catalogue, I saw a machine I knew I had to have. It was the Lakeland pie maker. 

The wording alongside the photo boasted of freshly made pies in 10 minutes; that the space it took up was similar to that of a sandwich toaster – and that you didn’t need any pie dishes to go with it because the pie maker had its own special pie-shaped indents that moulded the pastry. I placed my order, and couldn’t wait to get my hands on it. A couple of days later, it arrived. 

I can’t tell you the hassle I had when I first tried using this. There were times when I wanted to throw it out of the window. To begin with, I happily got on with making my own crumbly savoury shortcrust pastry; mixing, chilling and rolling, while the pie maker started heating up. This didn’t take long – about 2 minutes I reckon. I lowered a circle of pastry into one of the indents and pushed gently with the ‘pie pusher tool’. The pastry split. I tried again with another circle. It split again. I’ve never had any trouble with this pastry before, but for some reason it didn’t like the pie maker at all. 


I then defrosted some shop-bought pastry I had in the freezer. It was puff pastry. And then I noticed in the instruction booklet that Lakeland do not recommend using puff pastry for the base, only for the top. I wondered why, so I made it with puff pastry anyway to see what would happen. The pastry didn’t split at all when I shaped the base but I now found out that it’s not recommended because it doesn’t cook through properly. 

But making puff pastry pies with this machine is not impossible. If you use the maker to shape and fill your pies and then seal the lid on, you can take them out after 10 minutes and then slide them into a hot oven for another 15 minutes or so. Just make sure you pierce the top, so they don’t explode. This will give you perfectly-shaped puff pastry pies cooked all the way through. 

I’ve tried quite a few pastry recipes with the pie maker and haven’t found one yet that doesn’t result in splitting when you try and mould the pie. When you make a crumbly pastry to line a regular pie dish, remember that the pie dish isn’t usually searing hot and so you can patch up any bits that crack as you go. And because this IS searing hot, the pastry starts to cook even before you’ve put your fillings in. I’m using shop-bought shortcrust with mine now, but I’ll report back on this post if I figure out a way around it. 


I’ve had the pie maker for a few weeks now, and I have to say it’s worth persevering with. At £29.99, it’s not badly priced for something that you will use a lot, throughout the year. I bought mine because I always end up with the odd serving of stew or curry that no one wants and so I decided to put it into a pie and freeze it for lunches or quick dinners. It’s great for this, and I reckon it will save us a lot of food waste. 

I’m a bit peeved that I didn’t know beforehand that crumbly pastry wouldn’t work in it, or puff pastry (at least not without the oven’s help). But I am glad I bought it – once you get the hang of it it’ll help you produce pies quickly and easily – and it takes up just a bit more space than a sandwich toaster. 

Lakeland Pie Maker Bonuses:

  • You get freshly cooked, sweet or savoury pies in 10 minutes and you save energy because you won’t have the oven blaring for half an hour (or more).
  • You can make quiches, tarts or pies – just don’t overfill them though or you’ll get black toasty bits on the top of your quiche and your filling will stick to the top of the pie maker (resulting in washing up nightmare, see below). 
  • Use up your leftovers and turn them into pies to put in the freezer to take to work, packed lunches or defrost for simple weeknight dinners – with chips. Mmmmm…
  • Your pies will be ‘real pies’ not just a stew in a dish with a puff pastry ‘hat’. And you won’t need to buy or wash up lots of pie dishes to get them.  
Lakeland Pie Maker Disadvantages:
  • Not all types of pastry will work with it – the instruction manual tells you that sweet shortcrust pastry will be too fragile, but I’ve found most home-made savoury shortcrust recipes do the same. At least to begin with, go for shop-bought pastry, which seems to keep its shape and not crumble apart so much. 
  • If you do overfill your pies, they’ll split and the pie filling will splurge out onto the non-stick panel. If this happens, you’ll need to spend ages scrubbing very gently with a sponge to try and get it off. Because it’s non-stick, no scourers or scraping of any kind is allowed, or you’ll ruin the non-stick coating. Hence why there’s all the ‘DO NOT OVERFILL YOUR PIES’ mentioned all the way through the instruction book. 
  • You can’t use puff pastry as the base of your pie, as it won’t cook properly, but you can use it as the topping. 
Do you have one of these pie makers? What did you think of it? 

Monday, 22 October 2012

Bramley Apple and Jersey Black Butter Tartlets

Ever since I enjoyed the Christmassy whiff of a jar of Jersey black butter, I’ve been meaning to cook it with apples. It is, after all, made by simmering cider with spices for a couple of days until it turns thick, dark and jammy. The results were great – you need just a 15ml tablespoon for a decent licorice kick from the black butter. The first time I made these, they were too sweet – so I tweaked the sugar a bit. 

The base is just shortcrust pastry – buy ready-made if you’re short on time or make your own if you prefer. We ate them with thick custard speckled with vanilla, but they’d be gorgeous with some vanilla ice cream too. I hope you like them. 


Bramley Apple and Jersey Black Butter Tartlets
Makes about 6
Ingredients

  • Shortcrust pastry
  • 1kg Bramley apples, peeled, cored and chopped into small dice
  • 20g butter
  • 50g caster sugar
  • 1 tablespoon Jersey black butter


Method

  1. Melt the butter in a large frying pan and add the chopped apples. Cook gently, for about 2 minutes, until the apple begins to soften. 
  2. Sprinkle in the sugar and spoon in the Jersey black butter, stirring well and leave to simmer for another 7-8 minutes until the apples are cooked. Turn off the heat and leave to cool.
  3. Roll and stamp circles from the pastry and use to line non-stick tartlet tins, or the indents of an electric pie maker. Fill with the apple mixture and bake until cooked. (I’m being vague about the baking as I made these in a pie maker and just left the pastry lid off, so I haven’t tested the oven temperature or how long they take to cook, but I’d reckon about 25 minutes at 190C). 

Friday, 19 October 2012

Broccoli and Stilton Soup

An old friend of ours, Dave, loved broccoli and Stilton soup. And whenever I make it, I always think of him. I like it quite thick, with extra Stilton crumbled over the top so it turns creamy in the heat of the soup, and lots of black pepper.  Here’s the recipe I use – I usually make a fairly large batch and then freeze it in portions in old plastic takeaway containers. A use for everything, and all that…..

This soup is great for using up leftover Stilton (and, indeed, broccoli) and it’s cheap to make, too. 


Broccoli and Stilton Soup
Serves 4, generously

Ingredients
  • 1-2 tbsp olive oil
  • small knob of butter (about 1tsp)
  • 1 small onion, chopped 
  • 1 large garlic clove, chopped
  • 500g broccoli, stalks and all
  • 1 litre chicken stock
  • pinch of sea salt
  • 125g Stilton cheese, plus extra for sprinkling over
  • Black pepper, to serve
Method
  1. Heat the olive oil in a largish saucepan and melt in the butter. Chop the broccoli stalks into 1cm approx chunks and slice off the separate florets. 
  2. Add the chopped garlic and onion to the melted butter and oil and cook gently for a few seconds, stirring, until they soften. Tip in the chopped up broccoli. Cook for 1-2 minutes, stirring. 
  3. Pour in the stock, with a pinch of salt and simmer gently until the broccoli (especially the stalk) is tender. This will take about 15-20 minutes. 
  4. Take the pan off the heat and leave to cool very slightly. Crumble in the Stilton and blend using a stick blender, until smooth and creamy. Serve straight away, in warmed bowls with the extra Stilton on top and lots of black pepper. 
What are your favourite quick winter soups?

Thursday, 18 October 2012

The UK’s Favourite Winter Comfort Foods

The wind has turned blustery, the rain has been lashing down and some of us have turned our central heating on. It’s well and truly autumn and we’re cosying up with comfort foods to cheer us up in the chilly, dark evenings. And I remembered a survey from last year, delving into which foods the British consider their favourite comfort food. And according to Sainsbury’s, who conducted the research, the winter comfort food most of us reach for is good old Shepherd’s Pie.


The meat and potato dish ranked first in a rundown of the most popular comfort foods us Brits love to warm up with in the winter.

Here’s the complete ‘top five’ list: 
  1. Shepherd’s Pie
  2. Lasagne
  3. Chicken Curry
  4. Beef Chilli
  5. Chicken and Mushroom Pie

Interestingly, the results also showed that we think that these foods are among the most calorific, with lasagne being the one dish most people would drop if they wanted to lose some weight.

And lasagne was the top choice for comfort with 18-35 year-olds. 

I’d take any of these dishes as perfect winter comfort food, but for me, anything pasta has to win. I am quite surprised not to see a classic beef and ale stew with dumplings on here, or a ‘bangers and mash’ style dinner, though.

What do you think of the results? What are your favourite winter comfort foods?

Wednesday, 17 October 2012

Halloween Marshmallow Skulls on Spikes

When I made these, I took one look at them, impaled on their sticks and drippy with red jam, and thought I’d gone too far. The more I looked at them, the more I started to think they might be inappropriate for such a young age group. And then I watched my girls as they laughed at the skulls’ faces and slid them off the skewers with their teeth. I wonder if there’s anything that’s too scary for Halloween? 


Halloween Marshmallow Skulls on Spikes

Ingredients:
  • 6 small wooden skewers (the kind that hold burgers together)
  • 18 large marshmallows (preferably white)
  • 1 black edible ink decorating pen (available in cake decorating shops)
  • 2 teaspoons strawberry or raspberry jam

Method:

  1. Thread 3 marshmallows onto each of the wooden skewers, leaving a gap between them. With the edible ink pen, draw different expressions on each of the marshmallows.
  2. Finally, dab a little of the jam onto the base of each marshmallow. Obviously, always supervise children when they’re eating from skewers.
What Halloween treats will you be tucking into this year?

Tuesday, 16 October 2012

Keema Karai – Minced Meat Curry

I stumbled across the Pakistani dish Keema Karai while I was researching comfort foods around the world. It’s a mixture of beef or lamb mince, spices and chopped tomatoes, topped with fried green chilli slices and fresh coriander. You can serve it with rice, or whatever flatbreads you can find – a good garlic and coriander naan works a treat here.

I tried a recipe online and then tweaked the amounts for this version. The version I tried didn’t seem to have the depth of flavour that I was looking for – so I added more cumin. It also didn’t contain any onions, so I added those too. Because of this, I’m not sure how authentic the recipe is but I can tell you it’s easy to cook, really tasty and flavourful and perfect for making a big batch of and letting everyone dig in themselves. I sometimes dish up a bowl of peas on the side just for the children to mix in with the curry themselves. And as for the final step of frying some chillies and sprinkling over the coriander – don’t be tempted to leave this bit out – this is where all the aromatics come in at the end. Unless you’re serving children, in which case the chillies might be a bit too spicy for them. Just tip the chillies in a bowl so everyone can scatter them over themselves.


Keema Karai
Serves 4-5
Ingredients
  • 1 medium-sized onion, peeled and chopped
  • 400g minced beef
  • 2 cloves garlic, finely chopped
  • 2cm piece of ginger, finely chopped
  • 2-3 tablespoons oil
  • 400g fresh tomatoes (not tinned, only fresh ones have the right flavour)
  • 2 tsp paprika
  • 1 tsp garam masala
  • 1 tsp ground cumin
  • good pinch of salt
  • generous handful coriander leaves
  • 2-3 green chillies, sliced

Method
  1. Fry the onion in the oil for about 5 minutes, until soft and slightly browned. Throw in the garlic and ginger and fry for a couple more minutes.
  2. Stir in the minced beef and cook until just browned. Stir in the garam masala, paprika and the salt and tip in the chopped tomatoes. Stir everything until mixed well, and leave to cook for about 15 minutes. Add a small splash of water if it looks like it’s drying out.
  3. Meanwhile, put your naan bread/flatbreads in the oven to heat up, and heat a small frying pan with a little oil. Fry the chilli slices for a few seconds, until they’ve just started to turn brown and lift them out with a slotted spoon. Scatter them over the top of the curry, along with the fresh coriander leaves and serve at the table with the warmed flatbreads.
Does this sound like your kind of curry? Which curries do you enjoy the most?
 

Monday, 15 October 2012

My Guilty Pleasure 5: Fishfinger Sandwiches


I grew up in the 1980s’, and it seems that, looking back, most of our dinners back then started life from a frosty box or packet pulled from the deep mists of the freezer. We had Rounders (mashed potato packed around a baked bean filling and then coated in breadcrumbs), Findus Crispy Pancakes (I swear they’ve got smaller since then) and of course fishfingers. And so the taste of crispy fishfingers takes me back to that time.

But nowadays I love to eat them in a sandwich, crispy on the outside, scorchingly hot in the middle, inbetween slices of white fluffy bread. Here’s how I do it:

Get the grill on, and slide under 4 fishfingers on a grill tray. Keep an eye on them while you get on with the sandwich, turning them over halfway through cooking. Take two slices of white bread – I love fluffy, farmhouse bread if I’ve got it, otherwise I’ll settle for generic, white ‘plastic’ bread. Spread one side of both slices thinly with mayonnaise. One one of the slices, spread over about 1 tsp tartare sauce over the mayonnaise.

Wash some crunchy lettuce, something like little gem, Romaine lettuce or Iceberg – dry, and lay over the slice with just the mayonnaise. Lay the cooked, crunchy fishfingers on top and then lightly press down the slice of bread with the tartare sauce on the top. Cut in half and eat.

What’s your guilty food pleasure? 

Friday, 12 October 2012

Nigellissima: A Review

Since I bought a copy of Nigellissima, Nigella Lawson’s new book, I’ve been cooking from it. Lots. It’s typical Nigella, really – lots of hearty but simple to make recipes, described in normal, non-pompous language. And as she says on TV, she’s looked to Italy for the inspiration for it.
 
However, the links between some of the foods and Italy are sometimes a bit tenuous. Although Nigella describes the inspiration for Eggs in Purgatory as coming from Dante’s Inferno, when I tweeted a picture of it I recieved a reply telling me that this is actually a well-known Mexican breakfast. In a way, I don’t care: the eggs were delicious and I hadn’t known about them before I saw Nigella cooking it. By the way, this is probably one of those recipes in the book you flick through to get to all the other meaty stuff, but don’t. It’s become one of my favourite late breakfasts or lunches.


Eggs in Purgatory (a.k.a the Mexican breakfast of egg in tomatoes, garlic and chilli)

There are also quick family-friendly meals (not just pasta) you can throw together – I’ve tossed chestnuts into my sprouts and bacon at Christmas but I’d never thought of combining chestnuts and pancetta to make a quick Marsala-soaked pasta dish. And the peas, pancetta and orzo was quick and simple to whip up, too – a bit like making a risotto. The children loved it. However they weren’t fooled by the Mock Mash (semolina and milk), pushing it to one side and asking for some real mashed potato. I liked it though and would make it again – a kind of English-style polenta.
 
 
Spaghetti with bacon and chestnuts
And there are slow-cook meals too – the Italian roast chicken, for example. As the chicken roasts, all the juices from the bird trickle down into the vegetables underneath: perfect for a lazy Sunday afternoon. Forget the roast potatoes, just break open a ciabatta to mop up all those delicious juices.
 
Nigella’s Italian Roast Chicken
Obviously, dessert-wise, with Nigella you know you won’t be disappointed. My children wolfed down a wedge of the olive oil chocolate cake as an after-school snack – and you’d never know it was made from olive oil. It’s light, quite dense and moist inside – perfect for serving warm with a scoop of ice cream.
 

Chocolate Olive Oil Cake

And the chocolate hazelnut cheesecake was a roaring sucess – it took me around 10 minutes to prepare it – the next 4 hours it was sitting in the fridge. The girls loved it, obviously – you’ll only need a small slice, about half of the size of this one pictured.  It’s pretty filling, you see… *blushes*.

Chocolate Hazelnut Cheesecake (a.k.a Nutella cheesecake)
As for the tone of the book, imagine pottering about in the kitchen and having Nigella standing next to you, telling you what to do next. That’s what you get. The book’s entertaining too, for all the Nigella-isms: “children’s little hands are much better suited for rolling dough”, don’t EVER use green peppers and frequent references to her Italian inspiration, Anna del Conte. There’s even a little tribute to Lady Gaga in the book too.

The only criticism I would really make is that in this book, the ‘notes to the reader’ part is split apart from everything else and wodged in at the end. It lists certain recipes and gives freezing and storage instructions. I much preferred the layout in Kitchen, where this was given at the end of each recipe. In fact, how long a dish is likely to keep for could be a factor in whether you decide to make it at all – so this information, at least for me, is best bundled together.

Since I bought the book I’ve cooked from it a lot – and you will too. It’s a really worthwhile book to have to hand. Nigella understands that you need a book for all types of eating – sometimes you’ll eat alone, other times two of you and sometimes you’ll have a table of 8-10 people to feed. This book covers all the bases, has some really delicious treats in and they’re all delivered in Nigella’s non-authoritative, down to earth way.

Nigellissima (2012) is published by Chatto and Windus.

Have you read the book, or cooked from it? What did you think? What have you made?


Thursday, 11 October 2012

Cadbury Trademarks the Colour Purple – and Why it’s Not as Daft as it Sounds

The news broke this week that Cadbury have successfully won an eight-year long case that gives them the right to trademark a colour, or, as the New Statesman put it “a certain wavelength of the magnetic spectrum”. It seems ridiculous, and perhaps over-aggressive commericialism, a bit like trademarking a facial expression or the aroma of fresh bread baking.
And, as I read articles that talked about it being ridiculous and the puzzled responses from Tweeters, I couldn’t help but place myself firmly on Cadbury’s side.
Here’s the text of the application, as quoted in the New Statesman article I mentioned earlier:

“The colour purple (Pantone 2685C), as shown in the form of application, applied to the whole visible surface or being the predominant colour applied to the whole visible surface, of the packaging of the goods [for] chocolate in bar and tablet form, chocolate confectionery, chocolate assortments, cocoa-based beverages, chocolate-based beverages, preparations for chocolate-based beverages, chocolate cakes.”

If you read it carefully, you’ll notice that the colour is only being trademarked in relation to the manufacture and sale of chocolate products. Cadbury aren’t going to sue you for wearing a Pantone 2685C-coloured jumper or if you open a fish and chip shop with the same colour on the signage. It’s just relating to chocolate in all forms, including drinking chocolate.
Wispa…. unmistakably Cadbury’s, thanks to Pantone 2685C
And, to be honest, anyone launching a chocolate bar with exactly the same purple-coloured packaging as Cadbury is obviously doing it to ride on the coat-tails of the chocolate giant. Here’s an example. The other day I bought one of those desk-trays, where you can slide in your papers so they’re not all over your desk. It came in a white box, with a blue company name, underlined with a wiggly dotted red line. I got it home and couldn’t believe the resemblance it bore to the Tesco ‘value’ packaging. This was no accident; even the company name was written in the same (or very similar font) to Tesco. And I thought to myself: if I was the owner of Tesco I wouldn’t feel happy about it. So I can understand Cadbury’s efforts to trademark and protect a colour that they’ve been associated with for almost 100 years.


What do you think? Do you think it’s greedy of them to trademark the colour of their packaging? Or do you sympathise and think that they’re just protecting their brand? Or can’t you see what all the fuss is about? Let me know in the comments below…

Wednesday, 10 October 2012

UK’s Top 10 Favourite Curries

Well, we’re half way through National Curry Week already (8th-14th October 2012) and just for some fun I thought I’d share with you the top ten curries enjoyed in Britain, according to the event’s organisers. Is your favourite in here?

Britain’s Top 10 Curries:

1. Chicken Tikka Masala
Obviously, this had to be the most loved curry; I mean, it overtook fish and chips to become our national dish, didn’t it? Legend has it that a diner at an Indian restaurant in Scotland asked for some sauce to go with his Chicken Tikka and was served the first ever Chicken Tikka Masala. It’s not an easy curry to make absolutely from scratch; there’s a lot of grinding various spices and pureeing tomatoes and the like – and lots of different stages. But it’s a silky, mild and aromatic curry. I love it.


Chicken Tikka Masala

2. Chicken Korma
Soft, pale, and often scattered with sliced almonds, Chicken Korma is a rich and creamy curry made from mild spices and coconut milk or cream (sometimes both). I ate it for years – it was my knee jerk reaction to student curry nights in Hull until I discovered the Balti….

3. Chicken Madras
Ooh, a spicy one. And chicken again. According to the Patak’s website, the Madras curry was named after the city of Madras, now named Chennai. It’s sauce is hot and spicy and made from tomatoes along with spices such as coriander and cumin. If you like your curries spicy, you’ll love it.

4. Lamb Rogan Josh
Lamb (as well as beef) I think, works so well in a curry because the natural fat and muscle fibres in the meat break down over long cooking so you get meltingly tender and flavoursome meat. And lamb is perfectly paired in this medium-spiced tomato-based curry from the Kashmiri region of India. It’s one of my favourite curries and I always, always make it with red meat.

5. Chicken Jalfrezi
A sweeter curry with a gentle heat, the jalfrezi is tomato-based but often has red peppers or other vegetables in it – although you don’t have to make it with chicken – it’s also quite popular made with prawns.
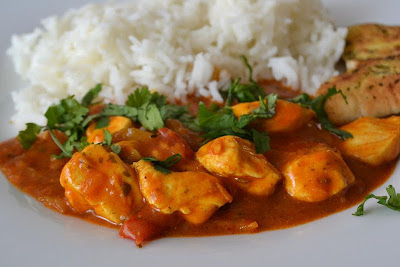
Chicken Jalfrezi

6. Chicken Balti
It was with a Chicken Balti that I had my first ‘eureka’ moment when it came to Indian food. I used to meet up with 10-12 friends and we’d all go off take over our local curry house in Hull. Scared stiff of anything with spice, for months I automatically ordered a creamy, mild Chicken Korma, until one day I decided to order a Balti. The aroma was amazing; the dish came sizzling to me at the table and it was served with only coriander and garlic naan – no rice. It has quite a hum to it, heat-wise, and a beautiful fresh aroma. I love it sprinkled with lots of freshly chopped coriander.

7. Chicken Rogan Josh
Rogan Josh again, but this time with chicken. It seems we can’t get enough of chicken in this country…

8. Chicken Dhansak
Chicken again, but this time it’s a Dhansak. A Dhansak has a sauce with medium-heat and it’s made with lentils, too. If you’re into jars of curry sauce you might find it difficult to track down this one, which will give you a good excuse to make it yourself. Anjum Anand has a good one here, and she uses tamarind paste for a slight bitterness.

9. Prawn Korma
A creamy, mild sauce with succulent prawns. If I had to choose a Korma I’d have to say I would go for the chicken, but the prawns’ sweetness really does work well with it.

Prawn Korma


10. Vegetable Balti
Ah, the Balti again – and this time with veg. In a vegetable Balti you normally get chunky pieces of red, green and yellow peppers, tomatoes and onion, although the veg used will vary between restaurants. Incidentally there’s still a debate over where the Balti first originated: some say Birmingham and others say Pakistan. Either way, when made properly, it’s one of my favourite curries.

Was your favourite curry here? What’s yours?

Tuesday, 9 October 2012

Talking British Cheese with Nigel White, Secretary of the British Cheese Board


“For proper dinner party etiquette, you should never cut off the ‘nose’ of a piece of cheese,” Nigel White, Secretary of the British Cheese Board told me as he carefully sliced a runny wedge of Somerset brie lengthways. (I’d just told him I usually lop the pointed end off, which is, as I now know, bad manners).

 I’m in Covent Garden, at a personal cheese tasting with Nigel, and it seems there is nothing he doesn’t know about cheese. “With 700 varieties of British cheese, there’s so much choice,” he adds, reaching for a tiny cylinder of sheep’s milk cheese. And, with all that variety it is sometimes a wonder why we Brits instinctively reach for the likes of French brie, Edam and Gorgonzola for the after-dinner cheese board.

Cornish Yarg, covered in nettle leaves… Nigel says the Romans were covering cheese in leaves too…

I let him into a discussion I’d had with my French friend, Sabine, the other day. She told me that since she moved to the UK, she has found the flavour of British cheese so bland that she only ever buys French goat’s cheese or extra mature cheddar. Nigel understands. It’s all about the depth of flavour – it seems that we prefer a goat’s cheese with a much mellower flavour to one with a goaty tang from the continent. But the thing to remember is that British cheesemakers have created versions of these continental cheeses (brie and camembert for example) and not carbon copies. There would be no point in creating exactly the same cheese you can buy on the continent, because we already have that one. So mellower versions have been created that work well with our British tastes.

This brings me on to one of the main points we discussed throughout the tasting. What is the main flavour that comes through when you eat a chunk of cheddar cheese? Even forgetting the differences between mild, medium and mature, what other flavours are going on? Would you describe your favourite cheddar as creamy? Sweet? Nutty? Crumbly? The truth is, there is no such thing as a flavour for just ‘cheddar’. Cheddar cheese (and all other cheeses) will have tiny differences in how they’re made, variations in the milking animal’s diet and the length of time the cheese has taken to mature. Compare a sweet, creamy Davidstow with a complex and tangy Keen’s West Country Farmhouse Cheddar. And it’s the same for Lancashire cheese.

Gorgeous, full-flavoured Red Leicester: Aged Leicestershire Red


When Nigel passed me a chunk of Lancashire I thought I knew what I was expecting: crumbly, pale, creamy cheese. But it’s not what I got. This was a Lancashire I’d never tried before. It was tangy, buttery and smooth. Similarly, I’d been used to orange, rubbery blocks of Red Leicester from my local supermarket. I tried the Aged Leicestershire Red: it was firm, sweet and nutty. It was the surprise of the day – if I’d known I could have bought Red Leicester like that, I wouldn’t have relied on those sweaty supermarket blocks of cheese for so long.

We talked about supermarkets and how smaller-scale artisan cheeses can’t always be found on the supermarket shelf, giving way to those rubbery, generic blocks that always taste the same all year round. “Everyone always slates supermarkets, but they have improved,” Nigel said. You’ll have more luck finding a Cornish Yarg or a Tunworth on the deli counter than on the pre-wrapped shelf, but they do now stock lots of different cheeses. “What I would say,” Nigel added, “is wherever you go in Britain, try the local cheese while you’re there.” It makes sense. Pop to Bath with the family and pick up some Wyfe of Bath cheese for tea, go to Sussex and pick up a creamy round of Sussex Slipcote. There’s much more to British cheese than just the main types and, as I found, much more variety within each of those varieties. I left the tasting with more knowledge of cheese as a whole, and an appreciation for the British cheesemakers that are working so hard to provide all those regional cheeses, often, as Nigel said, alongside other day jobs. Britain has so much more to offer in the way of cheese, and I for one won’t be automatically plonking a Roquefort on the table when I get the cheeseboard out.

Visit the website for more information about the British Cheese Board and take a look at the cheese flavour map, which will help you to identify which cheeses you’re more likely to enjoy.


Monday, 8 October 2012

Buttered Brown Shrimps

I’m really pleased that Sainsbury’s, at least in my local shop, have started selling jellied eels and brown shrimps. While I’m still not that keen on the jellied eels (sorry, Londoners) I’ve always wondered why so many people opt instinctively for prawns that are shipped across from the other side of the world instead of these delicious little shrimps, native to our shores.


If you’ve never tried them, they’re tiny little brownish-pink curled up shrimps that are usually bought cooked – either potted, or sold cooked and peeled. I read Xanthe Clay’s article (on the Telegraph’s website) about the possible decline of the brown shrimp industry in Morecambe Bay and her recommendations for serving them, just warmed in a little butter.
 
In a way, I can understand people’s preference for the plump, blushing pink prawns from Asia. They’re meatier, larger and look more attractive in a stir-fry or curry. But the big advantage these little tiny brown shrimps have is that they’re packed full of sweet flavour – and taste just like the sea. I heated up a batch with some butter and served them on toast, partly as an experiment to see if the children would eat them. And they did – we soon found ourselves fighting for the last few spoonfuls.
 
If you can get hold of them, do give them a go – to me, it seems madness that we’re buying in prawns shipped in from across the other side of the world and neglecting these little beauties crawling around our shores.
 
How to cook them: Warm a generous knob of butter in a non-stick frying pan and, when it’s melted, tumble in the cooked shrimps. Crack in a little black pepper and heat gently, stirring them over in the melted butter until warmed through – about 2 minutes. Eat straight away, with toast.
 
 
Have you tried brown shrimps? What do you think of them?
 

Friday, 5 October 2012

His and Hers Chocolate Bars…. Is It Really Necessary?

I was browsing through the morning’s news when I came across this article in the Guardian. It was basically along the lines of the different chocolate products aimed at women and men and how they’re marketed differently. There were those sexy ’80s adverts for Flake, the chocolate crumbling between glossy, pouting lips against a slinky saxophone backdrop (if you ask me, that advert was just as much aimed at men as at women) and the ‘Not For Girls’ campaign for Yorkie bars, featuring men in vans and lumberjack shirts. And now, apparently, Cadbury’s have just launched Crispello – a cheeky chocolate-filled wafer number aimed at (go on, have a guess) women.
 
Dairy Milk Bliss… unmistakably aimed at women – but does marketing gender-specific chocolates really work?
  

So what’s the deal with all this gender-specific advertising, and does it really work?
 
Personally, I’m just as likely to eat a Mars Bar as I am some flimsy chocolate wafer with 100 calories. If I like it, I’ll eat it. I’m not seduced by marketing campaigns or pearlesque, pastel-coloured packaging. I wouldn’t eat a chocolate bar just because it had less calories than another one – for me, chocolate is a treat and not for every day anyway. So when I eat one, I want to really enjoy it.
 
We seem to have ‘his ‘n hers’ products everywhere: deoderants (even if they smell the same), cereals, crackers, biscuits. Do we really need it with chocolate, too? Now let’s get the kettle on. Mine’s the Yorkie. 
 
Do you find yourself going for chocolates with gender-specific marketing? Do you really think that Yorkie bars shouldn’t be eaten by girls? And does it all really matter? Let me know what you think in the comments below…


Wednesday, 3 October 2012

Plum and Vanilla Crumble

Just like I look forward to summer for the first taste of British asparagus, I look forward to autumn for plums. They’re everywhere in the shops right now, and if I’m ever stuck with what to do with them I always make a crumble. Pick really ripe plums for the best results and the most flavour, and any leftovers will be fine kept covered in the fridge for a couple of days.


Plum and Vanilla Crumble
Serves 6-8
Ingredients:
  • 8-9 ripe plums
  • 2 tbsp soft light brown sugar
  • small knob of butter
  • splash of water
  • 1 vanilla pod and its seeds
  • 170g butter, cut into cubes
  • 220g plain flour
  • 50g demerara sugar + an extra 2 tbsp for sprinkling
Method:
  1. Wash the plums and run a sharp knife around each one, starting from the stalk end. Put the knife down and twist the two halves in opposite directions so they come apart. pull out the stone and drop the empty plum halves into a non stick pan with the soft light brown sugar, the butter, water and the vanilla pod and its seeds. Heat gently and leave to simmer for 10 minutes.
  2. Preheat your oven to 200°C. In a mixing bowl, rub together the butter and flour until it looks like fluffy breadcrumbs. Stir in the demerara sugar. Arrange the plums and their ruby red juices in the base of a 30cm wide pie dish. Tip the crumble mixture over the top and spread around so it more or less covers the plums. Don’t worry if there are a few small gaps – the juice will just bubble up through the crumble, which is a good thing.
  3. Sprinkle 1-2 tbsp demerara sugar over the top to give a crunchy topping and then bake for 25-30 minutes, or until the crumble is crisp on the top and the plum juices are bubbling up through it. Serve hot, with some fresh custard.
Do you make fruit crumbles? Which are your favourite fruits to use?


Tuesday, 2 October 2012

The French Elvis: Peanut Butter and Banana Fried Brioche

I had the idea for this when I sliced a hunk from a loaf of brioche and glanced over at the jar of peanut butter that was left on the kitchen worktop. But peanut butter goes so well with bananas, I thought. And wasn’t Elvis Presley partial to the combination in a fried sandwich?
 
And so it was born. You basically make an eggy bread sandwich (French Toast) with the peanut butter, banana and brioche and fry until crisp. The sweet, eggy brioche turns crisp in the pan, the bananas soften and the peanut butter just melts. But don’t stop there, it’s gorgeous drizzled with maple syrup, too.
 
Maybe not one you’d want to be eating every day, but when you wake up groggy on a rainy, sleepy Sunday morning, with a milky coffee alongside? It’s just the job.


Peanut Butter and Banana Fried Brioche Sandwich
Serves 2 people
Ingredients:
  • 1 egg, beaten
  • splash of milk
  • 4 slices of brioche, from a loaf
  • 2-3 tablespoons smooth peanut butter
  • 1 small banana, peeled and sliced
  • 1 tablespoon butter
  • maple syrup, for drizzling over
 
Method
     
  1. Beat the egg and the milk together in a shallow, wide bowl and set to one side.
  2.  
  3. Spread each slice of brioche with a little of the peanut butter and lay the banana slices over two of the slices. Sandwich the rest to create two brioche peanut butter and banana sandwiches.
  4.  
  5. In a non-stick frying pan, melt the butter, until it starts to foam. Dip the sandwiches (both sides) in the egg and drop into the frying pan. Fry for about 2 minutes each side, or until crisp.
  6.  
  7. Serve straight away, drizzled with maple syrup.


LinkWithin

Related Posts Plugin for WordPress, Blogger...